|
|
Other Functions
JPEG,TIFF development Mode [SILKYPIX RAW Bridge] / Taste/Parameter / Exposure bias / White balance / WB Fine-tuning / Tone adjustment / Color Adjustment / Fine color control / Highlight Controller / Sharpness / Noise Reduction Adjustment / Development / Print / Lens Aberration Controller / Rotation,Digital Shift / Setting for Trimming / Display warning
JPEG,TIFF development Mode [SILKYPIX RAW Bridge] / Taste/Parameter / Exposure bias / White balance / WB Fine-tuning / Tone adjustment / Color Adjustment / Fine color control / Highlight Controller / Sharpness / Noise Reduction Adjustment / Development / Print / Lens Aberration Controller / Rotation,Digital Shift / Setting for Trimming / Display warning
 EXP.bias is a function to adjust the brightness of the photograph.
|
This example was photographed under low light.
|
Thise photograph was captured under low light. SILKYPIX can adjust the under exposeure photograph.
|
This is the example where it is overexposed.
|
Note the default picture. The top of the mountain is overexposed. The photograph after adjustment regains the gradation of the part which was clipped. This was done by reducing the amount of exposure. SILKYPIX fully utilizes the highlight information of RAW data.
 Dodging is a function to give a different part each exposure of one piece of photograph.
|
|
a bird is gloomy, and the lower photograph comes out. However, a background is too bright if this photograph becomes bright more than this. Dodging can light a gloomy part. Therefore the bird is expressed brightly.
|
This is the example where it is overexposed.
|
the difference of the light and shade is a thing of the big case. As for this photograph, an exposure fits a gloomy part. Therefore a background is too bright and is white, and it is expressed. Dodging can restore gradation and the color of the part which it is too light. Because SILKYPIX is because I use the information of RAW data to the maximum.
|
This is the example where it is overexposed.
|
There should be the sea and the horizon in the background. However, it does not seem that it is too bright. On the other hand, the hair of the person is too gloomy. This is in state that contrast is too high. The dodging compresses a highlight and lights a shadow. Therefore the dodging can balance a shadow with a highlight in such a scene.
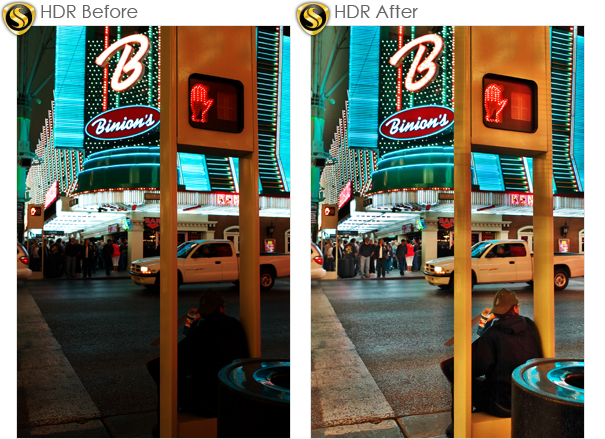
 What is HDR (high dynamic range)?
HDR is a function to achieve a wide dynamic range. Can be expressed in rich tones of difference in subject brightness. You can not get a picture representation of saturation or underexposure. And it is closer to the human eye.
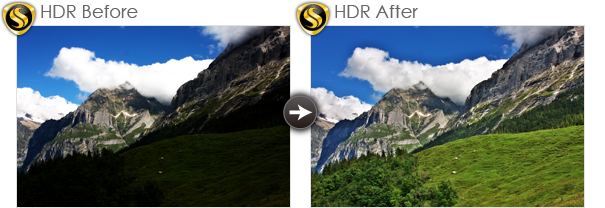
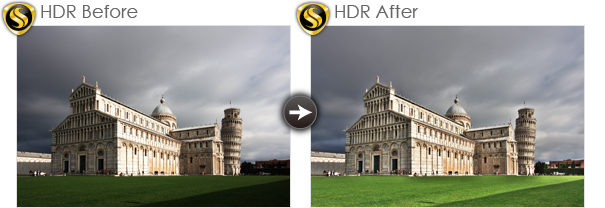
If the exposure is set to either the mountains or grass, cloud is saturated.
SILKYPIX HDR can be finished to a wide dynamic range photo.
In addition, RAW data in one file only.
SILKYPIX HDR can be finished to a wide dynamic range photo.
In addition, RAW data in one file only.
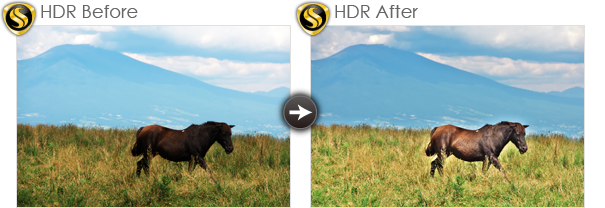
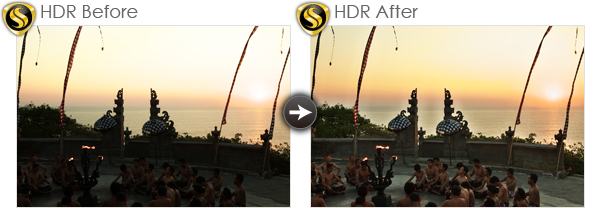
General HDR is performed by synthesizing multiple photos.
But if the case is moving subject is difficult.
It is possible to apply in this case.
HDR in this way can be used in a variety of subjects.
But if the case is moving subject is difficult.
It is possible to apply in this case.
HDR in this way can be used in a variety of subjects.
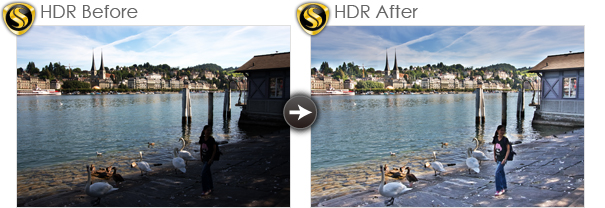
HDR is effective even at night.
Without saturating illumination, the brighter the darker areas.
Without saturating illumination, the brighter the darker areas.
Change the contrast to use in conjunction with the tone control.
The image is high contrast and high dynamic range.
The image is high contrast and high dynamic range.
If you have a piece of RAW data taken in the past, you can run HDR.
Need help those in the stock do you have?
Need help those in the stock do you have?
Other than work, please use effectively and photos in private.
 Even if the subject is affected by the color of the source of light, SILKYPIX offers the best color.
|
This example shows the affect of the light source.
|
Have you ever had an experience where whites aren't appearing to be white? The bride in this photo will be expecting you to capture her wedding dress white. You can now obtain the white balance you really want when you photograph in RAW.
- Influences by light sources such as an electric bulb or the fluorescent lamp.
- Photography in the shade.
- In still life photography, clients demand the most accurate colors from you.
- When you want to create an impressive artistic photograph.
|
The genuine color of a sunset
|
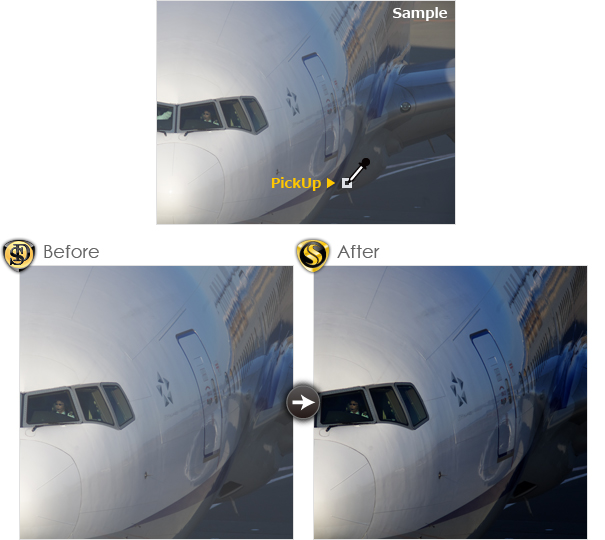
In some cases, your camera will negatively affect the desired white balance of a photograph. With SILKYPIX, you can apply the appropriate white balance filters so your image looks the way it should.
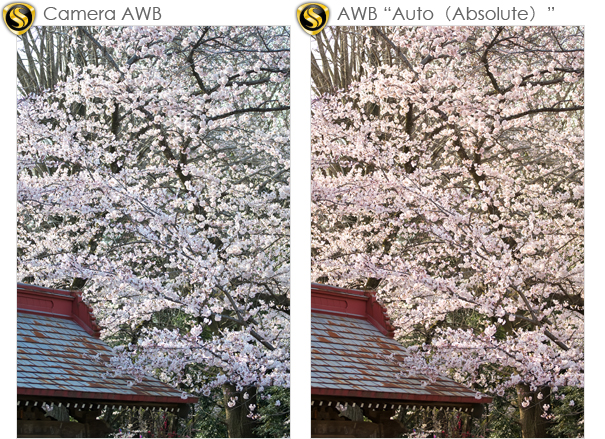
Cherry blossoms are a pale pink.
The camera's auto white balance can cause white showed deviation to determine the color of the cherry.
SILKYPIX AWB (absolute) can detect the color of the light source, without relying on the color of the subject.
This has been achieved accurate AWB.
The camera's auto white balance can cause white showed deviation to determine the color of the cherry.
SILKYPIX AWB (absolute) can detect the color of the light source, without relying on the color of the subject.
This has been achieved accurate AWB.
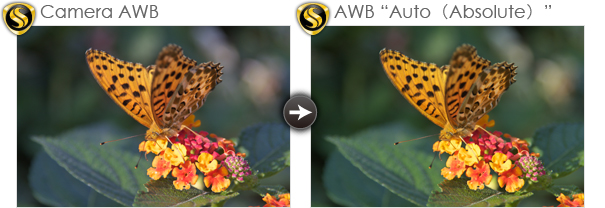
Many digital cameras has determined that it would cast many green to green in this case the photo.
SILKYPIX AWB can be detected even if the white balance exactly like this.
SILKYPIX AWB can be detected even if the white balance exactly like this.
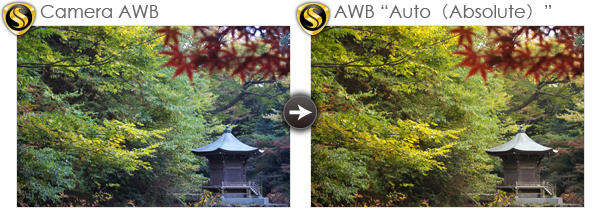
The pictures on cloudy days became bluish, and turbid colored cases.
Turbidity of color are eliminated by setting the correct white balance.
Turbidity of color are eliminated by setting the correct white balance.

Generally, if there is no gray part in the photo, an accurate auto white balance is difficult.SILKYPIX AWB sets the white balance correctly even though there is no gray part.
*Auto White Balance (absolute)
- AWB to correct the color of the light source as possible.
- AWB light source color of the type of respect.
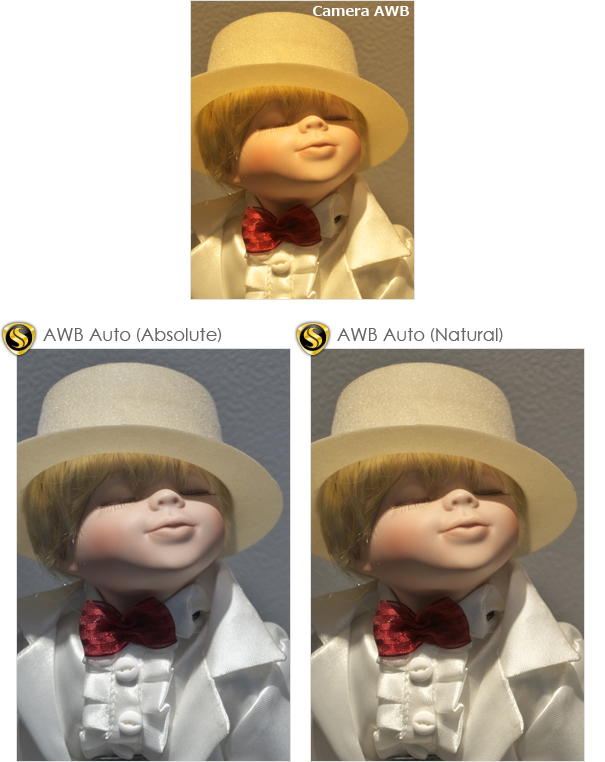
The photo above is taken under the light bulb.
Color of the bulb is "Auto (absolute)" has been fully correction.
On the other hand, "Auto (nature)" is perceived in color.
Color of the bulb is "Auto (absolute)" has been fully correction.
On the other hand, "Auto (nature)" is perceived in color.
If there are two or more different light colors in your photos, and processes them to determine automatically.
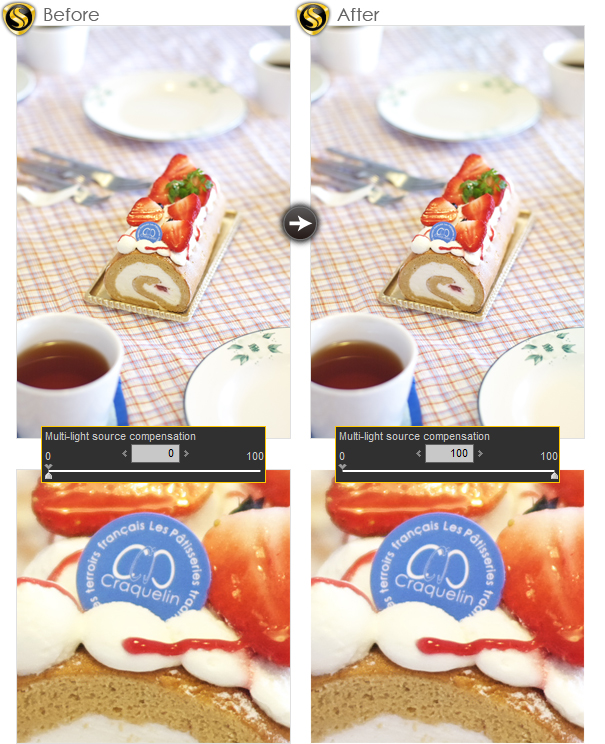
This photo was taken under fluorescent light bulb.
However, under the influence of ambient light from the background.
This is a state in which there is a different color temperatures in the photo.
This feature allows correction for each color temperature.
However, under the influence of ambient light from the background.
This is a state in which there is a different color temperatures in the photo.
This feature allows correction for each color temperature.
 Tone is a function that regulates the gradation of light and shade in the photograph.
|
This example is lit by a soft light.
|
High contrast can emphasize the difference between light and shade. The metal feel of a material is accentuated through easy adjustment.
|
Low contrast tends to happen due to poor atmospheric conditions (haze) and soft light . This produces a reduced third dimensional perpsective of an image.
|
The photograph regains a three-dimensional impression by increasing the contrast that deteriorated by the poor atmospheric conditions.
|
Contrast is too strong, and the texture of the material is lost.
|
A low contrast setting is useful to regain the texture of the material of a soft subject such as cloth.
The default setting is completely black part of the specified RGB values ??(R0, G0, B0) has to set.
*How to use
There are two kinds of black.
For example, a car tire. This is a black color.It has the tone.
Another black in space.It does not have the tone.This is completely black.
Please specify the completely black in black level tools.
*How to use
There are two kinds of black.
For example, a car tire. This is a black color.It has the tone.
Another black in space.It does not have the tone.This is completely black.
Please specify the completely black in black level tools.
It is too pale color photographs. This is due to the dark too bright.
Choose black with black-level tools.
The adjusted later became a good tone.
Choose black with black-level tools.
The adjusted later became a good tone.
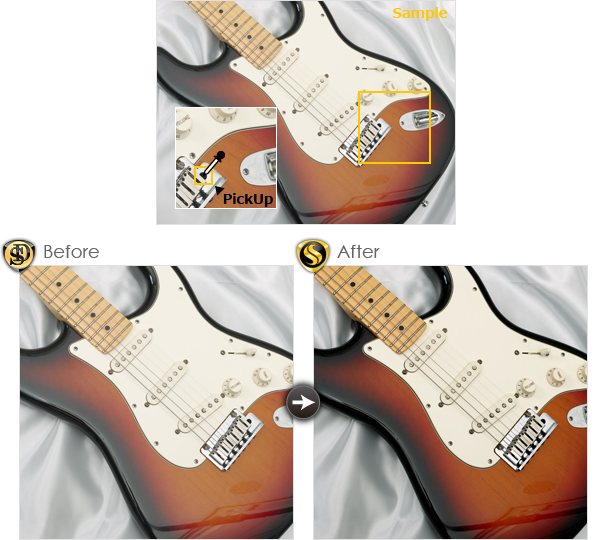
Example of using the flash.
Dark areas are taken in too bright.The weak tones for it.
So, choose a hole in the guitar.The dark tone was set.
Dark areas are taken in too bright.The weak tones for it.
So, choose a hole in the guitar.The dark tone was set.
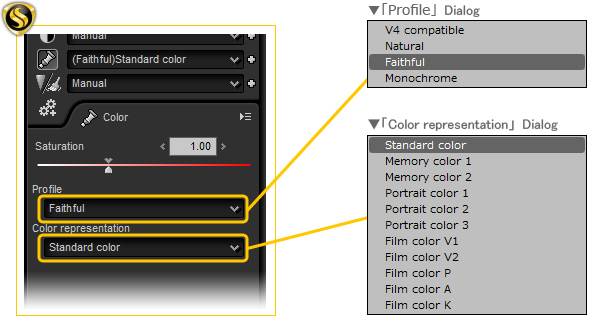
 *About Profiles
- A profile is a characteristic color.
The color mode "profile" has been added.
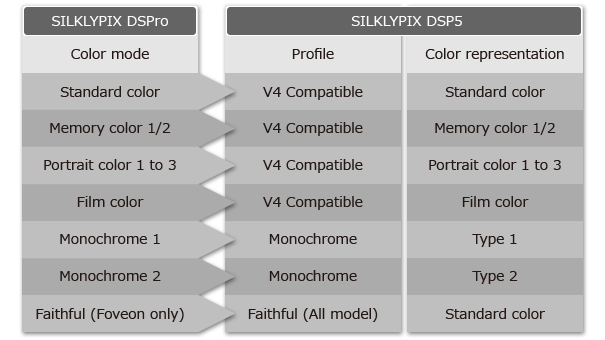
*V4 compatible
- At the border of different colors may be a side effect blurred contours.
- This mode is the default setting SILKYPIX DSP5.
- This mode has good tones. The faithful color reproduction.
- Converted to monochrome.
In this mode, the saturation is kept even when the contrast is changed.
Therefore, the following features.
Therefore, the following features.
- Even if it is set higher contrast, vivid colors too.
- Even if it is set lower contrast, color is too pale.
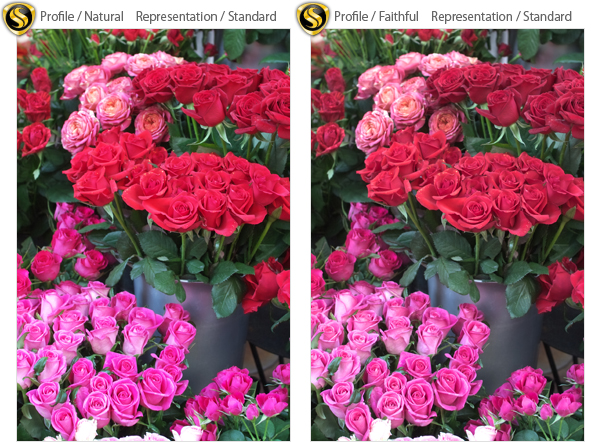
The default setting is a difference in the color of the vivid.
- Nature is vivid color.
- Faithful is is smooth tone.
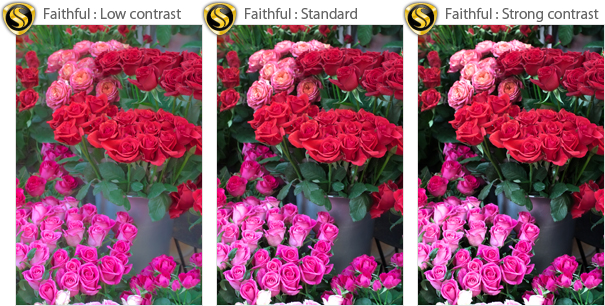
If used Faithful, even if the tone changes are made to maintain the color coordinates.
Therefore, the color saturation does not occur even if the contrast is set higher.
Therefore, the color saturation does not occur even if the contrast is set higher.
 Sharpness corrects the definition lost by a low pass filter.