SILKYPIX Developer Studio SE Version
"SILKYPIX Developer Studio SE Version" is a RAW development software that allows you to create "High-quality, High-resolution, Low-noise Images" from RAW data using Panasonic digital cameras. Our unique technology contains the following:
- Accurate Colorful Representation
- Easy-to-Use Interface
- High Performance
In addition, this software has various professional features, making it easier to have accurate color reproduction and to correct lens aberration.
These features can be used during RAW development, allowing you to create high-quality pictures.
The following cameras are currently compatible with "SILKYPIX Developer Studio SE Version."
- Panasonic
The camera which you purchased.
If you would like to use this software with other cameras, please confirm the camera type and purchase the appropriate "SILKYPIX Developer Studio (Japanese/English)" from the SILKYPIX Website. ("SILKYPIX Developer Studio (Japanese/English)" can only be purchased by downloading it from the SILKYPIX Website.)
[Installation Notes]
- Installation for WindowsXP/2000 requires System Administrator authority.
SILKYPIX Developer Studio SE Version Basic Operations
This section explains basic operations for SILKYPIX Developer Studio SE Version development.
For more details about the operation method, please refer to the Software Manual.
1. Opening the RAW File
1. When Opening One RAW File
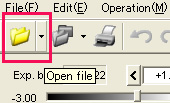 Press the "Read File" button from the menu bar. Press the "Read File" button from the menu bar.

Select the RAW file that you want to open from the "Open File" dialog box and then press the "Open" button.
When Opening All RAW Files in a Folder
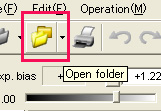 Press the "Specify Folder" button from the menu bar. Press the "Specify Folder" button from the menu bar.
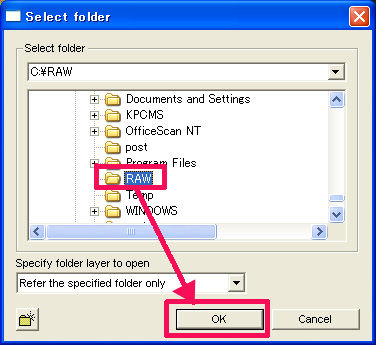
Select the folder that contains the RAW data you want from the "Selection Process Object Folder" dialog box and then press "OK."
2. Screen Description
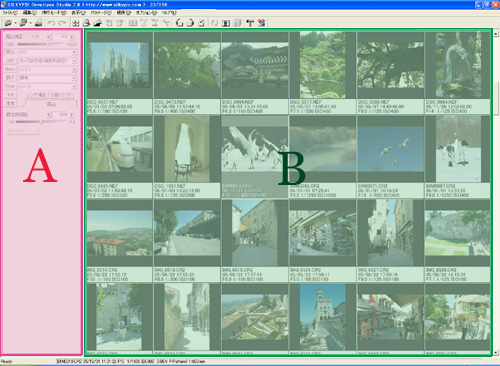
A. Control Box
You can set the parameters for editing RAW data in this portion.
(Exposure, WB, Sharpness, Tone, Color, Development)
B. Thumbnail/Preview Display Screen
This portion shows thumbnails or previews of the RAW data that you open.
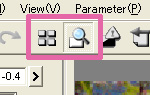
After selecting the image that you want to edit from the thumbnails, you can press the "Preview Display" button from the menu bar to preview the image.
Also, when the preview is displayed, you can press the "Thumbnail Display" button to return to the thumbnail display screen.
Preview Screen 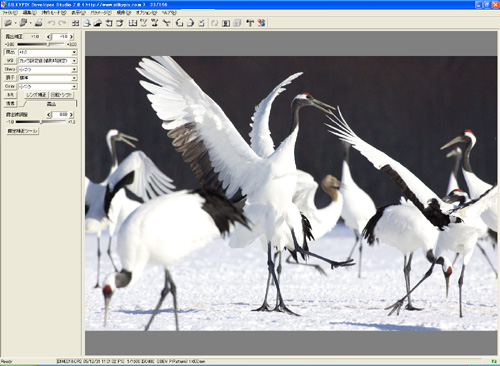
3. Editing the RAW Data
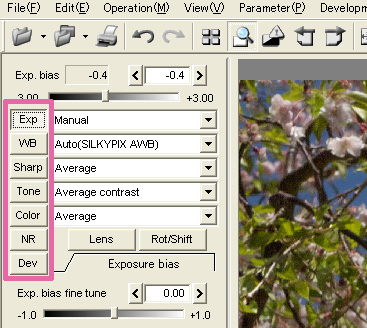
You can use the buttons in the control box to change each parameter.
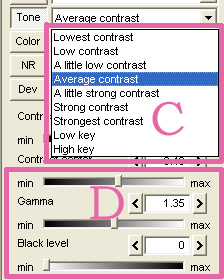
You can select a parameter using the settings in section C, or using the sliders in section D to adjust detailed settings.
For more details about parameter operations, please refer to the Software Manual.
4. Developing the Edited RAW Data
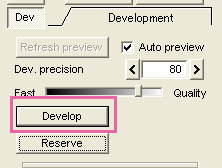
After you finish editing, press the "Develop" button from the Development tab.
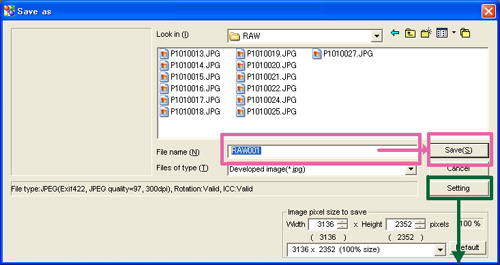
Select the folder where you want to save the image from the "Rename and Save" dialog, name to file, and then press the "Save" button to execute development.
If you do not want to save the file (TIFF) as a Jpeg, you can specify the following setting from the Save Settings button.
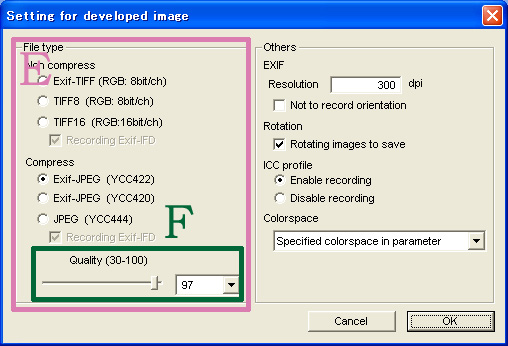
You can select the file type for saving from section E. You can specify Jpeg or TIFF from here.
Also, if you select Jpeg, you can set the Jpeg compression ratio using the Quality Factor in section F.
Top of Page
|

