| SILKYPIX® Developer Studio 3.0 | SOFTWARE MANUAL |
| 2. Loading RAW Data File | ||||||||
There are two ways of loading a RAW data file into SILKYPIX® before processing RAW image.
2.1 Opening File
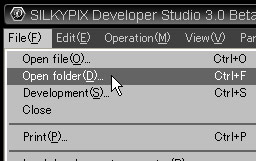
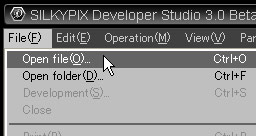 "Open File" function allows you to select and load the RAW data files for processing.
The menu command [File(F)]-[Open file] or clicking the
 button on the toolbar to open RAW data files.
Then the "Open file" dialog is displayed. Click [Open(O] button after selecting a file/files to load on the dialog.
You can select multiple files with [SHIFT] key or [CTRL] key during selecting files.
* You can use "drag & drop" method for loading RAW data files. You can drop the files or a folder directly, which is dragged from, for example, Windows explorer or Finder.
2.1.1 To Add File
You can add RAW data files when some RAW data files have been already loaded for processing.
At first, you should select RAW data files for adding on the "Open file" dialog, and please click [CTRL] key before clicking [Open(O)] button.
Then [Open(O)] button is changed to [Append(O)] button. Click this [[Append(O)] button to add RAW data files.
If you click [Open(O)] button without clicking [CTRL] key, the RAW data files is closed automatically which have been already loaded for processing.
And the RAW data files selected in this time is loaded instead of them.
* You can use "drag & drop" method for adding RAW data files. Please begin the drag with right-clicking of the mouse. When you release the right-clicking of the mouse to drop files, the menu is displayed.
You can select how to load the dragged files in this menu, "open files as new" or "append files".
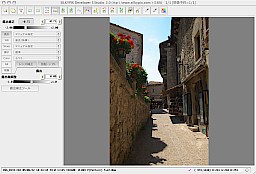
 When the RAW data is normally read, the Preview display shows the developed results.
At first, you should select RAW data files for adding on the "Open file" dialog, and please click [CTRL] key before clicking [Open(O)] button.
Then [Open(O)] button is changed to [Append(O)] button. Click this [[Append(O)] button to add RAW data files.
If you click [Open(O)] button without clicking [CTRL] key, the RAW data files is closed automatically which have been already loaded for processing.
And the RAW data files selected in this time is loaded instead of them.
* You can use "drag & drop" method for adding RAW data files. Please begin the drag with right-clicking of the mouse. When you release the right-clicking of the mouse to drop files, the menu is displayed.
You can select how to load the dragged files in this menu, "open files as new" or "append files".
 "Open file" dialog of Windows | 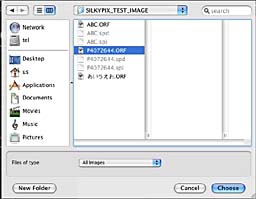 "Open file" dialog of Macintosh |
When the RAW data is normally read, the Preview display shows the developed results. 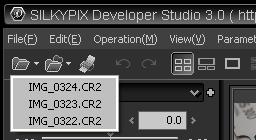
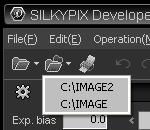
[File Access History]
SILKYPIX® records the access history of the file once opened. You can call the history list by clicking  button located right side of , and you can select the file previously opened.
[When the RAW data cannot be opened normally] button located right side of , and you can select the file previously opened.There is a possibility that the RAW data file is broken or the RAW data is not compatible with this software.
Please refer to the supported camera list to check whether SILKYPIX supports this RAW data.
When the incompatible/unsupported RAW data is loaded, the warning message "Incompatible camera was detected." is displayed only once.
It is your responsibility to use SILKYPIX® for such incompatible/unsupported RAW data.
2.2 Opening Folder
"Open Folder" function allows you to select and load the RAW data files from the specified folder.
The menu command [File(F)]-[Open folder] or clicking the
 button on the toolbar to open a folder.
2.2.1 Load from Sub-folder
There is an option to load RAW data from sub folders according to the method of "Specify folder layer to open" on the "Select folder" dialog.
You can load the RAW data from the sub folder of the selected folder with this option.
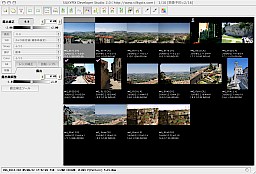
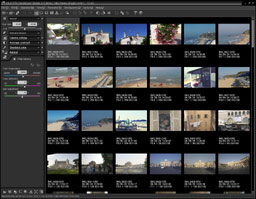
When a folder is normally opened, the list of the image is displayed in the thumbnail mode.
You can load the RAW data from the sub folder of the selected folder with this option.
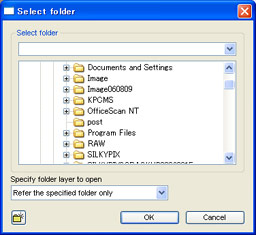 "Select folder" dialog of Windows | 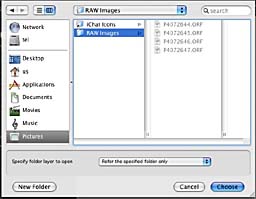 "Select folder" dialog of Macintosh |
When a folder is normally opened, the list of the image is displayed in the thumbnail mode.
[Folder Access History]
SILKYPIX® records the access history of the folder once opened. You can call the history list by clicking button located right side of , and you can select the folder previously opened.
SILKYPIX® can open RAW files, JPEG files and TIFF files as the default setting. button located right side of , and you can select the folder previously opened.However, you can select to open only RAW data files. For more details, please refer to '9.3.1.6 Operate RAW Data File Only'.
* You can set JPEG/TIFF images for processing with "SILKYPIX RAW Bridge", or set JPEG/TIFF images for only browsing.
2.3 How to Handle JPEG/TIFF Image
SILKYPIX® has the feature of developing JPEG/TIFF image like the RAW data, which is called "SILKYPIX® RAW Bridge".
It is strange to use a word, the development, for JPEG/TIFF image, however, it is extremely convenient to process JPEG/TIFF image as the same as treating a RAW development by using the same parameters.
There is a difference between SILKYPIX® and a photo retouching software, SILKYPIX® does inverse transformation from JPEG/TIFF image to virtual RAW data and treats them same as RAW data internally.
Therefore, SILKYPIX® does the color processing which is more correct than photo retouching software can be done.
You can treat JPEG/TIFF image almost same as RAW data with SILKYPIX®.
"JPEG/TIFF Processing Mode" is enabled in the default setting, please refer to '4.8.5 JPEG/TIFF Processing Mode' for the details.
SILKYPIX® processes tone interpolation and wide reproduction color mapping for JPEG/TIFF images, but JPEG/TIFF images have too little information compared to genuine RAW. The substantial adjustment for JPEG/TIFF images causes the failure of the image.
2.3.1 Color Temperatures for JPEG/TIFF Processing
For the "RAW data", you can use the absolute "color temperature" to adjust white balance.
For example to the scene to have taken the photograph under the 3000K bulb, you can get the approximately right white balance if you set "color temperature" on 3000K.
For the "JPEG/TIFF" image, you can only use "color temperature" relatively because "white balance" has been already once processed in the camera or by software.
The default value is "color temperature = 6500K and color deflection = 3", which is the white point defined by sRGB and Adobe RGB colorspace.
You have to relatively adjust "white balance" from this white point for the "JPEG/TIFF" image.
2.3.2 Sharpness/Noise Reduction for JPEG/TIFF ProcessingFor example to the scene to have taken the photograph under the 3000K bulb, you can get the approximately right white balance if you set "color temperature" on 3000K.
For the "JPEG/TIFF" image, you can only use "color temperature" relatively because "white balance" has been already once processed in the camera or by software.
The default value is "color temperature = 6500K and color deflection = 3", which is the white point defined by sRGB and Adobe RGB colorspace.
You have to relatively adjust "white balance" from this white point for the "JPEG/TIFF" image.
For the "JPEG/TIFF" image, the default setting of the "sharpness" sub-control and the "noise reduction" sub-control has no effect.
You have to relatively adjust "sharpness" or "noise reduction" from the original "JPEG/TIFF" image, because it has been already once processed in the camera or by software.
2.3.3 Feature that cannot be Used for JPEG/TIFFYou have to relatively adjust "sharpness" or "noise reduction" from the original "JPEG/TIFF" image, because it has been already once processed in the camera or by software.
For the "JPEG/TIFF" image, you cannot use "demosaic sharp", "resolution plus", and "noise reduction" parameter.
Please use "noise cancel" or "false color ctrl" to remove/reduce the noise.
Please use "noise cancel" or "false color ctrl" to remove/reduce the noise.