| SILKYPIX® Developer Studio 4.0 | SOFTWARE MANUAL |
| 9. Option and Setting | ||||||||
9.1. Setting for Developed Image
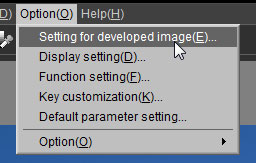 The menu command [Option(O)]-[Setting for developed image(E)] displays the "Setting for developed image" dialog.
9.1.1. Setting of File Type
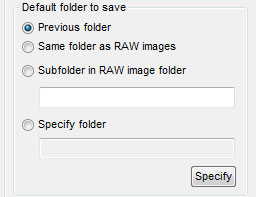 You can specify the default folder to save the developed JPEG/TIFF files. This is a default setting for the "Save as" dialog and you can modify to any folder for saving every time.
In this software, you can save a TIFF file as uncompressed format and a JPEG file as compressed format.
Settings for recording and saving in JPEG / TIFF formats will be explained here.
JPEG is a format for compressing and saving images through irreversible compression. It is a format adopted for general use as a recording format for photographs taken with digital cameras.
TIFF is a format for saving images without deterioration through no compression or reversible compression. Use this if you will further process images on other software.
Make settings here for recording and saving in JPEG / TIFF. Determining which format, JPEG or TIFF, you will record and save is set at the time of development processing.
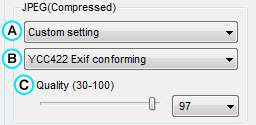 (1) JPEG Format
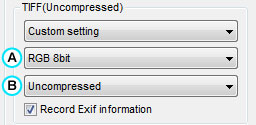 (2) TIFF Format
9.1.2. Default Folder to Save Settings for recording and saving in JPEG / TIFF formats will be explained here.
JPEG is a format for compressing and saving images through irreversible compression. It is a format adopted for general use as a recording format for photographs taken with digital cameras.
TIFF is a format for saving images without deterioration through no compression or reversible compression. Use this if you will further process images on other software.
Make settings here for recording and saving in JPEG / TIFF. Determining which format, JPEG or TIFF, you will record and save is set at the time of development processing.
(1) JPEG FormatMake settings when saving as a JPEG image file.
The higher the quality, the less deterioration to the image, but the size of the data to be recorded will be larger.
[Culled color information]
The higher the quality, the less deterioration to the image, but the size of the data to be recorded will be larger.
| (A) | Quality | Typical settings are included. Select an image quality for recording that is based on your aims. "High quality" is equivalent to JPEG image quality recorded on digital cameras. "Type" and "Quality coefficient" can be set at will only when "Custom settings" is selected. |
| (B) | Type | Culled color information and EXIF information existence are the two main types when compressing images. |
| (C) | Quality | This is a coefficient for compressing images by a method called quantization. When 100 is indicated, there is no image degradation through quantization. |
[Culled color information]
JPEG images are saved after converting RGB color information into YCC color information. RGB is the three primary colors of light, while YCC represents brightness and two color differences.
If the two color differences are lost and only Y (= brightness) remains, you will have a monochrome image.
With JPEG, brightness is treated as more important information than color difference. When the image is compressed, the culled colors that are the color information lower the quantity of data.
"YCC444" is a recording format that does not cull color differences. Select "YCC444" if you want to minimize degradation of the image quality.
"YCC422" is a recording format that culls half of the color differences in contrast to brightness. "YCC420" is a recording format that saves only 1/4, culling 3/4 of the color differences.
When color information is culled, the expression of border colors becomes rough.
[Differences between "Exif standard" and "With Exif information"]If the two color differences are lost and only Y (= brightness) remains, you will have a monochrome image.
With JPEG, brightness is treated as more important information than color difference. When the image is compressed, the culled colors that are the color information lower the quantity of data.
"YCC444" is a recording format that does not cull color differences. Select "YCC444" if you want to minimize degradation of the image quality.
"YCC422" is a recording format that culls half of the color differences in contrast to brightness. "YCC420" is a recording format that saves only 1/4, culling 3/4 of the color differences.
When color information is culled, the expression of border colors becomes rough.
Exif is an image file format standard for digital cameras.
"Exif information" refers to information defined by Exif. It contains information such as the date and time the photograph was taken and camera settings when shot.
If the "Exif standard" type is selected, it follows the rules set out by Exif standards and buries "Exif information" in the JPEG image.
If the "With Exif information" type is selected, it buries "Exif information" in the JPEG image, but is a format not based on Exif standards.
Recording in a JPEG format called YCC444 is not prescribed by Exif standards, so it is expressed this way on this software.
| * | You can check degradation of image quality by setting JPEG saving settings on the preview display at "1 scene development settings." Please refer to "5.1.2. Settings" for details. |
(2) TIFF FormatMake settings if saving as a TIFF image file.
"Type" and "Compression format" can be set at will when "Custom settings" is selected.
"Type" and "Compression format" can be set at will when "Custom settings" is selected.
| (A) | Type | You can select "RGB 8bit" or "RGB 16bit." If you will further process development results from SILKYPIX with photo retouching software, saving to the 16bit higher gradation is advantageous. SILKYPIX is not compatible with recording and saving to color spaces other than RGB, such as CMYK. |
| (B) | Compressed Format | You can select from three formats: "Uncompressed," "LZW low compression" and "LZW high compression (LZW + Prediction compression)" (*1). "LZW low compression" and "LZW high compression" are reversible compressions, so there is no degradation to image quality. |
| *1 | Please note that some software is not compatible with "LZW high compression (LZW + Prediction compression)." |
You can specify the default folder to save the developed JPEG/TIFF files. This is a default setting for the "Save as" dialog and you can modify to any folder for saving every time.This setting does not affect for the "Batch development" function, because it has another setting for itself.
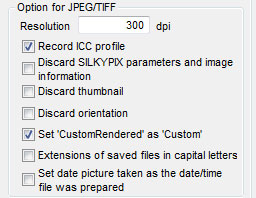 9.1.3. Option for JPEG/TIFF
 When the development result is saved in the JPEG/TIFF file, incident information is saved together, for which option is set on the Option for JPEG/TIFF.
This setting does not have any influences on the results of the picture. Only the incidental information recorded in the image is influenced.
 You can specify whether to record the ICC profile which indicates colorspace into an output JPEG/TIFF file. It is checked in the default.
If you are using the photo retouching software which is compatible with color management, namely, a recorded profile, it can transfer the colorspace information correctly.
9.1.4. Development Policy This setting does not have any influences on the results of the picture. Only the incidental information recorded in the image is influenced.
| (1) | Resolution |
The recorded "resolution" in JPEG and TIFF is defined here. The default setting is 300dpi.
Even if you increase the dpi setting, the resolution of an outputted picture does not change at all. The value set here is recorded in EXIF information, and used as a standard to convert it into an actual size when the image is displayed or is printed.
If a software is not compatible with the dpi information, this setting does not have any meaning.
If you do not understand this setting well, please use the default setting.
| (2) | Record ICC Profile |
If you are using the photo retouching software which is compatible with color management, namely, a recorded profile, it can transfer the colorspace information correctly.
| (3) | Discard SILKYPIX parameters and photography information |
This setting allows you not to record the information into a JPEG/TIFF file, which is the information about taking a photograph and the development parameter of SILKYPIX®.
This setting is not checked in the default.
The photography information is recorded in the information tag of EXIF, which includes all data of the photography and the time and date. The development parameter of SILKYPIX® is stored in "Makernote" tag of the EXIF information.
Please use this setting if you do not want to disclose the information about taking the photograph and developing with SILKYPIX® Developer Studio 4.0.
| (4) | Discard thumbnail |
This setting allows you not to record the thumbnail into a JPEG/TIFF file, This setting is not checked in the default.
| (5) | Discard orientation |
This setting allows you not to record the orientation information to the "Orientation" tag of EXIF. This setting is not checked in the default.
| (6) | Set 'CustomRendered' as 'Custom' |
This setting is specified to record "CustomRendered" tag of EXIF as "Custom" or "Normal". This setting is checked in the default.
When this setting is checked, it is recorded as 'Custom process' to the 'CustomRendered' tag. It indicates the special processing was performed, and a next process is expected to disable or minimize any further processing.
If this setting is disabled, it does not record a "Custom rendered" tag.
If this setting is checked, for example, the image processings automatic correction will not be performed when requesting the print of the photograph by the DPE service.
If you expect some image processing next to a process, please remove the check from this setting.
Since SILKYPIX® assumes the output of the complete image which incorporated the intention of the user, it expects a next process to disable or minimize any further processing in the default setting.
| (7) | Set date picture taken as the date/time file was prepared |
This is a setting for creating / updating the date and time as a file attribute in JPEG / TIFF image files that were recorded and saved from development results. The default setting is disable.
As for the date and time a file was created / updated, the date and time development processing took place is recorded, by default.
If this setting is enabled, the date and time of the photograph for the scene being developed is set as the date and time a file was created / updated.
If the date and time of the photograph for the scene being developed is not recorded, the date and time the data file for the scene being developed is updated is deemed to be the date and time of the photograph.
Furthermore, if the date and time of the photograph is edited with image properties, the edited date and time of the photograph is set.
These are the setting how to develop to a JPEG/TIFF file. These setting affect the developed image itself.
9.1.4.1. Method for Rotation Processing
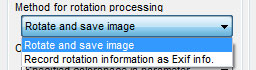 This setting is for the method of rotation processing. It is set to "Rotate and save images" by default.
9.1.4.2. Output colorspace
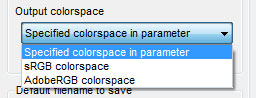 You can specify the working colorspace and the output colorspace. Regardless of the colorspace which has been set as a development parameter, you can execute development with the colorspace of "sRGB" or "Adobe RGB."
It is useful, for example, if you would like to print out with "Adobe RGB" colorspace and also save JPEG files for web site with "sRGB" colorspace, you need not change each development parameter.
The following four are choices for "Output color space."
9.1.4.1. Method for Rotation Processing
This setting is for the method of rotation processing. It is set to "Rotate and save images" by default.| (1) | Rotating images to save |
When this setting is checked, a developed image will be rotated as same orientation as a preview image.
| (2) | Record rotation information as Exif info. |
Development results are not rotated. Rotation information is recorded as EXIF information. The image itself is not rotated. Instructions for rotations are recorded as information. Please note that if this setting and "Do not record rotation information in tags" are enabled at the same time, rotations may not be accurately reflected when saved.
When you use the software which is compatible with the orientation information (like this software), the picture will be displayed which is rotated with the orientation information. In this case, you cannot distinguish the differences whether this setting is checked or not.
You can arrange the rotation direction of the developed image by setting this to "Record rotation information as EXIF information," so utilize this if you want to use the same actions when doing further processing such as with photo retouching software.
You can specify the working colorspace and the output colorspace. Regardless of the colorspace which has been set as a development parameter, you can execute development with the colorspace of "sRGB" or "Adobe RGB."It is useful, for example, if you would like to print out with "Adobe RGB" colorspace and also save JPEG files for web site with "sRGB" colorspace, you need not change each development parameter.
The following four are choices for "Output color space."
| (1) | Specified colorspace in parameter |
You can set either sRGB or Adobe RGB as the output color space in development parameters.
Developments are processed in an output color space of either sRGB or Adobe RGB as designated in development parameters if this setting is selected.
Developments are processed in an output color space of either sRGB or Adobe RGB as designated in development parameters if this setting is selected.
| (2) | sRGB colorspace |
Develop with the output color space fixed at sRGB, regardless of the development parameters.
| (3) | AdobeRGB colorspace |
Develop with the output color space fixed at Adobe RGB, regardless of the development parameters.
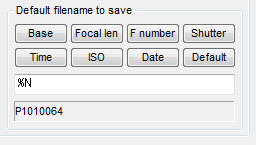 When saving development results, the default name set as JPEG and TIFF image file names is given. By default, RAW data files are set to the same base name ("%N" control characters).
This is a default setting for the "Save as" dialog and you can modify to any filename for saving every time.
This setting is also used for the "Batch development" function.
You can set the control character here. Click [Base], [Focal Length], [F Number], [Shutter speed], [ISO speed], [Date/Day], or [Time] button, the related control character is input automatically.
If the [Initialize] button is clicked, it will initialize to "%N". You can also use your keyboard to input any character directly.
[Control characters for specifying default filename]
If the [Initialize] button is clicked, it will initialize to "%N". You can also use your keyboard to input any character directly.
[Control characters for specifying default filename]
| %N | ... | Basename of the RAW data file ("Basename" means a part of filename except the extension) |
| %L | ... | Focal Length |
| %F | ... | F Number |
| %T | ... | Shutter Speed |
| %I | ... | ISO Speed |
| %Y | ... | Date Time - Year (2 digit) |
| %y | ... | Date Time - Year (4 digit) |
| %M | ... | Date Time - Month |
| %D | ... | Date Time - Day |
| %h | ... | Date Time - Hour |
| %m | ... | Date Time - Minute |
| %s | ... | Date Time - Seconds |
| %% | ... | Method of describing '%' |
| * | This is the same control character as for the "Batch rename" function. |
9.2. Display Setting
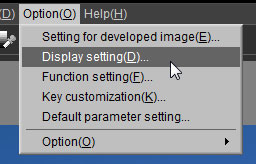 Make settings related to the preview display and thumbnail display.
The menu command [Option(O)]-[Display setting(D)] displays the "Display setting" dialog.
| * | Please refer to "9.8.3. Selecting a skin" concerning switching skins (= background image). |
9.2.1. Color Management
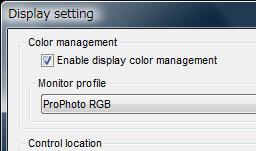 This setting specifies the color management for your display/monitor.
If you check this setting, the color management is enabled and the selected monitor profile is applied for the displayed image.
The preview image cannot display accurate colors if it is a JPEG / TIFF image recorded in an input color space other than sRGB and if the output color space is set to something other than sRGB when color management is disabled.
Appropriate color conversion is performed and displayed even when the input and output color spaces are something other than sRGB if color management is enabled.
However, even if color management is enabled, accurate colors will not be displayed if the monitor being used is not appropriately calibrated and the monitor profile applied to the monitor is not set.
If accurate colors are not displayed, you cannot adjust colors accurately. Enable color management and make appropriate settings.
Please refer to "10.4.5. Color management" for details.
9.2.1.1. Monitor Profile
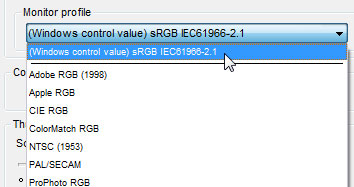 If "color management" is enabled, you can specify a monitor profile by the following two ways.
Use the default monitor profile set in the OS.
Monitor profiles listed in the dropdown list are RGB-XYZ format RGB-Lab format profiles within the profiles registered in the OS.
If you want to use a monitor profile not found in this list, you must first register it to the OS.
Monitor profile refers to ICC / ICM profiles for color management in monitors.
The most desirable method is to prepare a monitor profile especially for the monitor, upon calibrating the monitor with special software. Using a monitor profile prepared appropriately with this method is the limit of feasible color management on this monitor.
Even if you do not have special software for creating a monitor profile, a monitor profile for the monitor may be available, depending on the monitor's manufacturer. Please check the manufacturer's home page.
Please refer to "10.4.5.4. Color management on monitor displays" for details.
| * | If colors differ when compared to other software, the cause may be that one of the software's color management has not been enabled, or the monitor profile being used is different. |
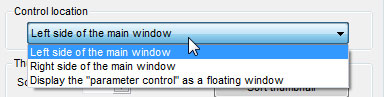 You can specify the location of the "parameter control" that is main GUI control. You can set it left side (default) or right side in the main window, or change it to a floating windows.
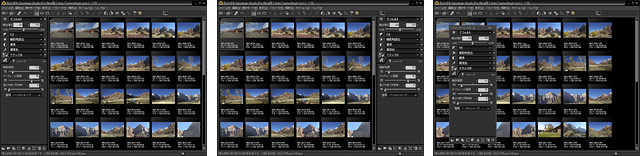 |
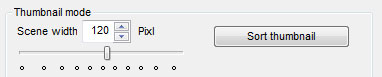 9.2.3. Thumbnail Mode
 | (1) | Scene width |
Set the width of scenes when displaying thumbnails in pixel units.
You can select a pixel width that has no blank spaces in the thumbnail window by clicking on the round mark at the bottom of the slider.
You can select a pixel width that has no blank spaces in the thumbnail window by clicking on the round mark at the bottom of the slider.
| (2) | Sort thumbnail |
You can specify the display order of the thumbnail.
Please refer to "3.3.3. Sorting thumbnails" for details.
Please refer to "3.3.3. Sorting thumbnails" for details.
| (3) | Combination Mode |
The "combination mode" is a mixed mode of the "thumbnail mode" and "preview mode", displaying Thumbnails and single view at the same time.
You can set the scroll direction of thumbnails by arranging these two windows.
You can set the scroll direction of thumbnails by arranging these two windows.
9.2.4.1. Preview Mode
9.2.4.2. Double-click operations
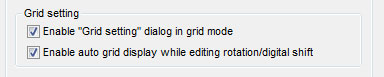 9.2.4.3. Grid Setting
9.2.4.4. Operations in preview display mode when opening folders
9.2.5. Other | (1) | Display development results in 2-stage display |
This setting first displays simple results quickly, and then switches to full development results in stages as parts are completed. Use this under normal circumstances.
| (2) | Quick display of only simple developing results |
This setting shows only the simple preview display, without making a full development preview, if preview display magnification is under 100%.
Test to see if SILKYPIX's responses are slow during the process of adjusting development parameters while looking at the preview display, such as when the PC you use has little memory (less than 1GB) or the PC you use has a low CPU processing capability such as notebook computers.
You will need to check at a display magnification over 100% when adjusting parameters such as sharpness and false color controls that can only be confirmed on full development previews, but you can largely control the CPU load and memory consumed and easily adjust parameters.
Select actions by double clicking on the preview display.
9.2.4.3. Grid Setting | (1) | Disable "Grid setting" dialog in grid mode |
When this setting is disabled, the grid setting dialog is displayed while the grid is displayed. The default setting is disable.
You can make settings for grid position and interval on the grid setting dialog, but even if the dialog is not displayed, changing the grid position can be made through operations on the keyboard ([CTRL] key + left drag), so if the display is not needed, disable it.
You can make settings for grid position and interval on the grid setting dialog, but even if the dialog is not displayed, changing the grid position can be made through operations on the keyboard ([CTRL] key + left drag), so if the display is not needed, disable it.
| (2) | Enable auto grid display while editing rotation/digital shift |
If this setting is checked, the grid is automatically displayed in a few seconds while editing rotation/digital shift parameters. This setting is valid in the default.
Set actions when a folder is opened in preview display mode status.
| (1) | Stay preview mode |
The mode does not change, staying in preview display mode.
| (2) | Change to thumbnail mode |
Switch to thumbnail display mode at the same time you open a folder.
| (3) | Change to combination mode |
Switch to combination display mode at the same time you open a folder.
| (1) | Enable smooth scrolling |
When this setting is on, you enable smooth scrolling through thumbnail displays and preview displays. This setting is on by default.
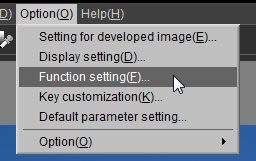 9.3. Function Setting
 The menu command [Option(O)]-[Function setting(F)] displays the "Function setting" dialog in which you can set a method of saving the rotation for JPEG/TIFF/DNG, a brightness level of exposure bias tool and so forth.
9.3.1. Setting
 9.3.1.1. Saving Rotation for JPEG/TIFF/DNG
 9.3.1.2. Setting up Exposure Bias Tool
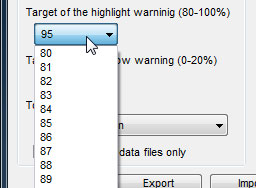 9.3.1.3. Setting up Highlight Warning
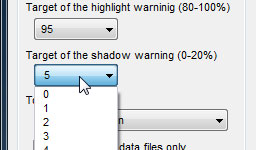 9.3.1.4. Setting up Shadow Warning
 You can select this option to operate a RAW data file only.
When this setting is not checked, RAW/JPEG/TIFF files are displayed together.
When this setting is checked, only a RAW data file is displayed.
 9.3.2. Operation
9.3.1. Setting
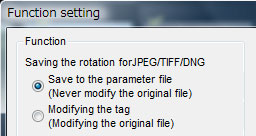
9.3.1.1. Saving Rotation for JPEG/TIFF/DNG When rotating the image of JPEG/TIFF/DNG files, there are two ways to record the rotation information. You can specify whether or not to overwrite rotation information in the original file.
| (1) | Save to the parameter file (Never modify the original file) |
The rotation information will be recorded in a parameter file, and the original file is not modified.
| (2) | Modify the tag (Modify the original file) |
The rotation information will be recorded into the original file which will be modified.
Since the rotation information is overwritten in the original file, other software (*) besides SILKYPIX® Developer Studio 4.0 can recognize rotation information.
However, if no rotation information is recorded in the original file, rotation information cannot be overwritten, and it is recorded in the parameter file (.spd).
| * | Software must be compatible with rotation information which is recorded in the orientation tag of EXIF. |
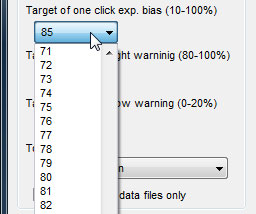
9.3.1.2. Setting up Exposure Bias Tool You can set a "brightness level" at the point where you click with the "Exposure bias tool". The exposure bias is adjusted to meet the brightness level as you set here. The default brightness level is 85%.
If setting this value 85% even when not using a gray card, you can adjust an exposure bias to a certain level easily by clicking the brightest portion such as a white paper with the "Exposure bias tool", because the reflectance of a white paper is approximately between 80 to 90%. Use this without changing the value under normal circumstances.
A brightness level of 85% means that the brightness of the point clicked with exposure bias tools estimated 85% brightness.
There is one thing you must consider. "85% brightness" is not the "pixel value after image processing," but the "brightness level (= amount of light energy)." The final process in image processing is adding processes such as tone, gamma and tone curve, so the final pixel value has no comparative relationship to "Brightness level."
When pixels are processed at a brightness level = 85%, sRGB is converted to about 93%, and when processed at the SILKYPIX default "tone," to a pixel value of about 97.5%.
In other words, under the SILKYPIX default value set at 85%, when areas of white objects in photographs are designated by exposure bias tools, this setting will obtain a reasonable exposure.
As an example of utilizing and applying this function, we will explain methods for adjusting exposure using an 18% gray card.
This is a method of taking a photograph at "18% gray card" and setting a reasonable exposure by setting the brightness level of the "18% gray card" to 18% in the photograph.
Specifically, under settings of 18% for the value of "Exposure bias tool settings," the area of the "18% gray card" shot in the photograph is designated with "Exposure bias tools."
This method is the same as determining exposure through spot photometry with an "18% gray card" positioned in image angles using a simple light meter or the light meter in the camera.
Furthermore, when pixels with a brightness level = 18% are processed, it is converted to a pixel value of around 46%, even with sRGB and the SILKYPIX default setting.
9.3.1.3. Setting up Highlight Warning You can set a threshold value to execute the highlight warning.
This value must be specified as a ratio to the maximum pixel value of the developed image.
This value must be specified as a ratio to the maximum pixel value of the developed image.
9.3.1.4. Setting up Shadow Warning You can set a threshold value to execute the shadow warning.
This value must be specified as a ratio to the maximum pixel value of the developed image.
9.3.1.5. Tooltip This value must be specified as a ratio to the maximum pixel value of the developed image.
Set the tooltip display.
(1) Information button
9.3.1.6. Operate RAW Data Files Only (1) Information button
Display the tooltip with the information button. When you push the information button, a manual for the concerned portion will open.
(2) No information buttonDisplay the tooltip without the information button.
(3) Do not display tooltipDo not display the tooltip.
When this setting is not checked, RAW/JPEG/TIFF files are displayed together.
When this setting is checked, only a RAW data file is displayed.
| * | The RAW data extension for EOS-1D and EOS-1Ds is "TIF," so if this setting is checked, you will not be able to process such RAW data. |
| * | Files in DNG format are handled as a type of RAW data. |
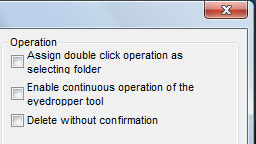
9.3.2. Operation | (1) | Assign Double Click Operation as Selecting Folder |
You can select the operation of double-clicking on a folder in the "Select folder" dialog.
When this setting is checked, you can decide the folder to open by double-clicking.
When this setting is not checked, you can open or close the folder on the tree view by double-clicking.
In another word, it is an operation for the tree view in this case.
When this setting is checked, you can decide the folder to open by double-clicking.
When this setting is not checked, you can open or close the folder on the tree view by double-clicking.
In another word, it is an operation for the tree view in this case.
| (2) | Enable Continuous Operation of Eyedropper Tool |
The eyedropper tool consists of "Exposure bias tool", "Gray balance tool", "Skin color tool", "Chromatic aberration tool" and "Add point tool for Tone curve".
When this setting is checked, an operation mode does not change even if you specify a point or area with these tools once. And you can continue to operate with the same tool.
When this setting is not checked, these tools function as a one shot tool. And operation mode will be changed to the previous mode after using a tool.
In addition, when you use these tools with [SHIFT] key, the "one shot" and the "continuous operation" function oppositely to the setting.
| (3) | Delete without Confirmation |
You can set whether to confirm or not when you delete a file.
If this setting is not checked, you need to confirm when you delete a file.
If this setting is checked, you can delete a file without confirmation.
If this setting is not checked, you need to confirm when you delete a file.
If this setting is checked, you can delete a file without confirmation.
9.3.3. Performance
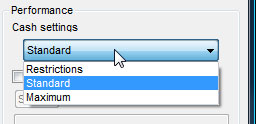 9.3.3.1. Cache Setting
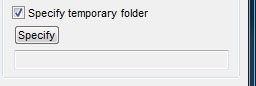 9.3.3.2. Specify Temporary Folder
9.3.3.1. Cache Setting Set frequency for utilizing cache.
SILKYPIX records cache data to memory and files during the development process.
SILKYPIX records cache data to memory and files during the development process.
| Restrictions | Restrict utilization of cache. You can apply this setting if you are using a PC that does not have a lot of memory. | |
| Standard (default) | It's a standard setting. | |
| Maximum | Maximize the use of Cache Record the maximum cache data to memory and files. You can apply this setting if the PC you use has more than 2GB of memory and sufficient capacity in temporary folders. |
9.3.3.2. Specify Temporary Folder You can specify the folder in which this software creates a virtual storage file. Initial values are set to the OS standard temporary folders.
Please check "Specify temporary folder" checkbox, and specify a folder by clicking the [Specify] button.
If you can specify a folder in a physically different drive from the drive which OS is installed, performance may improve.
When you specify a drive, you should specify the drive which has sufficient free storage space and also runs at as high speed as possible.
| * | The total amount of temporary files that SILKYPIX creates may be several GB. |
9.4. Key customization
Many SILKYPIX functions can be assigned short cut keys.
Functions that are thought to be frequently used have pre-assigned short cut keys by default, but you can freely modify and make settings for your own usage.
When you select [Option (O)] [Key settings (K)] from the menu, the "Key settings" dialog, from which you can customize short cut keys, will appear.
The keyboard styled GUI located at the bottom of the dialog is called the "Software keyboard." You can use it instead of pushing your real keyboard keys.
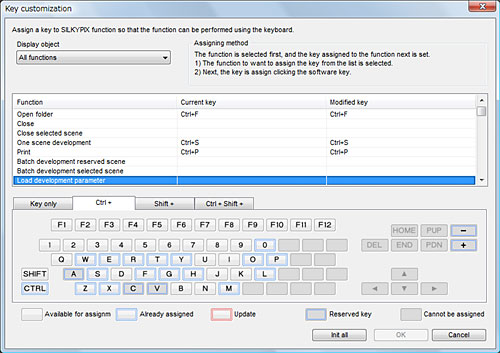 |
9.4.1. GUI Operation methods
| (1) | Display object |
Select the functions to be displayed in the list.
If you select "All functions," the number of functions is so great that it may be difficult to locate the "Function" you want. In this case, you can reduce the number of functions displayed in the list here.
When a selected "Function" can be maintained, the status of the selection does not change, even if the display is switched here.
| (2) | List |
Display a list of "Functions" to be displayed and the "Keys" that are assigned to those functions.
"Functions" whose key assignments have been changed are displayed in red for emphasis.
"Keys after change" displays only those functions whose key assignments have been changed.
The four tabs, [Simple key], [Ctrl], [Shift] and [Ctrl + Shift] indicate combinations with the [Ctrl] key and [Shift] key.
[Simple key] indicates pushing only a single "key" without using either the [Ctrl] key or [Shift] key.
[Ctrl] indicates pushing a "key" while holding down the [Ctrl] key.
| (3) | Software keyboard |
This is an input control that can be used instead of the real keyboard, and is also an information control that shows the status of "keys."
Clicking on a "key" that can be set performs the same actions as pushing a "key" on the real keyboard and that "key" is assigned to the selected "function."
Clicking on a "key" that can be set performs the same actions as pushing a "key" on the real keyboard and that "key" is assigned to the selected "function."
| (4) | Init all |
Initialize SILKYPIX's default key settings.
The contents of changes from current key settings are displayed in a list. Changes will not be made until you click on the [OK] button.
The contents of changes from current key settings are displayed in a list. Changes will not be made until you click on the [OK] button.
9.4.2. How to assign keys
This explains the procedures for assigning a "key" to a "function."
9.4.3. Keys that can be assigned | (1) | Open the "Key setting" dialog |
There are three ways to open the "Key setting" dialog. The "Key setting" dialog will be displayed through any of these methods, but if you designate a special "Function" and open the "Key setting" dialog, a dialog for the selected status of that "Function" will open.
| a) | Select [Option (O)] [Key settings (K)] from the menu |
| b) | Open the "Key setting" dialog from various items on the menu. |
If you want to assign a short cut key to a "Function" found in the menu item, right click on the menu item to display a sub-menu. Select "Short cut key assignment" from there.
The "Key setting" dialog will be displayed as the status of the selected "Function."
The "Key setting" dialog will be displayed as the status of the selected "Function."
| c) | Open the "Key setting" dialog from an icon on the tool bar or elsewhere |
If you want to assign a short cut key to a "Function" set to an icon, right click on the icon to display a sub-menu. Select "Short cut key assignment" from there.
The "Key setting" dialog will be displayed as the status of the selected "Function."
The "Key setting" dialog will be displayed as the status of the selected "Function."
| (2) | Select functions you want to assign short cut keys |
Depending on how you open the "Key setting" dialog, the intended "Function" is already selected, but if you open the "Key setting" dialog using method (a) above, select a short cut key from the list of functions you want to assign.
| (3) | Assign a key to selected "Function" |
With the intended function selected, you can assign the designated "Key" to the function by either using the software keyboard displayed at the bottom of the dialog or by pushing the key on the real keyboard.
You can assign up to a maximum of 4 "keys" to one function.
"Keys" available for assignment are limited. Please refer to "9.4.3. Keys that can be assigned" for details.
To delete an assigned "Key," either right click on the list item or push the [DEL] key.
If multiple "Keys" are assigned, a menu will be displayed and you can designate which "Key" to delete.
When you assign a "Key" already assigned a "Function" to another "Function," the "Function" assigned to the "Key" to that point will be automatically deleted and the intended "Function" will be assigned.
If "Key" assignments are added, deleted or changed from the settings to that point, the concerned key on the software keyboard will change colors, making it easy to see the difference with settings before the change.
"Keys" that can be assigned "Functions" are limited. You can check the "Software keyboard" display to see keys that are available for assignment.
Short cut keys can be pushed as single "Keys" or used in a combination with the [Ctrl] key and/or [Shift] key. Four combinations are available for one "Key" in conjunction with the [Ctrl] key and [Shift] key.
[Ctrl] key and [Shift] key combinations are displayed in "Tabs" on the "Software keyboard."
Only the 11 [F2] ~ [F12] "Keys" are available for settings as single short cut "Keys."
"Functions" are assigned to "Keys" such as [F1], [DEL], [Page Up] and [End]. These are "Reserved keys" whose settings cannot be changed.
9.4.3.1. Reserved keys
"Functions" are assigned to these "Keys." As "Reserved keys," their settings cannot be changed.
These "Keys" are assigned standard "Functions" assigned by your OS or other software.
Please refer to "6.3.3. List of short cut keys" concerning assigned "Functions."
These "Keys" are assigned standard "Functions" assigned by your OS or other software.
| [F1] | [PageUp] | [PageDown] | [Home] | [End] | |
| Ctrl+[A] | Ctrl+[C] | Ctrl+[V] | Ctrl+[+] | Ctrl+[-] | Alt+Ctrl+[0] |
| Shift+[Up Arrow] | Shift+[Down Arrow] | Shift+[Right Arrow] | Shift+[Left Arrow] |
Please refer to "6.3.3. List of short cut keys" concerning assigned "Functions."
9.5. Default Parameter Setting
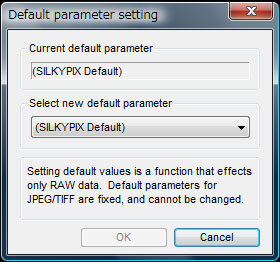 "Default parameters" are the parameters applied when there have been no adjustments made to development parameters.
You can set optional development parameters in these "Default parameters."
The menu command [Option(O)]-[Default Parameter Setting...] displays the "Default Parameter Setting" dialog.
You can register the taste as the default parameter, which was registered to "All parameters" of "Taste category".
(SILKYPIX® Default) is the default setting prepared by SILKYPIX®.
If you select a "partial taste" for the default parameter, it is mixed for "(SILKYPIX® Default)" and the composite development parameter is assigned as the default parameter.
[Attention]
The default parameter must be modified carefully. When you modify the default parameter, the developed result of all scenes which a development parameter isn't set to is changed all together.
Even if it is the scene which was browsed or developed in the past by SILKYPIX® Developer Studio 4.0, the developed image is not compatible with the past in case of the scene which was not set a development parameter.
As for the scene which a development parameter was once set to, it doesn't have an influence therefore.
| * | You can check whether a development parameter was set or not by "Dropdown list for Taste". If the development parameter was not set and it is same as the default, it's taste is displayed with green color. |
| * | This function is valid only for RAW. You cannot specify the default parameter for JPEG/TIFF because it is fixed. |
9.6. Option Feature
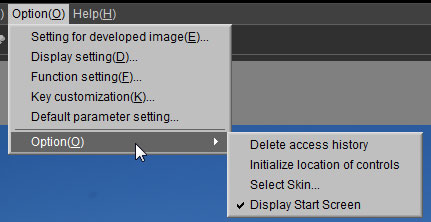
9.6.1. Delete Access History
This function deletes an access history to files/folders.
9.6.2. Initializing Location of Control This function initializes the location of all controls to the default.
9.6.3. Select Skin This function allows you to change the background skin of this software. It displays the "Select skin" dialog, and you can select a skin on the dialog.
This new skin is only visible after restarting SILKYPIX® Developer Studio 4.0. To display with the new skin, please close this software once and re-execute it.
9.6.4. Start screen is displayed This new skin is only visible after restarting SILKYPIX® Developer Studio 4.0. To display with the new skin, please close this software once and re-execute it.
The start screen is displayed when you start SILKYPIX® Developer Studio 4.0. You can set this screen to display or not.
9.7. Setting for Troubleshooting
You can set following settings according to the instruction from our support when troubles occur in your system environment.
Note that when you change settings by your own judgment, there is a possibility that a program does not run normally, or the performance drops significantly.
9.7.1. Initialize user configuration file
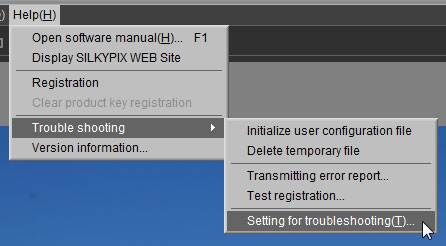 9.7.4. Troubleshooting for Windows
Note that when you change settings by your own judgment, there is a possibility that a program does not run normally, or the performance drops significantly.
9.7.1. Initialize user configuration file
Initialize SILKYPIX user configuration files by selecting [Help (h)] [Trouble shooting] [Initialize user configuration files] from the menu.
When you perform this process, you return to the original conditions for all settings such as function settings, display settings, development save settings and trouble shooting settings, as well as file history, folder history, window locations, etc.
After performing this operation, the program will shut down, so please restart it. It will start with settings in their initialized conditions.
9.7.2. Transmitting error report When you perform this process, you return to the original conditions for all settings such as function settings, display settings, development save settings and trouble shooting settings, as well as file history, folder history, window locations, etc.
After performing this operation, the program will shut down, so please restart it. It will start with settings in their initialized conditions.
If SILKYPIX detects an irregularity, error information may be recorded.
This function collects error information remaining at times of irregularities and sends an error report to our company's server.
Please do not use this function without instructions from our company's support desk.
If problems arise on your PC such as a forced shut down due to a SILKYPIX application error, contact our company's support desk.
In such a case, our company's support desk may ask that you provide information so that they can analyze your problem.
We will send a "Sender ID" if we request you to send an error report. You cannot send an error report to our company without entering this "Sender ID."
When you select [Help (h)] [Trouble shooting] [Send error report] from the menu, the "Send error report" dialog will be displayed.
After entering the "Sender ID" our company's support desk sent to you, click on the [Send] button. The error report will be automatically sent to our company's server.
Another method has been prepared for cases when you cannot send the error report from your PC. You can save the error report to a file and send it to our company as an attached file in an e-mail.
Enter the "Sender ID" our company's support desk sent you, and when you click on the [Save] button a "Save as�c" dialog will appear for saving the file.
When you set a file name for recording here and click on the [Save (S)] button, a SILKYPIX error report will be saved in the designated file.
Our company's support desk will give additional instructions on how to send this file to our company.
9.7.3. Test registration This function collects error information remaining at times of irregularities and sends an error report to our company's server.
Please do not use this function without instructions from our company's support desk.
If problems arise on your PC such as a forced shut down due to a SILKYPIX application error, contact our company's support desk.
In such a case, our company's support desk may ask that you provide information so that they can analyze your problem.
We will send a "Sender ID" if we request you to send an error report. You cannot send an error report to our company without entering this "Sender ID."
When you select [Help (h)] [Trouble shooting] [Send error report] from the menu, the "Send error report" dialog will be displayed.
After entering the "Sender ID" our company's support desk sent to you, click on the [Send] button. The error report will be automatically sent to our company's server.
Another method has been prepared for cases when you cannot send the error report from your PC. You can save the error report to a file and send it to our company as an attached file in an e-mail.
Enter the "Sender ID" our company's support desk sent you, and when you click on the [Save] button a "Save as�c" dialog will appear for saving the file.
When you set a file name for recording here and click on the [Save (S)] button, a SILKYPIX error report will be saved in the designated file.
Our company's support desk will give additional instructions on how to send this file to our company.
Test whether or not you can use on-line registration for your product key from your PC.
When you select [Help (h)] [Trouble shooting] [Product key registration test] from the menu, the "Product key registration test" dialog will be displayed.
Click on the [Test] button to begin the test.
If "Online registration of product key is possible" is displayed, you can perform online registration of your product key from your PC under current conditions.
If "Online registration of product key is not available" is displayed, you cannot perform online registration of your product key from your PC under current conditions.
If it is determined that you cannot perform online registration of your product key, enter the product key in the "Product key registration" dialog and register offline by clicking on the "Offline registration" button.
Please see "1.2.2.2. Product key offline registration" for details on offline registration.
9.7.4. Troubleshooting for Windows 9.7.4.1. Disable Parallel Processing When Developing
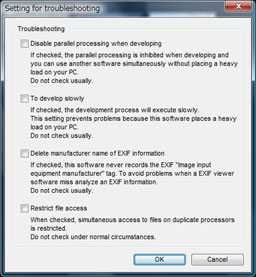 In order to achieve smooth operation even during complicated processing, SILKYPIX® has adopted multithread processing and multiprocessing in a positive way and achieved high performance by operating microprocessors with high efficiency.
As the result, there is a possibility that SILKYPIX® decreases performance of the other software which are running simultaneously because the microprocessors are handling heavy loads during development processing.
In addition, because the microprocessors are handling heavy loads, hardware operational failure has been reported. For example, a high temperature warning because of increased temperature of the processors, unstable operation, rebooting a PC and so forth.
In order to avoid these trouble, this setting controls microprocessor activity ratio and limits temperature rise.
Furthermore, if you want to specify more enhanced setting for limiting temperature rise, refer to '9.4.1.3 To Develop Slowly'.
9.7.4.2. To Develop Slowly
In order to achieve smooth operation even during complicated processing, SILKYPIX® has adopted multithread processing and multiprocessing in a positive way and achieved high performance by operating microprocessors with high efficiency.As the result, there is a possibility that SILKYPIX® decreases performance of the other software which are running simultaneously because the microprocessors are handling heavy loads during development processing.
In addition, because the microprocessors are handling heavy loads, hardware operational failure has been reported. For example, a high temperature warning because of increased temperature of the processors, unstable operation, rebooting a PC and so forth.
In order to avoid these trouble, this setting controls microprocessor activity ratio and limits temperature rise.
Furthermore, if you want to specify more enhanced setting for limiting temperature rise, refer to '9.4.1.3 To Develop Slowly'.
This setting aims for verifying trouble of CPU thermal runaway caused by temperature rise.
When this setting is checked, all development processes such as creating preview and thumbnail, 1-scene development, batch development and so forth are executed slowly.
By executing development process slowly and reducing the amount of load placed on CPU, heat generation of CPU can be controlled.
If the thermal runaway occurs while executing development process and changing development parameters, you should check this setting.
If the thermal runaway does not occur when you check this setting, there may be a problem about the countermeasure of heating in your PC environment.
If you continue to use a PC in this condition, the thermal runaway may give some damage to your PC, for example, break the data recorded in a hard disk.
This "To develop slowly" aims for only discovering trouble. Even though a PC runs with stability in this mode, it is dangerous to use it continuously in this condition.
In case of thermal runaway, there is a high possibility that breakage of data recorded in a hard disk will occur. This is quite different from a case that program runs abnormally and completes.
At the worst, the OS itself will not start up, and all data will be lost. We strongly recommend you not to use your PC continuously in this "To develop slowly" enabled.
[If you believe SILKYPIX is not properly operating due to thermal runaway]
9.7.4.3. Delete Manufacturer Name of EXIF Information In case of thermal runaway, there is a high possibility that breakage of data recorded in a hard disk will occur. This is quite different from a case that program runs abnormally and completes.
At the worst, the OS itself will not start up, and all data will be lost. We strongly recommend you not to use your PC continuously in this "To develop slowly" enabled.
[If you believe SILKYPIX is not properly operating due to thermal runaway]
When this damage occurs, you need to stop using this software and execute the following measures.
| (1) | Is there any obstacle around a cooling fan in a PC? |
You need to check whether dust clogs a fan or a fan is covered with dust. If it is too dirty, you should clean it according to a manual of your PC.
| (2) | Is PC installed at an appropriate place? |
You need to check whether a wall blocks ventilation of fan or thermal radiation because a wall is too close to a PC. You should avoid locating a PC where heat stays. Rather you should install it where ventilation is good.
If a room temperature is high, you should be careful for heat radiation from a PC. You may install it near to an air conditioner.
If a room temperature is high, you should be careful for heat radiation from a PC. You may install it near to an air conditioner.
| (3) | Please consult a manufacturer. |
SILKYPIX® Developer Studio 4.0 runs a CPU with high efficiency. Because of this, we say that a temperature of CPU gets higher than a case of running other software.
However, if a PC does not stand the heat, a problem does exist in a PC.
If thermal runaway occurs even in an appropriate locating condition, there is a possibility that PC's countermeasure to heat is not perfect.
You should consult a manufacturer about this thermal runaway.
You may be suggested to initialize BIOS or update it. You need to follow directions given from a manufacturer to take measures.
| (4) | In case of a custom-built PC, please enhance countermeasure for cooling. |
Is grease between CPU and heat sink sufficient? Is capacity of fan enough? Is ventilation in a PC ensured? Please enhance a heat radiation capacity. It is quite effective to open a PC and to blow air directly from a fan into it.
This setting aims for avoiding the trouble which the EXIF information is displayed incorrectly by some other software like an EXIF viewer tool.
9.7.4.4. Restrict file access Restrict simultaneous access to files on multiple processors. Normally, using multiple processors allows quicker processing, but there are cases, depending on the machine and environment you use, when processing is concentrated on file access, causing it to slow down. In such a case, use this setting.
 9.7.5. Setting for Troubleshooting Macintosh
 9.7.5.1. To Develop Slowly
This is the same feature as Windows. Please refer to '9.9.4.2 To Develop Slowly'.
9.7.5.2. Delete Manufacturer Name of EXIF Information This setting aims for avoiding the trouble which the EXIF information is displayed incorrectly by some other software like an EXIF viewer tool.
9.7.5.3. Restrict file access Restrict simultaneous access to files on multiple processors.