| SILKYPIX® Developer Studio Pro | SOFTWARE MANUAL |
| 5. Saving Development Process and Development Results | ||||||||
This will explain development processing of RAW data and JPEG / TIFF images, and how to save the results as JPEG and TIFF image files.
There are two methods, "One Scene Development," indicating development of one selected scene, and "Batch Development," indicating development of multiple scenes at the same time.
| Format | For processing | Processing format | Preview display | Other features |
| One scene development | One scene | Real time processing / batch processing | Yes | Possible to set details for each scene |
| Batch development | Multiple scenes | Batch processing | No | Possible to efficiently batch process |
[Processing format]
| Real time processing | Development processing is performed immediately and processing waits until it is complete. Processing status is displayed in a progress bar. |
| Batch processing | Development processing is registered as a job and registered jobs are processed in the background in order. You can do other work at the same time, such as adjusting development parameters during batch processing. Batch processing status is displayed in the "Batch Development Status" sub-control. |
5.1. One Scene Development
This is a method for designating a way to save development processing and development results for selected single scenes.
It processes following set instructions. You can select from two formats, a format for processing in real time and a format for registering jobs and processing in a batch.
You can also register jobs for batch development from "1 scene development," but compared to designating development with the "Batch development" function, you can make more detailed settings and confirm development results in advance in the preview display.
You can also register jobs for batch development from "1 scene development," but compared to designating development with the "Batch development" function, you can make more detailed settings and confirm development results in advance in the preview display.
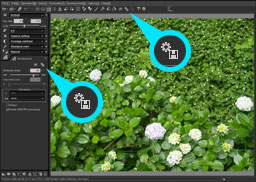 When you click the
  icon on the "Development" sub-control or the toolbar, the "Save as" dialog is displayed.
You can specify the filename to save the developed image, and specify settings for saving.
You can switch between "Save file" and "Settings" pages in the "1 scene development" dialog.
When the "Save file" tab is selected, you can designate the file folder, file name and type of file for saving the development results.
When the "Settings" tab is selected, you can make settings for 1 scene development while looking at the preview display of the development results.
After confirming instructions for saving files and development settings, click on the "Develop" or "Batch development" button and begin processing.
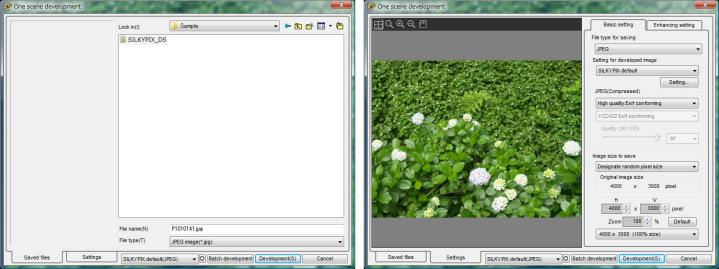
| (1) | Saved files | Switch to the page for designating files to be saved. You can designate the file folder, file name and type of file for saving the development results. |
| (2) | Settings | Switch to the page for making settings for 1 scene development. You can make settings for 1 scene development while looking at the preview display of the development results. |
| (3) | One scene development taste | The status of "1 scene development settings" will be displayed. Registered tastes will be displayed when you open the list. You can switch to "Settings for development and saving" from these tastes. |
| (4) | Batch development | Confirm set development instructions and register development processing to batch development as a job.Registered jobs are processed as batch development. When job registration is complete, "1 scene development" is closed, whether or not development processing has been completed and you can go to the next operation. |
| (5) | Development | Confirm set development instructions and begin real time development processing. The status of processing is displayed on a progress bar until development processing is complete. |
5.1.1. Saving Files
This page is for designating files to be saved.
Select a location (= folder) for saving files and designate a file name for the file to be saved.
Select the type of file, either a JPEG image (*.jpg) or TIFF image (*.tif). Please make detailed settings related to JPEG / TIFF images on the "Settings" page.
Select a location (= folder) for saving files and designate a file name for the file to be saved.
Select the type of file, either a JPEG image (*.jpg) or TIFF image (*.tif). Please make detailed settings related to JPEG / TIFF images on the "Settings" page.
If there are file names reserved for a job registered for batch development in a location (= folder) for saving files, those file names are displayed as reserved file names.
When a file name reserved here is designated, jobs registered for batch development are cancelled, and if that file already exists, it will be overwritten.
When a file name reserved here is designated, jobs registered for batch development are cancelled, and if that file already exists, it will be overwritten.
5.1.2. Settings
This page is for making settings for 1 scene development while looking at the preview display of saved results.
Settings here include many that have an influence on the developed image itself and on the quality of the image. Confirm appropriate development instructions while checking the effects and influence on the preview display.
Settings here include many that have an influence on the developed image itself and on the quality of the image. Confirm appropriate development instructions while checking the effects and influence on the preview display.
5.1.2.2. Basic Settings
| (1) | Image Size to Save |
Set the pixel size of the image to be saved. There are two ways to make designations, as follows.
| a) | Designate random pixel size |
When executing 1-scene development, you can specify the image size to save. In other words, you can save an enlarged or reduced image with this feature.
You can select an image size from the history, which includes the original image size (100%), the previous size, and the size that has been used for this scene and also for other scenes.
It is convenient to select it from the history if you want to save it with the same size as the previous image. However, the list shows only the size which is matched to the aspect ratio of the target scene.
Click the initialize button to return to default values.
| b) | Fit to designated size |
This is the same as the method for "Batch processing." Please see "5.3.1.3. Pixel size of image to be saved."
| (2) | Setting for developed image |
This is the same as the method for "Batch processing." Please see "5.3.1.2. Settings for saving developed images."
This is the same as the method for "Batch processing." Please see "5.3.2. Enhancing settings."
5.1.2.4. Preview
Before saving an image, you can check it with the preview, which reflects the effect of the "unsharp mask" and "JPGE compression".
When you adjust the setting value for the "unsharp mask" or the JPEG image, the preview is automatically refreshed.
It takes a time to complete the development of the entire preview image.
But when part of the image is displayed, only the part is developed, shortening the time for development.
You can change an operation mode or a display magnification from the context menu, which is displayed by right-clicking on the preview image.
5.2. Batch development
 "Batch development" is a function that develops multiple scenes together.
A single process of developing and saving to a file a single scene is called a "Job." When this job is registered in "Batch development," "Batch development" processes the registered jobs in the background.
"Batch development" develops in the background, so if jobs are registered, you do not have to wait for the processing to be completed, but rather you can immediately go to the next operation.
If multiple scenes are being processed, "Jobs" for the number of scenes are prepared and these jobs are registered to batch processing. They are processed in order.
The following four methods are for performing "Batch development."
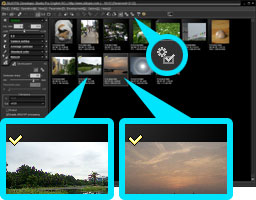
| (1) | Batch development of scenes reserved for development |
This is a method of registering scenes set with marks for development reservation to jobs in batch development. A dialog for making settings will be displayed.
Select [Develop (D)] [Batch development of jobs reserved for development (V)] from the menu, or click on the icon in the tool bar to begin processing.
The tool bar icons change based on the status of selected scenes. The (Batch development of scenes reserved for development) will be displayed only when one scene is selected.
Select [Develop (D)] [Batch development of jobs reserved for development (V)] from the menu, or click on the icon in the tool bar to begin processing.
The tool bar icons change based on the status of selected scenes. The
(Batch development of scenes reserved for development) will be displayed only when one scene is selected.| (2) | Batch development of selected scenes |
This is a method for registering a currently selected scene or scenes to jobs in batch development. A dialog for making settings will be displayed.
Select [Develop (D)] [Batch development of selected scenes] from the menu, or click on the icon in the tool bar to begin processing.
The tool bar icons change based on the status of selected scenes. The (Batch development of selected scenes) will be displayed only when multiple scenes are selected.
Select [Develop (D)] [Batch development of selected scenes] from the menu, or click on the icon in the tool bar to begin processing.
The tool bar icons change based on the status of selected scenes. The
(Batch development of selected scenes) will be displayed only when multiple scenes are selected.| (3) | Immediately register selected scenes to batch development |
This is a method for registering a currently selected scene or scenes to jobs in batch development. No dialog for making settings will be displayed. Current batch development settings will be used.
Select [Develop (D)] [Immediately register selected scenes to batch development] from the menu.
This function is also assigned to the [F5] key by default.
Select [Develop (D)] [Immediately register selected scenes to batch development] from the menu.
This function is also assigned to the [F5] key by default.
| (4) | Register from "1 scene development" to batch development |
This is a method for registering a currently selected scene from "1 scene development" to jobs in batch development. Job registration is performed from the "Save as�c" dialog.
Select [Develop (D)] [Develop and save (S)] from the menu, or click on the icon in the tool bar to begin processing.
Jobs are registered to batch development by clicking on the "Batch development" button in the "1 scene development" dialog.
When job registration is complete, the batch development processing dialog will close, even if development processing has not been completed. Registered jobs are processed in the background.Select [Develop (D)] [Develop and save (S)] from the menu, or click on the icon in the tool bar to begin processing.
Jobs are registered to batch development by clicking on the "Batch development" button in the "1 scene development" dialog.
You can confirm the status of job processing at "Batch development status." The number of remaining jobs is also displayed on the batch development status icon on the right side of the tool bar.
5.2.1. Batch Development Tastes
"Batch Development Settings" can be chosen from tastes prepared in advance. It is advantageous to register settings used often as tastes.
5.2.2. Basic Settings
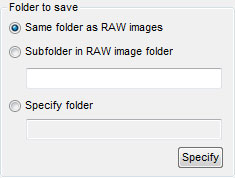 You can select the folder to save a file using the following three ways.
You can designate the type of file to be saved (JPEG or TIFF), pixel size of the image to be saved and development result save settings here.
"Development result save settings" and "One scene development" have common setting methods. Please see "5.3.1.2. Settings for saving developed images."
5.2.3. Enhancing Setting "Development result save settings" and "One scene development" have common setting methods. Please see "5.3.1.2. Settings for saving developed images."
| (1) | Size of Image |
You can specify the size in pixels of each developed image when you want to save an enlarged image or reduced image. The following three methods are for designating.
| a) | Normal size (100%) |
The pixel size of the image to be saved will be the pixel size after trimming. The image is not enlarged or reduced.
The trimming size is not designated, even if the output size is designated when setting trimming.
The trimming size is not designated, even if the output size is designated when setting trimming.
| b) | Trim/Resize to designates size |
If the output size is designated when trimming is set, it is resized to the size designated for trimming.
If trimming is not performed and if the output size is not designated when trimming is set, a normal size (100%) is recorded.
If trimming is not performed and if the output size is not designated when trimming is set, a normal size (100%) is recorded.
| c) | Fit to designated size |
This is the same as the method for "1 scene development." Please see "5.3.1.3. Pixel size of image to be saved."
| (2) | Setting for developed image |
This is the same as the method for "1 scene development." Please see "5.3.1.2. Settings for saving developed images."
This is the same as the method for "1 scene development." Please see "5.3.2. Enhancing settings."
5.2.4. Other settings | (1) | Folder to Save |
You can select the folder to save a file using the following three ways.| (1) | Same folder as RAW images |
You can save a developed image in the same folder as the original RAW image is stored.
| (2) | Subfolder in RAW image folder |
You can create a sub-folder under the same folder as the original RAW image is stored.
| (3) | Specify folder |
Click [Specify] button to display the "Select folder" dialog, and you can select the folder to save developed images.
| (2) | On File Name Collision |
Select an option for when there is a file of the same name as a file output to that destination.
If you select "Overwrite," the existing file will be overwritten and lost. Please be extremely careful.
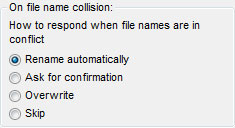 You can select one of the following four types of measures.
The default naming conventions use the base name of the RAW data file for image processing as is, and convert and save with a JPG or TIF extension.
If you select "Overwrite," the existing file will be overwritten and lost. Please be extremely careful.
You can select one of the following four types of measures.| (1) | Rename automatically |
A different file name is automatically created and given to the file as RAW data.
| (2) | Ask for confirmation. |
A dialog box for confirming how to handle the file is displayed.
Please decide the file name.
Please decide the file name.
| (3) | Overwrite |
When the file name exists already, SILKYPIX® Developer Studio Pro overwrites the existing file automatically.
| (4) | Skip |
When the file name exists already, SILKYPIX® Developer Studio Pro skips saving the file.
The file output in the above process is specified in detail at '5.3.1.2. Setting for Developed Image'.The default naming conventions use the base name of the RAW data file for image processing as is, and convert and save with a JPG or TIF extension.
| (3) | Don't Erase "Batch Development Mark" after Processing |
If you leave the check for 'Don't erase "Batch development mark" after processing', the "Batch development mark" will not be removed.
If a mark for reserving development is being utilized as a mark for job registration, please remove the check.
If a mark for reserving development is being utilized as a mark for job registration, please remove the check.
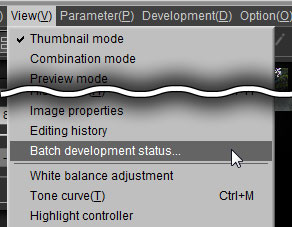 5.2.5. Batch development status
 In order to check the batch development status, select [View (V)] [Batch Development Status] from the menu or click on  in the tool bar to make the "Batch Development Status" sub-control appear.
Switch and display two kinds of information by selecting tabs in the "Batch Development Status" sub-control.
5.2.5.1. Waiting
in the tool bar to make the "Batch Development Status" sub-control appear.Switch and display two kinds of information by selecting tabs in the "Batch Development Status" sub-control.
5.2.5.1. Waiting
Jobs currently under batch development and a list of jobs waiting to be processed are displayed.
You can delete a selected job with the icon.
icon.
When you delete a job here, batch development for the deleted job will not be performed.
5.2.5.2. Processing complete You can delete a selected job with the
icon.When you delete a job here, batch development for the deleted job will not be performed.
This will display a list of completed batch development jobs.
You can delete a selected job with the icon.
Jobs displayed here have already completed batch development processing, so deleting a job is only erases it from the displayed list so that it will not be seen.
Jobs displayed here will accumulate and increase as batch development proceeds. Delete and arrange jobs when the number of jobs increases and the list becomes difficult to understand.
A context box will appear when you select a job and right click on it.
By selecting "Open in Explorer" after you select a job, you can open the developed and saved JPEG / TIFF image file in Explorer.
You can also delete a selected job from the menu.
5.2.5.3. Pausing and restarting batch development You can delete a selected job with the
icon.Jobs displayed here have already completed batch development processing, so deleting a job is only erases it from the displayed list so that it will not be seen.
Jobs displayed here will accumulate and increase as batch development proceeds. Delete and arrange jobs when the number of jobs increases and the list becomes difficult to understand.
A context box will appear when you select a job and right click on it.
By selecting "Open in Explorer" after you select a job, you can open the developed and saved JPEG / TIFF image file in Explorer.
You can also delete a selected job from the menu.
Batch development processing can be paused.
All batch development will be halted by clicking on on the bottom right. Click on
  when paused to restart batch development.
All batch development will be halted by clicking on
on the bottom right. Click on when paused to restart batch development.5.3. Settings for development and saving
Setting items common in both "1 scene development" and "Batch development" are explained here.
Basic settings differ slightly between "1 scene development" and "Batch development," but items that can be set in the same way will be explained.
By registering a setting status from "Settings for saving developed images" that you often use as a taste, you can easily switch settings by selecting that taste.
You can also set JPEG and TIFF saving formats here.
You can also set JPEG and TIFF saving formats here.
There are many detailed setting items in "Settings for saving developed images." Click on the "Detailed settings" button and open the "Settings for saving developed images" dialog to make settings for all items.
Please see "9.1. Settings for saving developed images" for details.
You can make detailed settings for both "JPEG" and "TIFF" by selecting "Type of saved file" here.
Contents that can be set here are the same as the contents that can be set with "Detailed settings." Please see "9.1.2. Setting type of file" for details.
5.3.1.3. Size of Image Please see "9.1. Settings for saving developed images" for details.
You can make detailed settings for both "JPEG" and "TIFF" by selecting "Type of saved file" here.
Contents that can be set here are the same as the contents that can be set with "Detailed settings." Please see "9.1.2. Setting type of file" for details.
You can specify the size in pixels of each developed image when you want to save an enlarged image or reduced image. The methods for designating pixel size for resizing differ slightly between "1 scene development" and "Batch development."
You can record and save at an appropriate pixel size that meets the purposes of the image.
You can record and save at an appropriate pixel size that meets the purposes of the image.
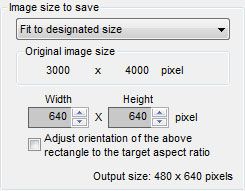 5.3.1.3.1. Fit to Designated Size
 Select "Fit to designated size" in "Pixel size of image to be saved." It will be saved at a pixel size within the restricted size that was designated.
This setting method can be set for both "1 scene development" and "Batch development."
When creating the picture for a slide show that are displayed on a particular display, you can specify a display size. For example, when you want to display images on a VGA display, you can specify the display size of 640x480.
By this setting, the developed image files are saved with the size of 640x480. Therefore, you do not need to adjust the image size at the slide show.
[Adjust orientation of the above rectangle to the target aspect ratio]
When you check this setting, the specified size is automatically adjusted to match the orientation with the aspect ratio of the target image.
For example, when specifying 640x480 as size, the result size will be inscribed to 640x480 for the lateral image and it will be inscribed to 480x640 for the longitudinal image.
For example, when specifying 640x480 as size, the result size will be inscribed to 640x480 for the lateral image and it will be inscribed to 480x640 for the longitudinal image.
Settings for imprinting the date and unsharp mask are made here.
 5.3.2.1. Imprinting the date
5.3.2.1. Imprinting the date As the name of the function implies, "Imprinting the date" allows you to imprint the date and time the photograph was taken onto the development results.
In addition to the date and time the photograph was taken, you can also include image information, optional characters and credit images on the development results.
You can imprint the date and time the photograph was taken and image information by selecting prepared data for imprinting the date.
You cannot imprint the date if the developed file is a 16bit TIFF.
Creating "Imprinting the date" is required for imprinting a credit image you prepared
Only JPEG images and TIFF images can be selected as images to be imprinted. Semitransparent images are also compatible with imprinting because it is compatible with TIFF with transparent color information.
Only JPEG images and TIFF images can be selected as images to be imprinted. Semitransparent images are also compatible with imprinting because it is compatible with TIFF with transparent color information.
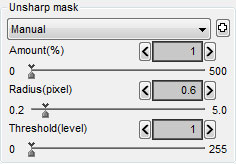 This feature allow you to apply the unsharp mask filter to the developed image. You can adjust the unsharp mask in amount(%), radius(pixel) and threshold value(level). Unsharp mask is applied to results after development and resizing. You can adjust in terms of amount (%), radius (pixel) and threshold value (level).
| Copyright (C) Ichikawa Soft Laboratory 2004-2011. All Rights Reserved. |