| SILKYPIX® Developer Studio 3.0 | SOFTWARE MANUAL |
| 3. Display Mode | ||||||||
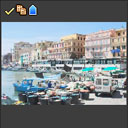
[Thumbnail Mode]
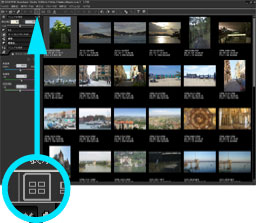 In the "thumbnail mode", the list of photographed images is displayed as a thumbnail view.
For displaying multiple images at high speed, the thumbnail images included in the RAW data file are displayed at first temporarily.
And then the thumbnail images that were developed by SILKYPIX® are displayed instead of the temporary thumbnail images.
When clicking
 button on the toolbar or double-clicking on the target scene on the thumbnail view, the target scene is displayed in the "preview mode".
[Preview Mode]
 Only the target scene is displayed in the "preview mode".
[Combination Mode]
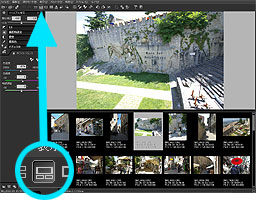 The "combination mode" is a mixed mode of the "thumbnail mode" and "preview mode".
displaying the Thumbnail and Preview mode at the same time., With this mode, you can select the image to process and you can preview the screen nail images.
3.1 Mark and Comment
 You can put a mark to each scene for operation and for management.
3.1.1 Mark
When right-clicking on a thumbnail, the pop-up menu is displayed in which you can put a mark or delete a mark on the scene.
 (1) Delete mark ... You can put this mark as the reservation to delete the scene. The menu command [File(F)]-[Delete reserved scene(E)] moves the marked scenes into the trash box collectively.
 (2) Copy/Move mark ... You can put this mark as the reservation to copy/move the scene. The menu command [File(F)]-[Copy reserved scene(C)] or [Move reserved scene(M)], copies or moves the marked scenes collectively.
 (3) Batch development mark ... You can put this mark as the reservation to develop scenes. The menu command [Development(D)]-[Batch development for reserved scene(V)] develops the marked scenes collectively.
 (4) User mark1 [blue] ... You can put "user mark1 [blue]" as the mark.
 (5) User mark2 [green] ... You can put "user mark2 [green]" as the mark.
 (6) User mark3 [red] ... You can put "user mark3 [red]" as the mark.
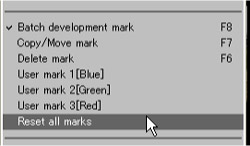 To reset the mark, right-click on the marked thumbnail. Then popup menu is displayed.
[Reset all marks] resets all marks of the target scene.
To reset each mark individually, select each mark on the popup menu.
You can put a maximum of five kinds of marks to one scene.
A set of combination is:
3.1.2 Comment(1) Delete mark ... You can put this mark as the reservation to delete the scene. The menu command [File(F)]-[Delete reserved scene(E)] moves the marked scenes into the trash box collectively.(2) Copy/Move mark ... You can put this mark as the reservation to copy/move the scene. The menu command [File(F)]-[Copy reserved scene(C)] or [Move reserved scene(M)], copies or moves the marked scenes collectively.(3) Batch development mark ... You can put this mark as the reservation to develop scenes. The menu command [Development(D)]-[Batch development for reserved scene(V)] develops the marked scenes collectively. (4) User mark1 [blue] ... You can put "user mark1 [blue]" as the mark.(5) User mark2 [green] ... You can put "user mark2 [green]" as the mark.(6) User mark3 [red] ... You can put "user mark3 [red]" as the mark.To reset the mark, right-click on the marked thumbnail. Then popup menu is displayed.[Reset all marks] resets all marks of the target scene.
To reset each mark individually, select each mark on the popup menu.
You can put a maximum of five kinds of marks to one scene.
A set of combination is:
1) Either of "Delete mark" or "Copy/Move mark"
2) Batch development mark
3) User mark1 [blue]
4) User mark2 [green]
5) User mark3 [red]
2) Batch development mark
3) User mark1 [blue]
4) User mark2 [green]
5) User mark3 [red]
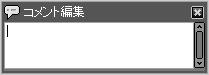 You can place a comment on each scene.
This "comment" is recorded into the Exif information that is developed by SILKYPIX®.
When entering a line feed, please use [CTRL]+[ENTER] key.
3.2 Outline Preview
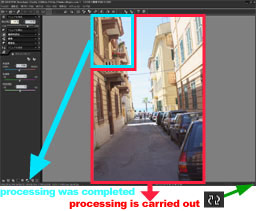
The "preview image" which is displayed in the "Preview mode" or "Combination mode", is processed by two methods in parallel.
One is "Outline Preview" method for displaying the image as quick as possible, and the other is "Formal Development Preview" method for displaying the image as the actual developed image.
At first, "Outline Preview" is displayed quickly. And "Formal Development" begins processing in parallel with the "Outline Preview", it automatically and sequentially replaces each block of the displayed image of which processing has been completed.
In the "Outline Preview", only the outline processing which is shown below is performed to speed up.
(1) It processes partially culled RAW data according to the display size, and executes simple demosaic process. Therefore, there are sometimes some jaggy and false colors around the outline.
(In the "Formal Development", it processes entire RAW data, and executes complete demosaic process and false color control.)
(2) It does not process noise reduction, false color control, sharpness, and other frequency surface filter processing. Therefore, when you modify the parameter "sharpness", "noise reduction", "demosaic sharp", "resolution plus", or "false color ctrl.", the "preview image" will not be updated during "Outline Preview".
(In the "Formal Development", it processes all filters and the effect of the modified parameter is reflected on the display.)
It processes data as well as the "Formal Development" except for the above description. Therefore, "exposure bias", "white balance", "tone", and "saturation" is reflected also in the "Outline Preview".
3.3 Formal Development Preview
 At first, "Outline Preview" is displayed quickly. And "Formal Development" begins processing the data in parallel, it automatically and sequentially replaces each block of the displayed image of which processing has been completed.
Therefore, until "Formal Development" has been completed, two types of "preview images" are intermingled.
While the
 mark is displayed at the right end of the statusbar, it indicates that the "Formal Development" is still under operation and there still remains the result of "Outline Preview".
When "Formal Development" is completed, the
mark disappears and it indicates that the whole "preview image" has been replaced to "Formal Development Preview". Then you can check the final development result on the screen.If you check 'Make operation comfortable by reducing the load' on the display setting dialog, "Formal Development Preview" is not displayed when displaying preview image smaller than 100%. And the parameter adjustment becomes able to be lightly done.
It provides you to reduce the memory cunsumption and the load of CPU when updating a preview image.
This setting is effective for the PC that has few built-in memories (less than roughly 1GB) or a notebook PC. Please refter to '9.2.5 Preview Mode'.
3.4 Changing Display Magnification of Preview

In the "Preview mode" or "Combination mode", you can change display magnification by clicking [Operation mode] button on the toolbar.
Use [Whole display(F)] to display the entire picture in the display area. Use the [100%(0)] to display an picture on which one dot of the developed image corresponds to one dot on the actual screen. In addition, you can select [25%(1)], [50%(2)], [200%(5)], and [400%(7)].
Use [Whole display(F)] to display the entire picture in the display area. Use the [100%(0)] to display an picture on which one dot of the developed image corresponds to one dot on the actual screen. In addition, you can select [25%(1)], [50%(2)], [200%(5)], and [400%(7)].
3.5 Mouse Operation on Preview
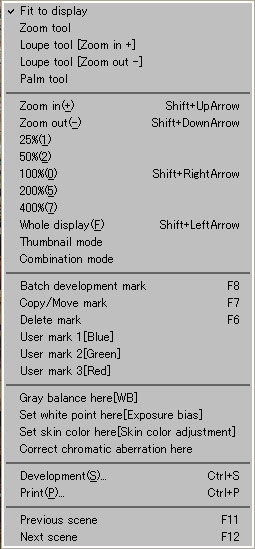 In the "Preview mode" or "Combination mode", when you right-click on the preview area, the pop-up menu is displayed by which you can change operation mode or display magnification.
The operation of the left mouse button on the preview area is determined by the mouse operation mode (tool). The mouse operation mode contains [Fitted display], [Zoom tool], [Loupe tool [Zoom in(+)]], [Loupe tool [Zoom out(-)]] and [Palm tool].
(1) Fitted Display
In this mode, the entire scene is displayed so as to fit the scene to the preview window. When resizing the window, its display magnification changes automatically according to the window size.
When the display magnification changes, the "zoom tool" is selected automatically.
In this mode, you can execute the following mouse operation
(2) Zoom ToolWhen the display magnification changes, the "zoom tool" is selected automatically.
In this mode, you can execute the following mouse operation
| Left Double-click | ... | Display magnification becomes 100% and the "zoom tool" is selected |
| [SHIFT] + Left-Drag | ... | The "zoom tool" is selected and you can change display magnification continuously. |

The zoom tool performs a convenient mouse operation mode that can enlarge a portion of a picture instantly reduce the picture to display the whole picture, and change it to any size.
We strongly recommend you to master the operation since it is a convenient mode that can change displayed location, and enlarge or reduce the picture quickly.
(3) Loupe Tool [Zoom In +]We strongly recommend you to master the operation since it is a convenient mode that can change displayed location, and enlarge or reduce the picture quickly.
| Left-Drag | ... | You can grab and move a picture (panning operation). |
| Left Double-Click | ... | When display magnification is at 100%, the magnification is changed so that the whole image fits on the window (full display). When the display magnification is at other than 100%, the magnification is returned to 100% at which developed pixels are the same as those on the window. Thus, only by left double-clicking, you can switch a magnification value between full display and 100%. It's very convenient function. |
| [SHIFT] + Left-Drag | ... | You can change display magnification continuously, with the center of changing being at the drag-starting point. You can instantly enlarge or reduce the portion when you want to check in detail. This is also convenient. |

The "loupe tool [zoom in(+)]" performs a convenient mouse operation mode that can enlarge the image, with the center of enlargement being at the clicking point.
Since this mouse operation has been adopted by a lot of other software, it appears familiar to many users. Please use it fully.
When you operate this tool while pressing the [ALT] key, [zoom in(+)] does not work but [zoom out(-)] works.
(4) Loupe Tool [Zoom Out -]Since this mouse operation has been adopted by a lot of other software, it appears familiar to many users. Please use it fully.
When you operate this tool while pressing the [ALT] key, [zoom in(+)] does not work but [zoom out(-)] works.
| Left-Click | ... | Zoom In |
| [ALT] + Left-Click | ... | Zoom Out |

The "loupe tool [zoom out(-)]" performs a convenient mouse operation mode that can reduce the image with the center of reduction being at the clicking point.
Since this mouse operation has been adopted by a lot of other software, it appears familiar to many users. Please use it fully.
When you operate this tool while pressing the [ALT] key, [zoom out(-)] does not work but [zoom in(+)] works.
(5) Palm ToolSince this mouse operation has been adopted by a lot of other software, it appears familiar to many users. Please use it fully.
When you operate this tool while pressing the [ALT] key, [zoom out(-)] does not work but [zoom in(+)] works.
| Left-Click | ... | Zoom Out |
| [ALT] + Left-Click | ... | Zoom In |

The palm tool performs the mouse operation mode that can grab and move a picture (panning operation). This operation similar to the mouse operation mode adopted by many other software.
In addition, when you click on a picture while pressing the [CTRL] key, the picture size is enlarged with the center of enlargement being at the clicking point.
When you click on a picture while pressing the Alt key, the picture size is reduced with the center of reduction being at the clicking point.
| Left-Drag | ... | You can grab and move a picture (panning operation). |
| [CTRL] + Left-Click | ... | Zoom In |
| [ALT] + Left Click | ... | Zoom Out |
3.6 Switching to Previous/Next Scene
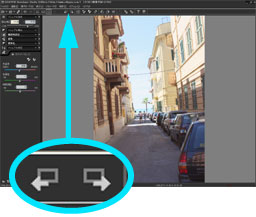 If there are some scenes to be selected, click the
  button to switch to the previous scene, or click the
  button to switch to the next scene.
 3.7 Rotating Images
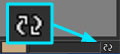
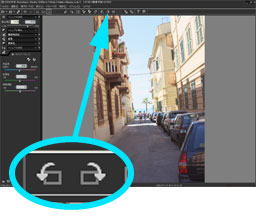 This function rotates the selected scenes.
When you click the
 button, the scene rotates 90 degrees counterclockwise (-90 degrees), and when you click the
  button, it rotates 90 degree clockwise (+90 degrees).
3.8 Thumbnail Operation
In the "Thumbnail mode" or "Combination mode", you can select multiple scenes simultaneously and execute a batch operation for the selected scenes.
3.8.1 Selecting Multiple Scenes
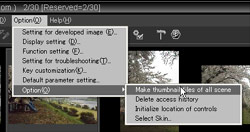 In the "Thumbnail mode" or "Combination mode", the menu command [Option(O)]-[Option(O)]-[Make thumbnail files of all scenes] remakes the thumbnail of all scenes.
Once this operation has been completed, you can copy both the original "RAW" data file and their thumbnail files onto media such as CD/DVD. When you browse this media by SILKYPIX®, you can see the thumbnail view quickly.
* Please refer to '8.4 Save Parameter and Thumbnail into CD/DVD'.
3.8.1 Selecting Multiple Scenes
When you left-click on a scene while pressing the [CTRL] key, you can select the scene keeping other scene selected. If you repeat this operation, you can select multiple arbitrary scenes.
When you left-click on a scene while pressing the [SHIFT] key, you can select the scenes together from the clicked scene to other selected scene.
When you press the [CTRL] and [A] keys at the same time, or click the menu command [Edit(E)]-[Select all scenes], you can select all the scenes on the window.
You can change the selected scene by using the arrow key.
* While multiple scenes are selected, you cannot change the parameter or switch to the preview mode.
3.8.2 Operation for Multiple ScenesWhen you left-click on a scene while pressing the [SHIFT] key, you can select the scenes together from the clicked scene to other selected scene.
When you press the [CTRL] and [A] keys at the same time, or click the menu command [Edit(E)]-[Select all scenes], you can select all the scenes on the window.
You can change the selected scene by using the arrow key.
* While multiple scenes are selected, you cannot change the parameter or switch to the preview mode.
For the multiple selected scenes, you can use the context menu operation by right-clicking.
The operations for the multiple selected scenes are "Rotate images", "Apply taste", "Paste/Load parameter", "Batch development", "Print", "File operation" and so on.
3.8.3 Making Thumbnail Files of All ScenesThe operations for the multiple selected scenes are "Rotate images", "Apply taste", "Paste/Load parameter", "Batch development", "Print", "File operation" and so on.
In the "Thumbnail mode" or "Combination mode", the menu command [Option(O)]-[Option(O)]-[Make thumbnail files of all scenes] remakes the thumbnail of all scenes.Once this operation has been completed, you can copy both the original "RAW" data file and their thumbnail files onto media such as CD/DVD. When you browse this media by SILKYPIX®, you can see the thumbnail view quickly.
* Please refer to '8.4 Save Parameter and Thumbnail into CD/DVD'.
3.9 Selecting scenes for operation
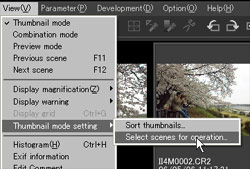 This function allows you to select some of scenes for operation, which are scenes that are selected in advance or scenes with a mark. When you use this function, the view mode is changed to "Combination mode" automatically.
To reset this function, select the command [View]-[Set thumbnail]-[Select Scenes for Operation], and display the "Select scenes for operation" dialog, then click [Reset] button on the dialog.
In the "Selected scene" mode, only the selected scene can be operated. The other scenes are not displayed and you cannot operate them (development, print, file operation and etc.).
When switching to a view mode other than the combination mode, or changing the target scenes for operation by "open file", "open folder" or other commands, the "selected scene" mode is automatically released.
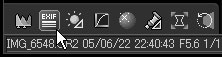
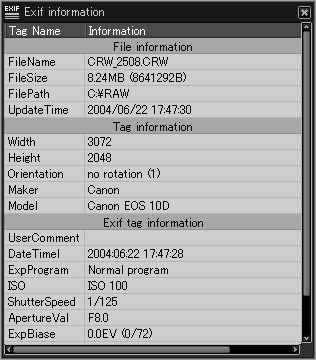
3.10 Displaying EXIF Information
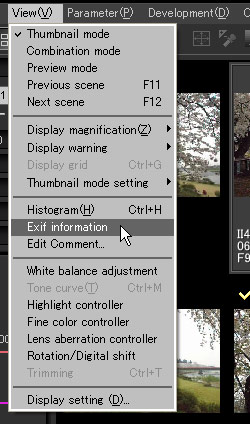 This function displays the Exif information on the selected scene.
 Selecting the menu command [View(V)]-[Exif information] or clicking the EXIF Information button displays the "Exif information" sub-control.
3.11 Grid Display
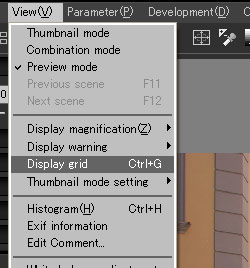 You can display the grid on the preview image in the "Preview mode" or "Combination mode".
Selecting the menu command [View(V)]-[Display grid] turns the grid on or off.
3.11.1 Moving Grid Position
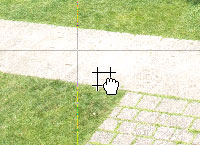 On the Preview window, you can grab and move the grid by the [CTRL] key + drag operation. In addition, the [CTLR] key + left-double-clicking reset the grid to the initial position.
 While displaying the grid, the "Grid setting" dialog appears in the default setting.
You can configure the interval and position of the grid on the dialog, and reset the grid to the initial position, too.
(1) Grid interval ... Use the slider to adjust the grid intervals.
(2) Move grid ... When you click the
 icon, the operation mode is changed to the "moving grid" mode and the mouse cursor is changed to
  . You can grab and move the grid by dragging. Once you perform the operation in the moving grid mode, the operation mode is returned to the previous mode automatically.
(3) Initialize grid position ... When you click the
 icon, the grid position is initialized. The grid interval is not changed by this operation. This feature is valid only in a status where a grid position is customized.
3.12 Arranging "Parameter control" and Sub-controls
"Parameter control" and sub-controls can be arranged as floating windows.
When you drag the floating window and arrange its position with other windows existing nearby, this function automatically aligns these floating windows side by side.
The automatically aligned floating windows can be moved together as a group.
Each floating window in the group follows its left or upper window. Therefore, to move them together as a group, please drag the most upper left window.
The [CTRL] + dragging allows you to move each floating window individually if you do not want to move them as a group.
* Please refer to the '9.8 Customize Control Location'.
3.13 Switching Floating Sub-control Display
This function allows you to show or hide all of the floating sub-controls at the same time.
It is the purpose of this function to hide all sub-controls temporarily when the preview display or the thumbnail display is obstructed by many sub-controls.
You can use this function only by the short cut key, which is assigned to F9 in the default setting.
After you hide all sub-controls with this function, if you show sub-controls again by using another ways, you will not be able to resume display by this function.
3.14 Sorting Thumbnail
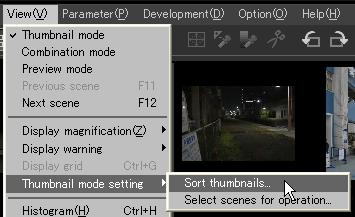
You can specify the display order of the thumbnail. Using the menu command [View(V)-[Thumbnail mode setting]-[Sort thumbnails] or clicking the [Sort thumbnail] button on the "Display setting" dialog.
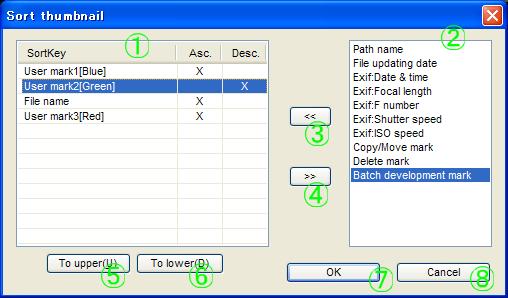
[Control description]
(1) Sorting method
File name
EXIF: Focal length
(1) Sorting method
You can specify the order of the sorting key on this list. The sorting key is applied in turn from top of the list.
And you can specify whether ascending order or descending order to each sorting key.
For example in the figure, thumbnails will be sorted by the following priority.
1. User mark 1[Blue] was put.
2. User mark 2[Green] was not put.
3. Filename by ascending order
4. User mark 3[Red] was put.
(2) Unused sorting key listAnd you can specify whether ascending order or descending order to each sorting key.
For example in the figure, thumbnails will be sorted by the following priority.
1. User mark 1[Blue] was put.
2. User mark 2[Green] was not put.
3. Filename by ascending order
4. User mark 3[Red] was put.
There are the sorting keys on the list, which are not used for sorting.
When selecting one key on the list and clicking the (3) button, you can add the key to the bottom of the list of (1).
(3) [Add sort key] buttonWhen selecting one key on the list and clicking the (3) button, you can add the key to the bottom of the list of (1).
When clicking this button, the sort key selected on the (2) list will be added to the bottom of the list of (1).
For example in the figure, "Batch development mark" will be added to the bottom of the sorting key list.
(4) [Remove sort key] buttonFor example in the figure, "Batch development mark" will be added to the bottom of the sorting key list.
When clicking this button, the sort key selected on the (1) list will be removed.
For example in the figure, "User mark 2[Green]" will be removed from the sorting key list and will be returned to the (2) list.
(5) [To upper] buttonFor example in the figure, "User mark 2[Green]" will be removed from the sorting key list and will be returned to the (2) list.
When clicking this button, the sort key selected on the (1) list will be moved upper of the list..
For example in the figure, "User mark 2[Green]" will be moved above "User mark 1[Blue]".
(6) [To lower] buttonFor example in the figure, "User mark 2[Green]" will be moved above "User mark 1[Blue]".
When clicking this button, the sort key selected on the (1) list will be moved lower of the list..
For example in the figure, "User mark 2[Green]" will be moved under "Filename".
(7) [OK] buttonFor example in the figure, "User mark 2[Green]" will be moved under "Filename".
It determins the sorting method which is specified in this dialog.
And current thumbnail will be re-sorted with this method.
(8) [Cancel] buttonAnd current thumbnail will be re-sorted with this method.
Cancel the operation in this dialog.
[Order of each key when ascending order is checked]File name
Ascending order of file names which do not include folder name.
Path nameAscending order of full path names which include folder name.
File updating dateOld order of the file updating date and time.
EXIF: Date & timeEXIF: Focal length
Short order of the "Focal length" of EXIF information.
EXIF: F numberFast order of the "F number" of EXIF information.
EXIF: Shutter speedFast order of the "Shutter speed" of EXIF information.
EXIF: ISO speedFast order of the "ISO speed rate" of EXIF information.
Copy/Move markThe order which has a Copy/Move mark.
Delete markThe order which has a Delete mark.
Batch development markThe order which has a Batch development mark.
User mark 1[Blue]The order which has a User mark 1[Blue] mark.
User mark 2[Green]The order which has a User mark 2[Green] mark.
User mark 3[Red]The order which has a User mark 3[Red] mark.