| SILKYPIX® Developer Studio 3.0 | SOFTWARE MANUAL |
| 6. Useful Functions for Adjustment | ||||||||
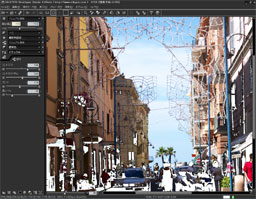
6.1 Highlight/Shadow/Outside of Color Gamut Warnings
This software has warning functions to support the parameter adjustment.
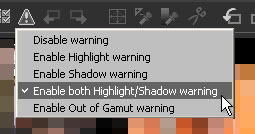
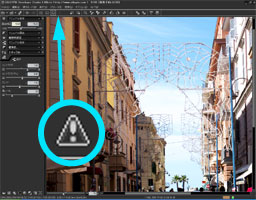 When you click the
  button on the toolbar, you can enable each warning.
A warning will be displayed blinking on the preview image.
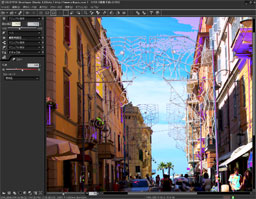
(1) Enable Highlight warning
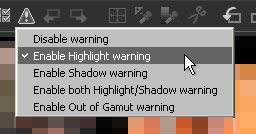 The portion where lightness or color is saturated blinks.
The portion where lightness is saturated blinks in black, and the portion where color is saturated blinks in negative color.
This function is convenient for adjusting "exposure bias" and for adjusting "saturation" of color.
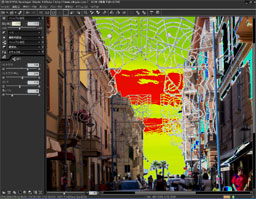
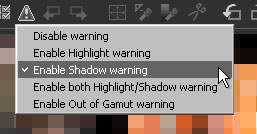
(2) Enable Shadow warning
 The portion where the lightness is underexposed blinks in white.
(3) Enable Both Highlight/Shadow warning
(4) Enable Out of Gamut warning
 This feature gives a warning for the portion where the color is outside of the color gamut. It means that the saturation in this portion is too much higher.
Please refer to '10.1.6 Color Gamut and Adjustment Outside of Gamut'.
You can customize these warning levels. Please refer to '9.3 Function Setting'.
When you click the button on the toolbar, you can enable each warning.A warning will be displayed blinking on the preview image.
(1) Enable Highlight warning
The portion where lightness or color is saturated blinks.The portion where lightness is saturated blinks in black, and the portion where color is saturated blinks in negative color.
This function is convenient for adjusting "exposure bias" and for adjusting "saturation" of color.
The portion where the lightness is underexposed blinks in white.(4) Enable Out of Gamut warning
 This feature gives both the
 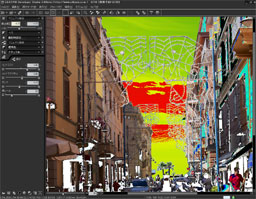 This feature gives a warning for the portion where the color is outside of the color gamut. It means that the saturation in this portion is too much higher.
Please refer to '10.1.6 Color Gamut and Adjustment Outside of Gamut'.
6.2 Histogram
The menu command [View(V)]-[Histogram(H)] displays the "Histogram" sub-control.

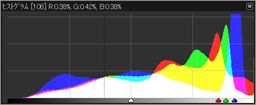 "Histogram" displays a brightness distribution on a picture. You can check which part of the picture
has what kind of brightness. The horizontal axis means brightness (0-255), and the more it goes to the right side, the more the brightness increases. The vertical axis means the number of pixels that corresponds to its brightness. R,G, and B are displayed in each color on a graph, and the place where these overlap is displayed in additive color mixture.
6.2.1 Display of Histogram
"Histogram" displays a brightness distribution on a picture. You can check which part of the picturehas what kind of brightness. The horizontal axis means brightness (0-255), and the more it goes to the right side, the more the brightness increases. The vertical axis means the number of pixels that corresponds to its brightness. R,G, and B are displayed in each color on a graph, and the place where these overlap is displayed in additive color mixture.
6.2.1 Display of Histogram
The arrow displayed on the gray scale at the bottom has the following meaning.
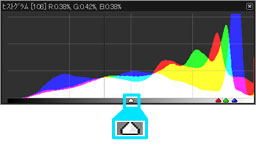 (1) Contrast center
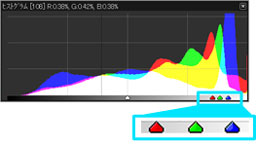 (2) RGB marker
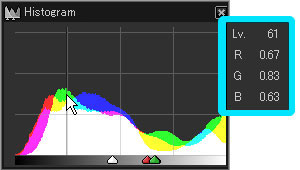 In addition, by clicking a graph, you can see each brightness statistic of the RGB.
(1) Contrast center(2) RGB markerThis displays RGB value at the point where the mouse cursor is on. The value corresponds to the brightness position on a graph.
It is very effective to check where a color of a point on a screen is distributed on a histogram.
It is very effective to check where a color of a point on a screen is distributed on a histogram.
In addition, by clicking a graph, you can see each brightness statistic of the RGB.6.3 Shortcut Keys and Function Keys
Shortcut keys and Function keys that you can use in SILKYPIX® are shown below.
*These are default settings, and you can customize the keys. Please refer to '9.5 Key Customization'.
6.3.1 Operating Menu
*These are default settings, and you can customize the keys. Please refer to '9.5 Key Customization'.
6.3.1 Operating Menu
6.3.1.1 File
6.3.1.2 Edit
6.3.1.3 Operation
6.3.1.4 Display
6.3.1.5 Parameter
6.3.1.6 Development
6.3.1.7 Help
6.3.2 Using Context Menu| Open file | Ctrl + O |
| Open folder | Ctrl + F |
| Development | Ctrl + S |
| Ctrl + P |
| Undo | Ctrl + Z |
| Redo | Ctrl + Y |
| Select all scene | Ctrl + A |
| Copy development parameter | Ctrl + C |
| Paste development parameter | Ctrl + V |
| Initialize development parameter | Ctrl + X |
| Rotate CW (+90 degree) | Ctrl + R |
| Rotate CW (-90 degree) | Ctrl + E |
| Exposure bias tool | F2 |
| Gray balance tool | F3 |
| Skin development tool | F4 |
| Previous scene | F11 |
| Next scene | F12 |
| Switching display floating/control | F9 |
| Display grid | Ctrl + G |
| Histogram | Ctrl + H |
| Tone curve | Ctrl + M |
| Trimming setting | Ctrl + T |
| Copy development parameter | Ctrl + C |
| Paste development parameter | Ctrl + V |
| Initialize development parameter | Ctrl + X |
| Rotate CW (+90 degree) | Ctrl + R |
| Rotate CW (-90 degree) | Ctrl + E |
| Development | Ctrl + S |
| Help | F1 |
6.3.2.1 Display Magnification
6.3.2.2 Mark
6.3.2.3 Development
6.3.2.4 Change of Scene
6.3.3 Shortcut Key List| Zoom in | Shift + Up key |
| Zoom out | Shift + Down key |
| 100% | Shift + Right key |
| Whole display | Shift + left key |
| Delete Mark | F6 |
| Copy/Move-mark | F7 |
| Reserve | F8 |
| Development | Ctrl + S |
| Previous scene | F11 |
| Next scene | F12 |
| Thumbnail Mode | Thumbnail Mode | Combination Mode | Combination Mode | Preview Mode | |||
| Key | Operation | Single selection | Multiple selection | Single selection | Multiple selection | Single selection | Besides Raw Date |
| [F1] | Help | * | * | * | * | * | * |
| [F2] | Exposure bias tools | --- | --- | * | * | * | --- |
| [F3] | Gray balance tool | --- | --- | * | * | * | --- |
| [F4] | Skin development tool | --- | --- | * | * | * | --- |
| [F5] | Preview update | * | --- | * | --- | * | --- |
| [F6] | Delete mark | * | * | * | * | * | * |
| [F7] | Copy/Move mark | * | * | * | * | * | * |
| [F8] | Reserve | * | * | * | * | * | --- |
| [F9] | Switching floating control display | * | * | * | * | * | * |
| [F11] | Previous scene | * | --- | * | --- | * | * |
| [F12] | Next scene | * | --- | * | --- | * | * |
| Ctrl+[A] | Select all scenes | * | * | * | * | --- | * |
| Ctrl+[C] | Copy development parameter | * | --- | * | --- | * | --- |
| Ctrl+[E] | Rotate CW (-90) | * | * | * | * | * | * |
| Ctrl+[F] | Open folder | * | * | * | * | * | * |
| Ctrl+[G] | Display grid | --- | --- | * | --- | * | * |
| Ctrl+[H] | Histogram | * | * | * | * | * | * |
| Ctrl+[M] | Tone curve | * | * | * | * | * | * |
| Ctrl+[O] | Open file | * | * | * | * | * | * |
| Ctrl+[P] | * | * | * | * | * | * | |
| Ctrl+[R] | Rotate CW (+90) | * | * | * | * | * | * |
| Ctrl+[S] | Development | * | --- | * | --- | * | --- |
| Ctrl+[T] | Trimming setting | * | --- | * | --- | * | --- |
| Ctrl+[V] | Paste development parameter | * | * | * | * | * | --- |
| Ctrl+[W] | Switch display mode | * | * | * | --- | * | * |
| Ctrl+[X] | Initialize development parameter | * | * | * | * | * | --- |
| Ctrl+[Y] | Redo | * | --- | * | --- | * | --- |
| Ctrl+[Z] | Undo | * | --- | * | --- | * | --- |
| Ctrl+[0] | Display magnification:Whole display | --- | --- | * | --- | * | * |
| Alt+Ctrl+[0] | Display magnification:100% | --- | --- | * | --- | * | * |
| Ctrl+[+] | Display magnification:Zoom in | --- | --- | * | --- | * | * |
| Ctrl+[-] | Display magnification:Zoom out | --- | --- | * | --- | * | * |
| Shift+[Up key] | Display magnification:Zoom in | --- | --- | * | --- | * | * |
| Shift+[Down key] | Display magnification:Zoom out | --- | --- | * | --- | * | * |
| Shift+[Right key] | Display magnification:100% | --- | --- | * | --- | * | * |
| Shift+[left key] | Display magnification:Whole display | --- | --- | * | --- | * | * |
| [PageUp] | ScrollUp | * | * | * | * | * | * |
| [PageDown] | ScrollDown | * | * | * | * | * | * |
| [Home] | Scroll to head | * | * | * | * | --- | * |
| [End] | Scroll to end | * | * | * | * | --- | * |
6.4 How to Use Cloakroom
In the "Taste/parameter" sub-control, there are convenient ways to register and temporarily past and save the development parameters.
6.4.1 Copy Development Parameter
6.4.1 Copy Development Parameter
A basic method of operation is described in "7.4 Initialize Development Parameter" and "7.5 Cloakroom of Development Parameter". This function is used to apply the development parameters, which are adjusted and set for one scene, to the other scene.
This is the same function as copying and pasting the development function parameters. This function can apply the development parameters to four scenes simultaneously.
6.4.2 Save Development Parameter TemporarilyThis is the same function as copying and pasting the development function parameters. This function can apply the development parameters to four scenes simultaneously.
The development parameters are determined after having finished adjustment. But it is sometimes necessary to temporarily record the development parameters on the way of adjustment. Because if you have the temporary parameters, you can restart to adjust the parameters from the point where you lost the way, not from the beginning.
6.4.3 Compare Development ParameterThe [Temporary registration] can save not only the development parameters but also developed images, temporarily. When using this feature, you can compare two developed parameters.
The two parameters are temporarily registered And then you can compare the image switching the parameter. We recommend you to use the this function in the Zoom tool mode. Then you can enlarge the portions of the whole image and compare them easily.
*1 When using this function, you need to set the "Maximize Cache" mode. Please refer to '9.3.3.1 Enable Cache Preview' for the setting. Please understand that using this function will maximize usage of memory.