| SILKYPIX® Developer Studio 3.0 | SOFTWARE MANUAL |
| 7. Development Parameter Operation | ||||||||
7.1 Copy Development Parameter
You can copy the development parameter of the selected scene to other scenes thru the paste buffer.
At first, you should select a scene to be copied and copy the development parameter to the paste buffer by the menu command [Parameter(P)] -[Copy development parameter(C)] or by the short cut key [CTRL]+C.
Next, you can paste the development parameter from the paste buffer to the selected scenes.
There are two methods to paste the development parameter, 1) paste the entire parameter, or 2) paste the partial parameter by the unit of the parameter category.
7.1.1 Paste Development Parameter
 This function allows you to paste the part of the development parameters or paste the special parameters, "Trimming are" or "Comment", which is not a development parameter.
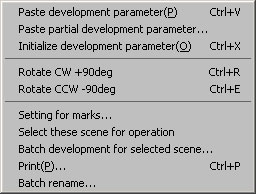
The menu command [Parameter(P)]-[Paste development parameter(P)] displays the "Paste part of the development parameters" dialog.
You can select the parameter category to paste on this dialog, and clicking [Execute] pastes the selected part of the parameters to the target scenes.
* "Trimming area" and "Comment" cannot be pasted to by the "Paste Development Parameter" function.
7.1.2.1 Paste Trimming Area
At first, you should select a scene to be copied and copy the development parameter to the paste buffer by the menu command [Parameter(P)] -[Copy development parameter(C)] or by the short cut key [CTRL]+C.
Next, you can paste the development parameter from the paste buffer to the selected scenes.
There are two methods to paste the development parameter, 1) paste the entire parameter, or 2) paste the partial parameter by the unit of the parameter category.
7.1.1 Paste Development Parameter
By the menu command [Parameter(P)]-[Paste development parameter(P)] or the short cut key [CTRL]+V, you can paste the entire development parameter from the paste buffer to the selected scenes.
7.1.2 Paste Partial Development ParameterThis function allows you to paste the part of the development parameters or paste the special parameters, "Trimming are" or "Comment", which is not a development parameter.The menu command [Parameter(P)]-[Paste development parameter(P)] displays the "Paste part of the development parameters" dialog.
You can select the parameter category to paste on this dialog, and clicking [Execute] pastes the selected part of the parameters to the target scenes.
* "Trimming area" and "Comment" cannot be pasted to by the "Paste Development Parameter" function.
7.1.2.1 Paste Trimming Area
When pasting the "Trimming area" by the "Paste Partial Development Parameter" function, "trimming area" is appropriately converted according to the image orientation or the development parameter.
When the orientation of the image is different, "trim area" is turned 90 degrees.
When the image is transformed by "Rotation/Digital shift" function, the "trimming area" is relocated to become identical the relative position in the default valid area.
This conversion adjust only a position and an orientation, but the size of the trimming area is not changed. The extension condition of the trimming area is pasted just as it is.
When pasting the parameter which does not specify a trimming area, the "trimming area" of the target scene will be initialized.
When the trimming area is converted from the scene which is taken by other digital camera or the scene which the trimming area is extended, it sometimes exceeds the range which it is possible for the target scene. In such a case, the pasting of the trimming area isn't done.
7.2 Save Development Parameter
 By clicking the [Save development parameter] button on the "Taste/Parameter" sub-control, you can save the development parameter of the selected scene.
7.3 Load Development Parameter
 By clicking the [Load development parameter] button on the "Taste/Parameter" sub-control, you can load the development parameter to the selected scenes.
You can load the development parameters from the saved parameter file (.spd) by the "Save Development Parameter" function, or from the developed image file (.jpg/.tif) by SILKYPIX®.
If you select multiple scenes in the "Thumbnail" mode or the "Combination" mode, you can load the development parameter to all of the selected scenes.
* By SILKYPIX®, the development parameter is embedded into the developed image file (.jpg/.tif). And you can load the development parameter from this developed image file.
For example, how to operate and use the features are noted below.
1. You must save the developed image file (.jpg/.tif) with EXIF information to embed the development parameter into the file.
2. Please select the target scenes to load.
* If you select multiple scenes, you can load the development parameter to all of the selected scenes.
3. Display "Taste/Parameter" sub-control by clicking the [Taste/Parameter] button.
4. Click the [Load development parameter] button on the "Taste/Parameter" sub-control.
5. The "Open file" dialog is displayed.
6. Select "Developed image (*.jpg, *.tif)" for "Files of type" on the dialog.
7. Select the source JPEG/TIFF file and then Click the [Open(O)] button.
8. The development parameter will be loaded to all of the selected scenes.
7.4 Initialize Development Parameter
 By clicking the [Initialize development parameter] button on the "Taste/Parameter" sub-control, you can initialize the development parameter of the selected scenes.
If you select multiple scenes in the "Thumbnail" mode or the "Combination" mode, you can initialize the development parameter of all of the selected scenes.
* After updating SILKYPIX®, sometimes you may not use the new function without initialization of the development parameter. Please use this function in this case.
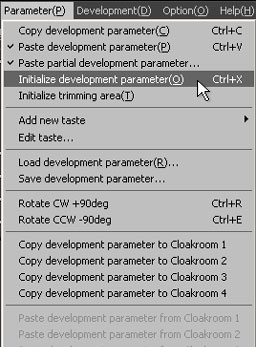 You can execute this function by the menu command [Parameter(P)] -[Initialize development parameter(O)], too.
7.5 Cloakroom of Development Parameter
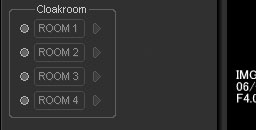 In the "Taste/Parameter" sub-control, you can save the development parameter in the cloakroom temporarily, and you can also restore the development parameter from the cloakroom.
You can utilize this feature to save the development parameter temporarily during operating one scene, or to copy the development parameter from one scene to other scenes.
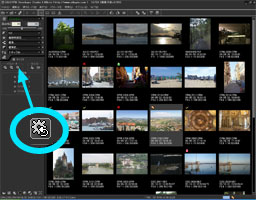
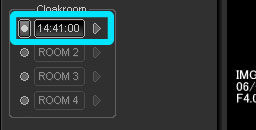 Click the
  button at the left side of the cloakroom to save the development parameter of the selected scene. Then a subscription time is displayed at the cloakroom and it becomes active.
Click the active cloakroom to paste the development parameter to the selected scenes.
This feature can be utilized for the comparison of two development parameters, too.
(If [Maximize the use of Cache] is checked on the "Function setting" dialog, you can switch the preview image quickly with using the cached image.)
* The cloakroom is valid until you close SILKYPIX®, and the cloakroom will be cleared. If you would like to save the development parameters continuously, please use the [Save development parameter] function.
7.6 Set Development Parameter to Multiple Scenes
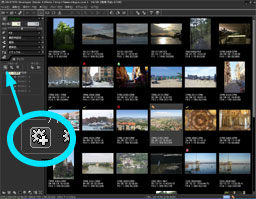
 You can set the development parameter stored in the cloakroom to multiple scenes continuously. Click the
  button at the right side of the cloakroom in the "Thumbnail mode" or the "Combination mode".
 Then the operation mode is changed to continuously paste mode. In this mode, you can set the development parameter to the target scene by clicking on the thumbnail, and you can repeat this action continuously.
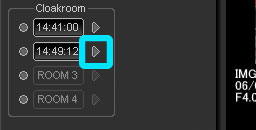 Click the button at the right side of the cloakroom once again to return to the previous mode.
7.7 Operation for Multiple Scenes
 You can use the following operation of development parameter if selecting multiple scenes in the "Thumbnail mode" or "Combination mode".
• Initialize Development Parameter
This function initializes the development parameter of all of the selected scenes.
• Paste Development ParameterThis function sets the development parameter that is in the paste buffer by "Copy Development Parameter" function, to all of the selected scenes.
• Paste Partial Development ParameterThis function allows you to paste the part of the development parameter to all of the selected scenes.
The menu command [Parameter(P)]-[Paste development parameter(P)] displays the "Paste parts of the development parameter" dialog.
You can select the parameter category to paste on this dialog, and clicking [Execute] pastes selected the part of the parameters to the target scenes.
The menu command [Parameter(P)]-[Paste development parameter(P)] displays the "Paste parts of the development parameter" dialog.
You can select the parameter category to paste on this dialog, and clicking [Execute] pastes selected the part of the parameters to the target scenes.
7.8 Select Taste
You can select the development parameter from the list of taste. You can improve efficiency of your work flow by registering the taste that is used frequently.
About "Taste", please refer to '4.1.1 Taste'.
About how to use taste, please refer to '4.1.1.1 Dropdown List for Taste' and '4.1.1.2 Other Dropdown List'.
About "Taste", please refer to '4.1.1 Taste'.
About how to use taste, please refer to '4.1.1.1 Dropdown List for Taste' and '4.1.1.2 Other Dropdown List'.
7.9 Add Taste
You can register the development parameter of the selected scene as "taste". You can improve efficiency of your work flow by registering the taste that is used frequently.
You can register in the taste section the current selected scene's development parameters. The registered taste parameters that you use often can be moved up toward to top to make your operation more efficient.
About how to add taste, Please refer to '4.1.1.3 Customizing or Adding Taste'.
You can register in the taste section the current selected scene's development parameters. The registered taste parameters that you use often can be moved up toward to top to make your operation more efficient.
About how to add taste, Please refer to '4.1.1.3 Customizing or Adding Taste'.
7.10 Default Parameter Setting
You can register the taste as the default parameter, which was registered to "All parameters" of "Taste category".
For more details, please refer to the '9.6 Default Parameter Setting'.
For more details, please refer to the '9.6 Default Parameter Setting'.