6. Useful Functions for Adjustment
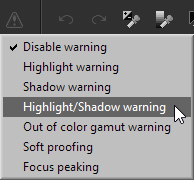
6.1. Display warning
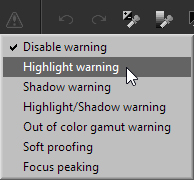
 This software has warning functions to support parameter adjustment.
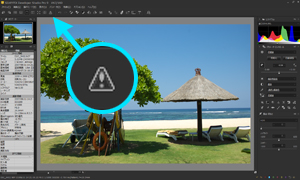
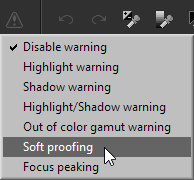
When you click the  button on the toolbar, you can enable each warning.
In addition, if there is a check at [View (V)]-[Display warning]-[Flash warning] in the menu, warning displays will flash on the image in the preview display.
If there is no check the warning display is always displayed.
(Soft proofing is always displayed.)
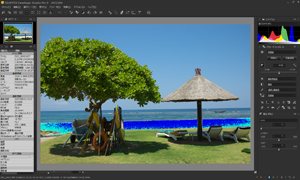
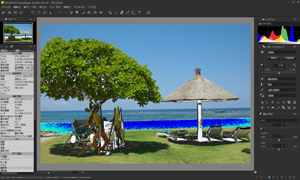
Highlight warning
 The portion where highlight or color is saturated blinks.
The portion where highlight is saturated blinks in black, and the portion where color is saturated blinks in negative color.
This function is convenient for adjusting “exposure bias” and for adjusting “saturation” of color.
Shadow warning
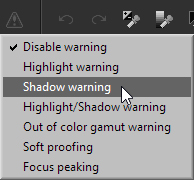 The portion where the shadows are underexposed blinks in white.

Highlight/Shadow warning
 This feature gives both the highlight warning and shadow warning simultaneously.
You can customize these warning levels. Please refer to ‘9.3.1.4. Threshold of highlight warning’ and ‘9.3.1.5. Threshold of shadow warning’.Out of color gamut warning
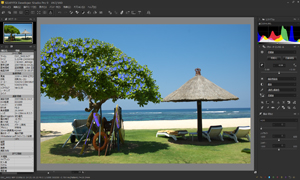
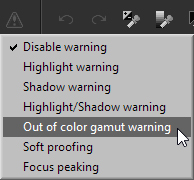 This feature gives a warning for the portion where the color is outside of the color gamut. It means that the saturation in this portion is to high.
Please refer to ‘10.1.3. Color Gamut and Adjustment Outside of Color Gamut’.
Soft proofing
 In this display mode you can check the colors processed and changed for color conversion with the color profile.
When printing on a printer, this considers the characteristics of the print paper and ink and performs color management processing for reproducing colors as faithfully as possible. However, there are limitations to the range of colors that can be faithfully reproduced and colors outside that range and on borders cannot be correctly reproduced.
In addition, there seems to be slight changes in the range of colors that can be reproduced depending on the applicable color profile.
Please use this to check the influence on color management processing on your monitor.
In this display mode, the display effects change depending on the corresponding print color space and matching methods.
However, you cannot check the influence of paper color because this is a simulation of color conversion processing by color profile.
When this warning is selected, the color management sub-control is displayed.
In the color management sub-control, you can set the color management for printing with possible settings in “Enhancing 1” in the “Print” dialog.
Please see “8.5.2. Enhancings 1” for details.
Focus peaking
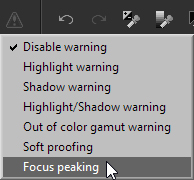 Focus peaking detects portions that meet the focus from adjacent pixels, and displays attached inverted colors (negatives) to that part.
Depending on the photograph, such if it is difficult to distinguish between subject and background, or with single colored subjects, this may not be correctly detected.
Use this function as a standard to confirm if the focus of the photograph matches what you shot.
Please see “9.3.1.6. Set Focus Peaking” concerning changes to areas being detected.
6.2. Histogram
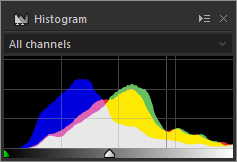 The menu command [View (V)]-[Histogram (H)] displays the “Histogram” sub-control.
Histogram displays a brightness distribution on a picture.
You can check which part of the picture has what level of brightness. The horizontal axis shows brightness (0-255), and the higher the value (right side), the greater the brightness.
The vertical axis shows the number of pixels that corresponds to relevant brightness level. R,G, and B are displayed in each color on a graph, and the place where these overlap it is displayed as an additive color mixture.
6.2.1. Display of Histogram
The arrow displayed on the gray scale at the bottom has the following meaning.
Contrast center
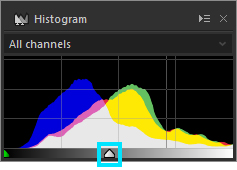 This indicates a contrast center of tone.
RGB marker
 This displays RGB value at the point where the mouse cursor is on. The value corresponds to the brightness position on a graph.
It is very effective to check where a color of a point on a screen is distributed on a histogram.
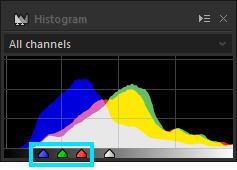
Channel
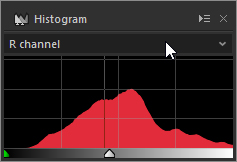 You can display the histogram of any channel of RGB.
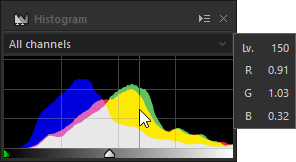 In addition, by clicking a graph, you can see each brightness statistic of the RGB.
Lv is the value given to brightness (0-255) shown on the horizontal axis.
“R”, “G” and “B” are the statistical values for RGB in percentage (%) units.
If the histogram of the image is evenly distributed for each RGB value (Lv value), the value for each statistical value 0-255 will be 1⁄256 = 0.39%.
For normal photographs, most of the area will be in the range of 0.00-2.00, but brightness distribution may be consolidated in a photograph whose subject is almost a single color, such as completely dark photographs and macro shots of flowers.
6.3. Navigator
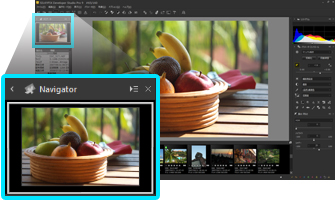 The “Navigator” is a guide display for places displayed on the preview screen for the dedicated thumbnail.
You can change the position of the display by dragging the guide on the “Navigator” in tool modes other than Fitted display, such as Zoom tool, Loupe tool or Palm tool.
In addition, you can expand or shrink the preview with mouse wheel operations on the “Navigator”.
The Navigator is not displayed when in thumbnail mode because this is effective only when in the preview window is displayed.
6.4. Shortcut Keys and Function Keys
Shortcut keys and Function keys that you can use in SILKYPIX JPEG Photography 9 are shown below.
* These are default settings, and you can customize the keys. Please refer to ‘9.4. Shortcut keys settings’.
* When your OS and SILKYPIX use the same shortcut keys, SILKYPIX may not be operated by those. In such case, please change those of your OS or SILKYPIX.
6.4.1. Operating Menu
| (Windows) | (macOS) | |
|---|---|---|
| File | ||
| Open file | Ctrl + O | command + O |
| Develop | Ctrl + S | command + S |
| Ctrl + P | command + P | |
| Edit | ||
| Undo | Ctrl + Z | command + Z |
| Redo | Ctrl + Y | command + Y, shift + command + Z |
| Select all images | Ctrl + A | command + A |
| Copy development parameters | Ctrl + C | command + C |
| Paste development parameters | Ctrl + V | command + V |
| Initialize development parameters | Ctrl + X | command + X |
| Rotate right | Ctrl + R | command + R |
| Rotate left | Ctrl + E | command + E |
| Operation | ||
| Exposure bias tool | F2 | F2 |
| Gray balance tool | F3 | F3 |
| Skin color tool | F4 | F4 |
| Crop tool | Ctrl + T | command + T |
| View | ||
| Previous image | F11 | — |
| Next image | F12 | — |
| Switching display floating/control | F9 | F9 |
| Display grid | Ctrl + G | command + G |
| Folder | Ctrl + F | command + F |
| Histogram | Ctrl + H | — |
| Tone curve | Ctrl + M | command + M |
| Parameter | ||
| Copy development parameters | Ctrl + C | command + C |
| Paste development parameters | Ctrl + V | command + V |
| Initialize development parameters | Ctrl + X | command + X |
| Rotate right | Ctrl + R | command + R |
| Rotate left | Ctrl + E | command + E |
| Paste the latest editing development parameters | Ctrl + L | command + L |
| Development | ||
| Develop | Ctrl + S | command + S |
| Immediately batch develop selected images | F5 | F5 |
| Help | ||
| Open software manual | F1 | F1 |
6.4.2. Using Context Menu
| (Windows) | (macOS) | |
|---|---|---|
| Display Magnification | ||
| Zoom in | Shift + Up key | shift + Up key |
| Zoom out | Shift + Down key | shift + Down key |
| 100% | Shift + Right key | shift + Right key |
| Whole display | Shift + left key | shift + left key |
| Mark | ||
| Delete Mark | F6 | F6 |
| Copy/Move mark | F7 | F7 |
| Develop mark | F8 | F8 |
| Development | ||
| Develop | Ctrl + S | command + S |
| Change of Image | ||
| Previous image | F11 | — |
| Next image | F12 | — |
6.4.3. Shortcut Key List
| (Windows) | (macOS) | Operation | Thumbnail mode | Combination mode | Preview Mode |
|---|---|---|---|---|---|
| Single selection / Multiple selection | Single selection / Multiple selection | Single selection / Not for development | |||
| [F1] | [F1] | Open software manual | * / * | * / * | * / * |
| [F2] | [F2] | Exposure bias tool | * / * | * / * | * / — |
| [F3] | [F3] | Gray balance tool | * / * | * / * | * / — |
| [F4] | [F4] | Skin color tool | * / * | * / * | * / — |
| [F5] | [F5] | Immediately batch develop selected images | * / * | * / * | * / — |
| [F6] | [F6] | Delete mark | * / * | * / * | * / * |
| [F7] | [F7] | Copy/Move mark | * / * | * / * | * / * |
| [F8] | [F8] | Develop mark | * / * | * / * | * / * |
| [F9] | [F9] | Switching display floating/control | * / * | * / * | * / * |
| [F11] | — | Previous image | * / * | * / * | * / * |
| [F12] | — | Next image | * / * | * / * | * / * |
| Ctrl+[A] | command+[A] | Select all images | * / * | * / * | — / * |
| Ctrl+[C] | command+[C] | Copy development parameters | * / * | * / * | * / — |
| Ctrl+[E] | command+[E] | Rotate left | * / * | * / * | * / * |
| Ctrl+[F] | command+[F] | Folder | * / * | * / * | * / * |
| Ctrl+[G] | command+[G] | Display grid | — / — | * / * | * / * |
| Ctrl+[H] | — | Histogram | * / * | * / * | * / * |
| Ctrl+[M] | command+[M] | Tone curve | * / * | * / * | * / * |
| Ctrl+[O] | command+[O] | Open file | * / * | * / * | * / * |
| Ctrl+[P] | command+[P] | * / * | * / * | * / * | |
| Ctrl+[R] | command+[R] | Rotate right | * / * | * / * | * / * |
| Ctrl+[S] | command+[S] | Develop | * / — | * / — | * / — |
| Ctrl+[T] | command+[T] | Crop tool | — / — | * / * | * / — |
| Ctrl+[V] | command+[V] | Paste development parameters | * / * | * / * | * / — |
| Ctrl+[W] | command+[W] | Switch display mode | * / * | * / * | * / * |
| Ctrl+[X] | command+[X] | Initialize development parameters | * / * | * / * | * / — |
| Ctrl+[Y] | command+[Y], shift+command+[Z] | Redo | * / — | * / — | * / — |
| Ctrl+[Z] | command+[Z] | Undo | * / — | * / — | * / — |
| Ctrl+[0] | command+[0] | Display magnification:Whole display | — / — | * / * | * / * |
| Alt+Ctrl+[0] | alt+command+[0] | Display magnification:100% | — / — | * / * | * / * |
| Ctrl+[+] | command+[+] | Display magnification:Zoom in | — / — | * / * | * / * |
| Ctrl+[-] | command+[-] | Display magnification:Zoom out | — / — | * / * | * / * |
| Shift+[Up key] | shift+[Up Key] | Display magnification:Zoom in | — / — | * / * | * / * |
| Shift+[Down key] | shift+[Down key] | Display magnification:Zoom out | — / — | * / * | * / * |
| Shift+[Right key] | shift+[Right key] | Display magnification:100% | — / — | * / * | * / * |
| Shift+[Left key] | shift+[Left key] | Display magnification:Whole display | — / — | * / * | * / * |
| [PageUp] | [page up] | Page up/left on thumbnail window | * / * | * / * | — / — |
| [PageDown] | [page down] | Page down/right on thumbnail window | * / * | * / * | — / — |
| [Home] | [home] | Top/Left edge on thumbnail window | * / * | * / * | — / — |
| [End] | [end] | End/Right edge on thumbnail window | * / * | * / * | — / — |
* This is the default setting. You can change to another key at “9.4. Shortcut keys settings”.
6.5. How to Use Storerooms
In the “Tastes/Parameters” sub-control, there are convenient ways to store and paste the development parameters.
6.5.1. Copy Development Parameter
A basic method of operation is described in “7.5. Copy Development Parameters to Storerooms” and “7.6. Set Development Parameters to Multiple Images”.
This function is used to apply the development parameters, which are adjusted and set for one image, to other images. This is the same function as copying and pasting the development parameters. However, This function can store the four development parameters simultaneously.
6.5.2. Save Development Parameter Temporarily
The development parameters are determined after having finished adjustment. But it is sometimes necessary to temporarily record the development parameters on the way of adjustment. Because if you have the temporary parameters, you can restart to adjust the parameters from the point where you lost the way, not from the beginning.
6.5.3. Compare Development Parameter
The “Storerooms” can save not only the development parameters but also developed images, temporarily. When using this feature, you can compare two developed parameters. (*1)
The two parameters are temporarily registered And then you can compare the image switching the parameter.
We recommend you to use the this function in the “Zoom tool” mode. Then you can enlarge the portions of the whole image and compare them easily.
*1 To utilize this function maximally, you need to set “Standard” or “Maximum” in “Cache settings” on “Function settings” dialog. Please refer to ‘9.3.3.1. Cache settings’ for the setting. Please understand that using this function will maximize usage of memory.