| SILKYPIX® | SOFTWARE MANUAL |
| 5. Development Execution | ||||||||
- 5.1 1-Scene Development
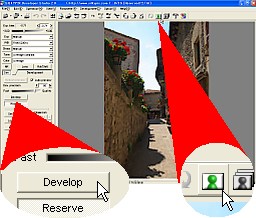 Click on the "Develop" button in the "Dev." tab or the
  button on the tool bar to specify a file name after executing development.
Regarding the file which is outputted here, you can set details at "Setting for developed image" dialog.
5.1.1 Image Pixel Size to Save
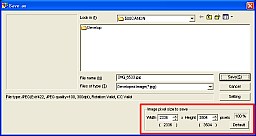 When executing 1-scene development, you can set to save an enlarged or reduced picture by specifying "image pixel size to save."
 Specify a pixel size to save an enlarged or reduced picture.
A picture is enlarged or reduced according to the specified pixel size and saved.
5.1.1.1 Selecting from Image Saving Size History
You can select a saving size from the history including a picture size of the development targeted scene, the previous saving size for development processing, and other development processed scenes.
It is convenient to select from the list when you want to save it with the same saving size as the previous development processed picture or other scenes.
However, the list only shows the saving size that matches the scene to be developed and its aspect size.
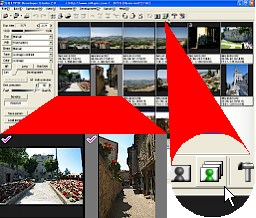 You can execute batch development for the multiple scenes that have been reserved for development in advance. Set the development reservation for multiple scenes, before clicking the
  button (the "Batch development" button).
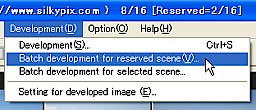 * You can also start the function from [Development(D)] - [Batch development for reserved scene].
 * You can also start the function from [File(F)] - [Batch development for reserved scene].
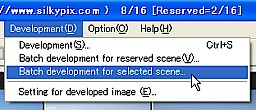 * You can execute batch development of a selected scene in the thumbnail mode from [Development(D)] - [Batch development selected scene].
When you select one scene, it is the only target for development. Batch development of SILKYPIX® develops only the picture that has been selected or reserved among the presently loaded files.
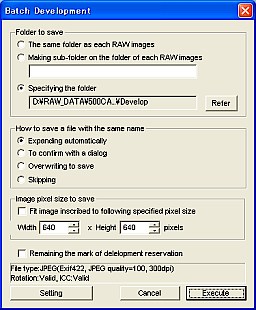 Batch Development
[Batch development] displays "Batch Development" dialog. Specify the folder to save the developed file and the way of development.
5.2.1 Folder to Save
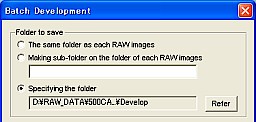 You can select from the following three ways.
The same folder as each RAW images
- You can save a developed picture in the same folder that the selected RAW picture has been saved to.
- You can create a sub-folder under the folder in which the selected RAW picture has been saved and save a developed result picture in that sub-folder.
- You can start the "Select folder" dialog and specify a folder to save by clicking the "Refer" button.
 You can select from the following four ways.
By default, SILKYPIX uses a RAW file base name (a file name without extension) and changes an extension to JPG or TIF for saving.
This section describes how to save files with the same name.
Expanding automatically
- A different file name is created by expanding a base name automatically.
- A dialog for confirmation is displayed.
Decide the file name.
- Overwrite and save files.
- Skip instead of saving files.
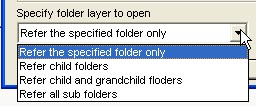 Select the folder in which the reserved scenes that you want to develop exist, to execute a batch development by the same procedure.
 If the scenes that you want to develop exist in multiple folders, you can develop the scenes folder by folder, or if those folders are under one targeted folder, you can select to batch develop the sub folders at the same time.
When it is not necessary to refer all files in the folder, you can drop the multiple files to this software.
In addition, as a higher technique, you can drop multiple RAW files that exist in different folders simultaneously into this software with the Explorer's Find Tool and so forth.
 At executing batch development, specify the image pixel size to save an enlarged or reduced file.
 To save an enlarged or reduced file, specify a pixel size by clicking "Fit image inscribed to following specified pixel size."
A file is saved as a fit image which inscribes to the specified pixel size.
When creating the picture for slide show that is displayed on a particular display etc., you can enter a display size. For example, when you want to display on a VGA display, you can specify 640x480.
By doing so, the file to which the batch development is executed is saved with the size which is inscribed to 640x480. As for slide show, the file will be the suitable size that does not need to be enlarged or reduced when it is displayed.
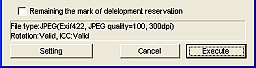 If you check "Remaining the mark of development reservation" checkbox even after development is executed, the mark of development reservation is not cancelled.
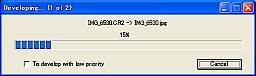 When executing the batch development, use this function to prevent from interfering with the operations of other running program.
 When the batch development is started, the progress dialog (indicating a progress status) as shown in Fig. is displayed.
Check "To develop with low priority" box in this dialog.
By lowering priority of the next scene from the clicked one and executing the development process, other program can run comfortably while the batch development is also running.
[---> Priority]
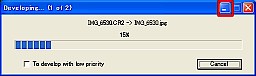 When executing the batch development, use this function to minimize a window.
 By clicking the minimize button displayed in the progress dialog (indicating a progress status) while the batch development is running, a window of the whole software is also minimize together.
When using other program and so forth, it is convenient to minimized the window in advance to so that it will not interfere with the operation.
If you want to run other program comfortably, see also 'Developing with Low Priority.'
[---> Developing with Low Priority]