| SILKYPIX® | SOFTWARE MANUAL |
| 9. Setting | ||||||||
- 9.1 Setting for Developed Image
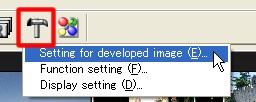
 The menu [Option(O)] - [Setting for developed image(E)] displays the "Setting for developed image" dialog, in which you can set types of the picture that is outputted at development is executed and so forth.
9.1.1 Setting File Type
- In this software, you can save TIFF file as non-compressed format and JPEG as compressed format.
We recommend you to use TIFF when you do not want to deteriorate a developed result in this software or when you process a file with photo retouching software.
When you process a file with photo retouching software, it is advantageous to save it as the 16-bit data that are useful for high gradation.
When you want to reduce a saved file size, JPEG is suitable for saving. However, since a picture will deteriorate, you should set an optimal compression ratio as usage.
In addition, you can record Exif information in an output file. Refer to '13.2 Exif Information' for details.
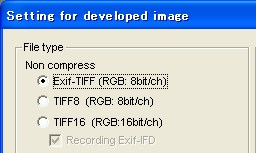 (1) Non Compressed Format
- You can select following three types.
RGB Exif-TIFF (8-bit)
- This is non-compressed format TIFF in conformity with EXIF standards, 1 channel 8-bit and R,G,B 3 channel including EXIF information.
- This is non-compressed format TIFF, 1 channel 8-bit and R,G,B 3 channel without EXIF information.
- This is non-compressed format TIFF, 1 channel 16-bit and R,G,B 3 channel.
This can include EXIF information. In this case, you should check the "Recording Exif-IFD" checkbox.
* The reason that this is not 16-bit Exif-TIFF is that saving in 16-bit is not prescribed in the Exif Standards.
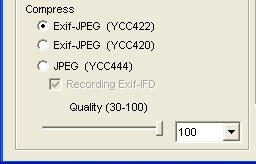 (2) Compressed Format
- You can set the following three types and quality factor.
Regarding the quality factor, if it is smaller, then a file size is also smaller. If it is larger, then a file size is also larger.
In addition, if quality factor is larger then image quality degradation is less.
Exif-JPEG (YCC422)
- This is a JPEG file including the EXIF information which has color information in 2 pixels per lightness information in 4 pixels.
This is the most popular formation. Since only the color information in 1 pixel per lightness information in 2 pixels is recorded, the compression ratio becomes higher. However, color separation degrades at a fine area.
- This is a JPEG file including the EXIF information which has color information in 1 pixel per lightness information in 4 pixels.
In comparison with the YCC422 above, its color information is less and image quality degradation is more. So its file size is small.
- This is a JPEG file with full color information. Because of this, its file size is larger. On the other hand, image quality degradation is less.
This can include EXIF information. In this case, you should check the "Recording Exif-IFD" checkbox.
* Since the 444-sample format is not prescribed in the Exif Standards, this format is expressed in this way.
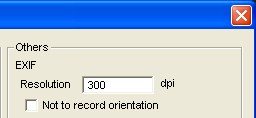 In this software, you can set the resolution information for an output file.
Set the DPI information in dpi.
If you check the "Not to record orientation " the rotation information will not be outputted to an EXIF tag.
* Even if you increase this dpi setting, resolution of an outputted picture does not change at all. When displaying or printing a picture, only the scale for transforming to an actual size does change.
Also in a case of the software which is not compatible with the dpi information, this setting does not have any meaning. So if you do not know much about this setting, you can use the default setting.
 By using the rotation function in this software, when you execute rotation, you can decide whether to save a picture after rotation.
- When you execute rotation, a developed result is rotated and then outputted.
When you do not execute rotation, a picture itself is not rotated but outputted into a file (When an output file is created, its direction is the same direction that is recorded in an input file).
If you uncheck the "Not to record orientation" checkbox, the rotating image is written into a file (When you use the tool which is compatible with rotation information, a picture is rotated and displayed).
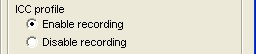 You can specify whether to record the ICC profile which indicates colorspace in an output file.
 If you are using the photo retouching software which is compatible with color management, namely, a recorded profile, it can transfer the colorspace information correctly.
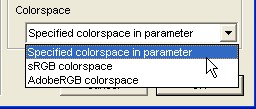 You can specify colorspace when executing development.
Regardless of the colorspace which has been set as a development parameter, you can execute development with the colorspace of "sRGB" or "AdobeRGB."
For example, it is convenient when you re-execute development with "AdobeRGB" in order to print for the time being while normally executing development with "sRGB" in order to view on a monitor.
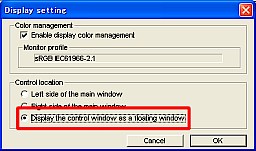
 The menu [Option(O)] - [Display setting(D)] starts up the "Display setting" dialog in order to set color management and location of a control window.
9.2.1 Color Management
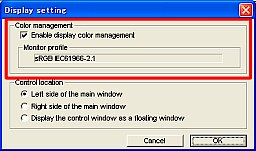 You can set color management to display.
If you check "Enable display color management" checkbox, the profile which is associated with a monitor as a monitor profile is used and displayed.
If you enable the color management, when you preview JPEG/TIFF files with adobeRGB or preview by setting "adobeRGB" as colorspace, correct colors can be displayed.
Also, even in a case of using the color management only with sRGB, by creating a monitor profile after measuring a color of a monitor with a color matching utility etc. and then setting it in this software, correct colors can be displayed.
If correct colors are not displayed, you cannot adjust correct colors. We recommend you to use the color management function.
There is a case that some monitor manufacturer distributes a profile for a monitor. So you may check it out on a manufacturer's home page etc..
9.2.1.1 Setting of Monitor Profile
- When color management is enabled, you can specify a monitor profile by the following two ways.
(1) Use the default monitor profile in the OS. About how to specify a monitor profile to the OS, refer to your OS manual.
(2) Select a monitor profile (ICC/ICM file) from files. Specify a monitor profile in XYZ-RGB format.
In some software, you have to specify a monitor profile directly. In such a case, please note that the specified monitor profile may differ.
- You can specify the control window, in which you can adjust development parameters etc., to locate it on the right side, left side, or to use it as a floating window.
Select the easiest way to use.
 |
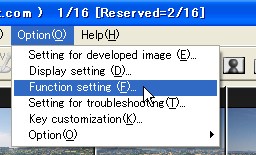 The menu [Option(O)] - [Function setting(F)] displays the "Function setting" dialog in which you can set a method of saving the rotation forJPEG/TIFF/DNG, a brightness level of exposure bias tool and so forth.
9.3.1 Saving the Rotation for JPEG/TIFF/DNG
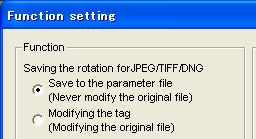 When rotating JPEG/TIFF/DNG files, you can select to rewrite rotation information recorded in a file or not.
• Save to the parameter file (Never modify the original file)
- Rotation information is recorded in a parameter file, and the original file is not modified.
- Only rotation information recorded in a file is modified.
Since rotation information rewrite the original file, other software (*) besides SILKYPIX can recognize rotation information.
However, when no rotation information is recorded in a file, rotation information cannot be rewritten, and it is recorded in the parameter file (.spj, .spt, or .spd).
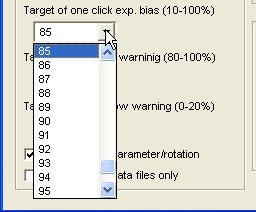 You can set a brightness level at the point where you click with an "Exp. bias tool." The exposure bias is operated to meet the brightness level as you set here.
The term "brightness level" here means a value of linear (photo energy) level at the point you click.
In other words, it is a value before adjusting tone representation, gamma and tone curve.
Therefore, even if you set 50%, a pixel value at the point does not become 127. When normal tone representation and tone curve are set, the value becomes the brightness level which is displayed on a display.
You can consider that the set value is a sensitive level on RAW data.
For example, when setting the value as 18% and using the exposure bias tool by specifying 18% gray card portion, you can obtain the exposure bias value which can reappear with 18% sensitive level on RAW data.
You can obtain almost the same result as a case of determining an exposure level by using an exposure meter.
Even when not using a gray card, you can adjust an exposure level to a certain level easily by specifying the brightest portion on white paper or a picture with a set value of this tool as 90% since a reflection factor of white paper is approximately between 80 to 90%.
You can apply this technique when taking multiple scenes of the same picture or reappearing the same area with certain brightness.
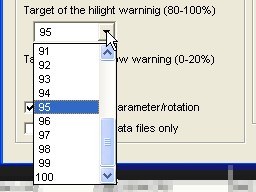 You can set a threshold value to execute the highlight warning.
You can set a ratio for the maximum pixel value of the final output picture.
 You can set a threshold value to execute the shadow warning.
You can set a ratio for the maximum pixel value of the final output picture.
 When you modify development parameters and rotation information, you can select setting to save such information automatically or not.
If this setting is not checked, the modified development parameters and rotation information are lost when the application is finished or when a new file or folder is selected.
If this setting is checked, data files with spd, spj, spt, spi etc. for SILKYPIX are created automatically in the folder in which a RAW picture exists.
When this setting is not checked or a storage media is write-protect, these files are not created.
 You can select this option to operate a RAW picture only.
When this setting is not checked, RAW/JPEG/TIFF files are also displayed.
When this setting is checked, only a RAW picture is displayed.
* Since extension of RAW data for EOS-1D and EOS-1Ds is "TIF", when this setting is checked, these RAW data cannot be operated.
 You can select the operation of double-clicking a folder in the selecting folder dialog.
When this setting is checked, the operation takes place as if it is determined by selecting the folder by double-clicking.
When this setting is not checked, you can open or close the folder by double-clicking.
The opening and closing of a folder means to display or not display a sub folder under the folder.
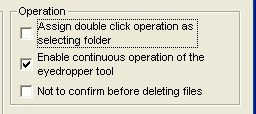 Operation of the eyedropper tool means adding points of the exposure bias tool, gray balance tool, skin tool, and tone curve.
When you check this item, an operation mode does not change even if you specify a color with these tools, and you can continue to execute the same process.
In addition, in these operation modes, when you specify a color by pressing Shift key, one-shot and continuous operation are operated in the opposite way as you have set.
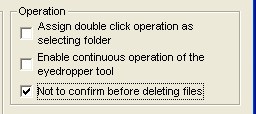 You can set whether to confirm or not when you delete a file.
If this setting is not checked, you need to confirm when you delete a file.
If this setting is checked, you can delete a file without confirming it.
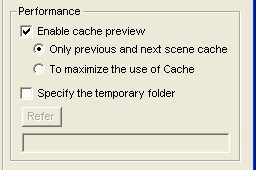 You can enable cache for preview and cache preview images of the previous and next scenes of the selected scene into cache memory.
This is effective when you check details on a picture by switching two pictures on the preview screen.
When you check this setting, memory space for cache increases. When you use a PC with little memory, please uncheck this function.
• Only previous and next scene cache
- By caching preview images of the previous and next scenes of the selected scene into cache memory, you can move to these scenes quickly.
By this, you check details on a picture by switching two pictures on the preview screen comfortably.
- You can cache intermediate development result and developed result of the five scenes at a maximum and the four sets of cloakroom.
You can switch scenes quickly in the preview mode by the previous and next scene feed function.
If you compare scenes by feeding to the previous and next scene with equimultiple pixels, you can check focus on the scenes that were taken in the continuous shooting mode and camera shake easily.
Also, when executing putting development parameter on cloakroom, the development result is also cached simultaneously. When you compare scenes by switching the parameters on the cloakroom, you can switch to the preview quickly and run-in development parameters easily.
| In the "To maximize the use of Cache" setting, since memory space for cache increases, please use this setting, when your PC has more than 512MB memory. We recommend using more than 1GB memory. |
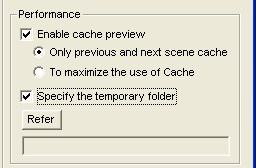 You can specify the folder in which this software creates a virtual storage file. When you check "Specify the temporary folder" checkbox, specify a folder by clicking the "Refer" button.
By specifying the drive which has a virtual storage file of the OS and also the folder which exists in a physically different drive, performance may improve. When you specify a drive, you should specify the drive which has sufficient free storage space and also runs at high speed as possible.
 * Regarding each setting item, you can display it by clicking on the "Environment setting" button.
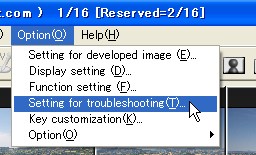
- 9.4 Setting for Troubleshooting
- The following operations that you can set in this dialog are what you need to execute. Follow the direction given from our support when troubles occur in your system environment.
Note that when you change settings by your own judgment, there is a possibility that a program does not run normally, or the performance drops significantly.
 9.4.1 Troubleshooting Setting for Windows Version
 9.4.1.1 Disable to Access Files with the Memory-Mapped Method
- Avoids problems that some device drivers of a certain storage device cannot access files with the memory-mapped method.
- In order to achieve smooth operation even during complicated processing, SILKYPIX® has adopted multithread processing and multiprocessing in a positive way and achieved high performance by operating microprocessors with high efficiency.
As the result, there is a possibility that SILKYPIX® decreases the other software's operations that are running simultaneously because the microprocessors are handling heavy loads during development processing.
In addition, because the microprocessors are handling heavy loads, hardware operational failure has been reported. For example, a high temperature warning because of increased temperature of the processors, unstable operation, rebooting a PC and so forth.
In order to avoid these trouble, this setting controls microprocessor activity ratio and limits temperature rise.
Furthermore, if you want to specify more enhanced setting for limiting temperature rise, refer to '9.4.1.4 To Develop Slowly.'
Also, in order to run other software comfortably while executing batch development, refer to '5.2.5 Developing with Low Priority.'
- This setting aims for avoiding the trouble that EXIF information cannot be displayed correctly with a certain graphics viewer tool.
- This setting aims for verifying trouble of CPU thermal runaway caused by temperature rise.
When this setting is done, all development processes such as creating preview and thumbnail, 1-scene development, batch development and so forth are executed slowly.
By executing development process slowly and reducing the amount of load placed on CPU, heat generation of CPU can be controlled.
If the thermal runaway occurs while executing development process and changing development parameters, you should enable this setting.
When you enable this setting, the CPU thermal runaway stops. However, if it is just a case that a time until the thermal runaway occurs delays, there must be a problem in PC's countermeasure to heat.
Because of the thermal runaway, if you continue to use a PC in this condition, breakage of data recorded in a hard disk and other damage may occur.
[--->Heat Reckless Run]
When this damage occurs, you need to stop using this software and execute the following measures.
This "To develop slowly" aims for only discovering trouble. Even though a PC runs with stability in this mode, it is dangerous to use it continuously in this condition.
In the case of thermal runaway, there is a high possibility that breakage of data recorded in a hard disk will occur. This is quite different from a case that program runs abnormally and completes.
At the worst, the OS itself will not start up, and all data will be lost. We strongly recommend you not to use your PC continuously in this "To develop slowly."
1. Is there any obstacle around a cooling fan in a PC?
- You need to check whether dust clogs a fan or a fan is covered with dust. If it is too dirty, you should clean it according to a manual of your PC.
- You need to check whether a wall blocks ventilation of fan or thermal radiation because a wall is too close to a PC. You should avoid locating a PC where heat stays. Rather you should install it where ventilation is good.
If a room temperature is high, you should be careful for heat radiation from a PC. You may install it near to an air conditioner.
- SILKYPIX® Developer Studio runs a CPU with high efficiency. Because of this, we say that a temperature of CPU gets higher than a case of running other software.
However, if a PC does not stand the heat, a problem does exist in a PC.
If thermal runaway occurs even in an appropriate locating condition, there is a possibility that PC's countermeasure to heat is not perfect.
You should consult a manufacturer about this thermal runaway.
You may be suggested to initialize BIOS or update it. You need to follow directions given from a manufacturer to take measures.
- Is grease between CPU and heat sink sufficient? Is capacity of fan enough? Is ventilation in a PC ensured? Enhance a heat radiation capacity.
You can open a PC and blow air from a fan into it. This is quite effective.
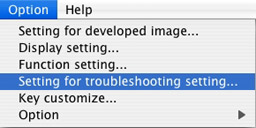 9.4.2 Troubleshooting Setting for Macintosh Version
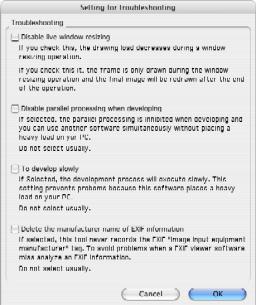 9.4.2.1 Turn Off the Live Resize of Window
- When you resize a window, turn off the Live Resize to reduce a load for drawing. By this setting, only drawing for a frame is processed.
If this setting is operated, when resizing, only drawing a frame is processed. When this resizing is completed, drawing is executed in a window.
- In order to achieve smooth operation even during complicated processing, SILKYPIX® has adopted multithread processing and multiprocessing in a positive way and achieved high performance by operating microprocessors with high efficiency.
As the result, there is a possibility that SILKYPIX® decreases the other software's operations that are running simultaneously because the microprocessors are handling heavy loads during development processing.
This setting is used when you want to reduce slowdown of other software's processing speed during development processing, or to avoid any trouble causing errors during development processing.
- This setting aims for avoiding the trouble that EXIF information cannot be displayed correctly with a certain graphics viewer tool.
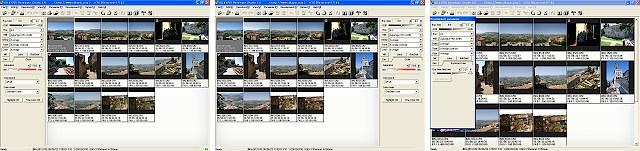
- This function can float the control box as a dialog or set each parameter dialog in the control box.
By the use of this function, you can comfortably execute operations while comparing multiple parameters, displaying a picture on the entire screen and so forth.
[How to Use]
- 1. When you select [Float Window] from the context menu which is displayed by right-clicking on each tab such as "Exposure", "WB" and so forth in the control box, you can display each parameter as a separate dialog.
 Floating a Control Box |
2. The menu [Option] - [Display setting] displays "Display setting" dialog. Select the "Display the control window as a floating window" to display the whole of parameter/control as the "Development Parameter" dialog.
 |
3. When you select [Locate it in the control box] from the context menu (Fig.2) which is displayed by right-clicking on the text menu of each parameter dialog such as "Tone curve", "Histogram" and so forth. You can locate each control in each parameter/control. If a screen size is not sufficient, you cannot use this function.
 Housing a Parameter Window |
- The menu [Option(O)] - [Key customization(K)] displays the "Key customization" dialog in which you can set to customize shortcut keys.
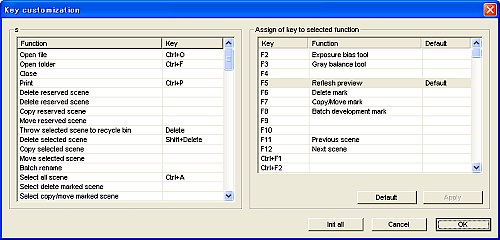 |
• Assign functions to keys
- In the "Function" list on the left side, you can select a function.
In the "Assign of key to selected function" list on the right side, you can select a key.
Press the "Apply" button, to assign the selected function to the selected key.
- In the "Function" list on the left side, you can select a function to initiate the assigned key (default).
Press the "Default" button then the "Apply" button, to initiate the selected function key (default).
- Press the "Init. all" button to initiate all key settings (default).
- 9.7.1 Make Thumbnail Files of All Scene
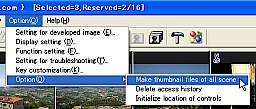 This function makes a thumbnail file of all scenes.
- This function deletes an access history to files/folders.
- This function initializes the display location of controls.