| SILKYPIX® | SOFTWARE MANUAL |
| 3. Preview Mode and Thumbnail Mode | ||||||||
[Thumbnail Mode]
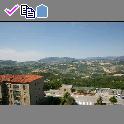
 In the thumbnail mode, in order to display multiple pictures quickly, the thumbnails in the data are displayed temporarily instead of executing development. They will be updated with the thumbnails that are created in the simple development executed concurrently in the background.
In the thumbnail mode, frames of the selected files are displayed in gray.
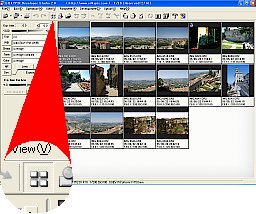
Click the
 button or double-click the left button to preview the file.
- 3.1 Mark
 In order for operation and management, you can attach a mark in each scene.
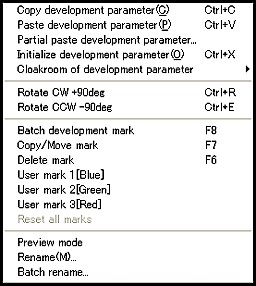
When you right-click on a thumbnail, the pop-up menu in which you can select a mark or delete a set mark is displayed.
 (1) Delete Mark: It is a mark to delete a scene. After reservation, the menu [File(F)] - [Delete reserved scene(E)] moves the delete-marked scenes into the trash box collectively.
 (2) Copy/Move Mark: It is a mark to copy or move a scene. After reservation, the menu [File(F)] - [Copy reserved scene(C)] or [Move reserved scene(M)], copies or moves the copy/move marked scenes collectively.
 (3) Batch development Mark: When you set reservation, the menu [Development(D)] - [Batch development for reserved scene(V)] develops multiple scenes collectively.
 (4) User Mark1 (blue): When you set the user mark1 (blue), you can use the blue mark as a tag.
 (5) User Mark2 (green): When you set the user mark2 (green), you can use the green mark as a tag.
 (6) User Mark3 (red): When you set the user mark3 (red), you can use the red mark as a tag.
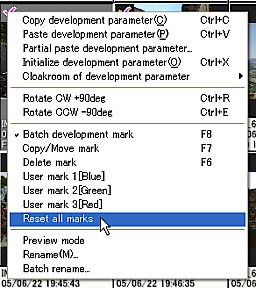 When you delete the marks and operations set in each scene, right-click on the marked thumbnail.
When you click on the [Reset all mark] in the displayed pop-up menu, you can cancel the set mark and operation.
 You can set five types of mark at the maximum for one picture.
A set of combination is:
- 1) One type either Delete Mark or Copy/Move Mark
2) On/Off of Batch development Mark
3) User Mark1 (blue)
4) User Mark2 (green)
5) User Mark3 (red)
 One picture is displayed in the preview mode.
Click on the
 button to go back to the thumbnail mode in preview mode.
- 3.2 Outline Preview
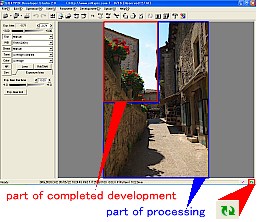 In preview mode, a concurrent process of quick display, which aims to display the entire picture as quickly as possible, and preview display, which displays same picture as is generated, takes place.
When switching to the preview mode, the outline preview of the entire picture is displayed quickly, and at the same time, the formal partial development process will be executed in the background. Update takes place automatically, replacing parts of the picture with the formally developed display block.
In the outline preview used for the initial whole display, only the simple development is executed for speeding up. In the simple development of the outline preview, the following process is executed.
- (1) There is a case where jaggies or false color may appear on the outline portion because the simple de-mosaic process is executed by fitting RAW data to a display size and reading in them thinly.
→In the formal development, the whole RAW data is loaded. Then, the complete de-mosaic process and the false color control process are executed.
(2) In the simple development, because the process (frequency surface filter) such as noise reduction, false color control, sharpness, and so forth are not executed, if you change parameters of sharpness, noise reduction, development precision and false color control, those settings will not be reflected in the outline preview.
→In the formal development, because the processes such as all filters and so forth are executed, you can obtain the effect of such set parameters.
- 3.3 Formal Development Preview
 During preview display, the formal development preview mechanism processed concurrently in the back ground creates pictures adjusted to the display size by executing the formal development process of the RAW data and replaces the displayed outline preview with it partially.
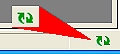
This means that the pictures in the outline preview and the pictures in the formal development preview coexist during the process of the formal preview. When the
 mark is displayed at the right most in the status area located at the lower part of the software, it indicates that the formal development process is still under operation and some of the displayed pictures of the simple development are still remaining.
When the replacement of all pictures are finished in the formal development process, the working state mark disappears, and only the formal development preview is displayed. Since this formal development preview follows same process as the formal development process, you can check the final development result on the screen.
- 3.4 Changing Display Magnification during Preview
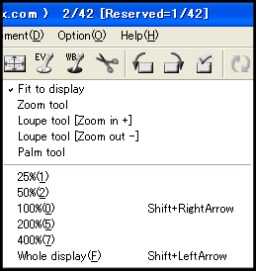
In the preview mode, you can change display magnification by clicking on the "Preview operation" button on the tool bar.
Use [Whole display(F)] to display the entire picture in the display area.
Use [100%] to display 1 dot of the developed RAW file as 1 dot on the screen.
In addition, you can select [25%], [50%], [200%], and [400%].
- 3.5 Using Mouse
 In the preview mode, when you right-click in the preview area, the pop-up menu on which you can select a tool or change magnification is displayed.
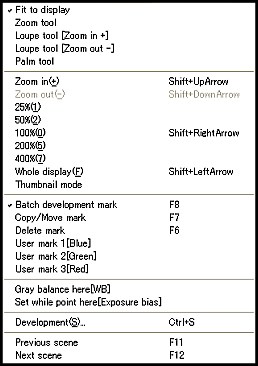
In the preview mode, you can select the left mouse button operations from the mouse operation mode (tool). The mouse operation mode contains [Fit to display], [Zoom tool], [Loupe tool [Zoom in +]], [Loupe tool [Zoom out -]], and [Palm tool].
- (1) Fit to display
- In this mode, the whole selected scene is displayed in the preview area. When resizing a window, its display magnification changes automatically according to the window size.
When the display magnification changes, the zoom tool is selected automatically.
In this mode, you can execute the following mouse operation.
| Left Double-Click | ... | 100% Display Magnification is used and the zoom tool is selected. |
| SHIFT + Left-Drag | ... | The zoom tool is selected and you can change display magnification continually. |

- The zoom tool is a convenient mouse operation mode that can enlarge a portion of a picture instantly or reduce it to display the whole picture, or also to change the displayed portion.
We strongly recommend you to master the operation since it is a convenient mode that can change displayed location, and enlarge or reduce picture quickly.
| Left-Drag | ... | You can grab and move a picture (panning operation). |
| Left Double-Click | ... | In the case of 100% display magnification, the display changes to the magnification that can display the whole. In the case of other magnifications, they change to 100% display magnification. Only by the left double-clicking, you can switch between 100% (equimultiple pixels) display and full display by turns. This is very convenient. |
| SHIFT + Left-Drag | ... | You can change display magnification continually centering on the drag starting point. You can enlarge or reduce the portion that you want to check in detail instantly. This is very convenient. |

- The loupe tool [zoom in +] is the convenient mouse operation mode that can operate enlargement by locating the position where you click on at the center on a screen.
We recommend this to the users who are familiar with its operation, since this operation is adapted to many other software.
When you operate this while pressing the Alt key, the size is reduced instead.
| Left-Click | ... | Zoom In |
| Alt + Left-Click | ... | Zoom Out |

- The loupe tool [zoom out -] is the convenient mouse operation mode that can operate reduction by locating the position where you click on at the center on a screen.
We recommend this to the users who are familiar with its operation, since this mouse operation mode is adapted to many other software.
When you operate this while pressing the Alt key, the size is enlarged instead.
| Left-Click | ... | Zoom In |
| Alt + Left-Click | ... | Zoom Out |

- The palm tool is the mouse operation mode that can grab and move a picture (panning operation). This operation is compatible with the mouse operation mode adapted to many other software.
In addition, when you click on a picture while pressing the Ctrl key, the size is enlarged with its center at the position where you clicked.
When you click on a picture while pressing the Alt key, the size is reduced with its center at the position where you clicked.
| Left-Drag | ... | You can grab and move a picture (panning operation). |
| Ctrl + Left-Click | ... | Zoom Out |
| Alt + Left-Click | ... | Zoom In |
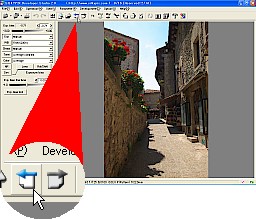 When multiple pictures are saved in the same holder, if you click on the
  button, the present scene switches to the previous scene, and if you click on the
  button, it switches to the next scene.
3.7 Rotating Pictures
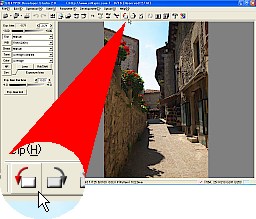 This rotates the picture displayed in the preview mode.
When you click on the
 button, it rotates 90 degrees counterclockwise (-90 degrees), and when you click on the
  button, it rotates 90 degrees clockwise (+90 degrees).
3.8 Using Thumbnail Mode
In the thumbnail mode, you can select multiple scenes and execute a batch operation to the selected scenes.
- 3.8.1 Selecting Multiple Scenes
- When you left-click on a scene while pressing on the Ctrl key, the clicked scene is in a selected state while the presently selected scene remains in a selected state. If you repeat this operation, you can select multiple arbitrary scenes.
When you left-click on a scene while pressing on the Shift key, the scenes from the presently selected scene up to the clicked scene are in a selected state.
You can select all scenes by pressing the Ctrl + A keys or from the Menu [Edit(E)] - [Select all scene Ctrl+A].
You can change the selected scene by using the arrow key.
* While multiple scenes are selected, you cannot change a parameter or switch to the preview mode.
- You can use the conventional operations for single selection to multiple selected scenes, such as the rotation function on the tool bar and so forth by means of the menu command.
Toward multiple selected scenes, you can use the context menu operation by the right-click.
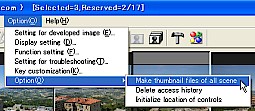 In the thumbnail mode, the menu [Option] - [Option] - [Make thumbnail files of all scene] can remake the thumbnail of the presently displayed folder.
By this, you can save*pictures and thumbnails in medias such as CD/DVD etc. and omit thumbnail construction at the time of access to the relevant media. So this means you can operate it comfortably.
* See 8.4 Saving Both Parameter and Thumbnail in CD/DVD.
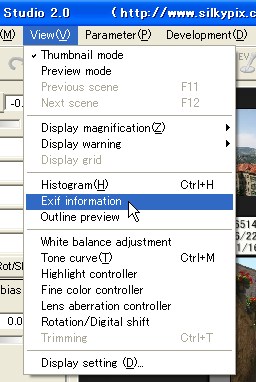 This function can display the Exif information of the presently selected picture. There are two types, Simple and Detail.
 Select the menu [View(V)] - [Exif information].
- Simple
- Typical items are:
| File Information | File name, Folder, and Update time |
| Tag Information | Image Width, Image Length, Make, and Model |
| Exif Tag Information | Date Time Original (Taking date and time), ISO Speed Ratatings, Shutter Speed Value, Aperture Value, Exposure Bias Value, Flash, Metering Mode, Focal Length, and White Balance |
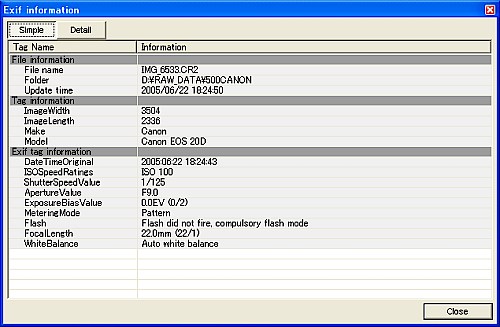 "Simple" |
- All items embedded in a picture are:
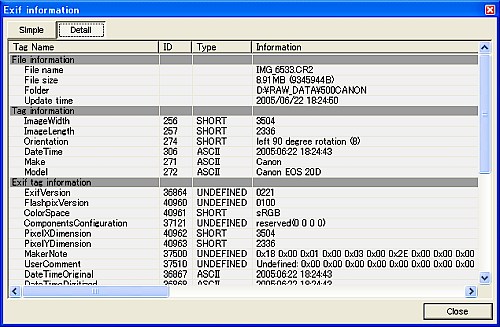 "Detail" |
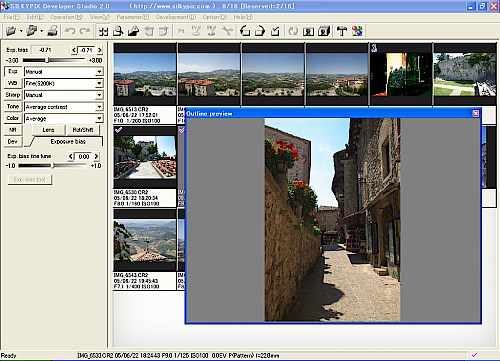
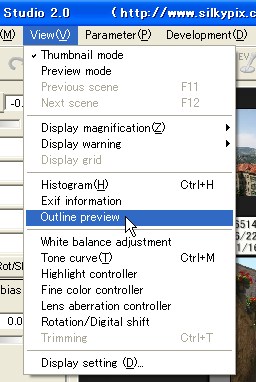 In the thumbnail mode, the outline preview can be displayed.
Select the menu [View(V)] - [Outline preview].
You can adjust a parameter by checking the outline preview, which is bigger than a thumbnail.
 |
- 3.11 Displaying Grid
- In the preview mode, you can choose to display grid.
Select the menu [View(V)] - [Display grid]. You can switch the function to display grid or hide it.
3.11.1 Moving Grid
In the display grid, when you click the left mouse button while pressing the Ctrl key, you can grab and move a grid.
In addition, when you double-click the left mouse button while pressing the Ctrl key, the grid returns to the initial position.
- This function allows you to hide or display the floating control windows.
This aims to hide the windows temporarily when they get in the way of viewing the preview or thumbnail display.
This function is assigned to a shortcut key (F9 key by default) only.
You will not be able to undo this function if the windows hidden using this function were displayed using any other function.