| SILKYPIX® | SOFTWARE MANUAL |
| 8. File Operation | ||||||||
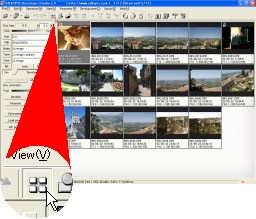 This software supports operations to delete, copy and move the scene which is displayed in the thumbnail mode.
8.1 Deletion Procedures
- You can put delete-mark or select scenes to delete.
8.1.1 Deleting Reserved Scene
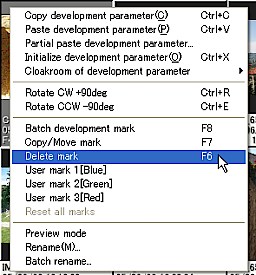 In order to delete a scene, you should display the pop-up menu by right-clicking in the thumbnail mode or the preview mode and execute "Delete mark."
  [Delete mark] is an operation to attach a mark to a scene for deletion, and at this moment a file has not been deleted, yet.
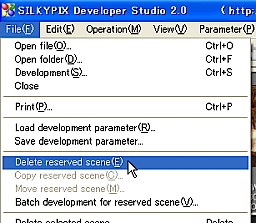 After attaching the delete-mark to the scene which you want to delete, execute [File(F)] - [Delete reserved scene], to move the delete-marked scene into the trash box.
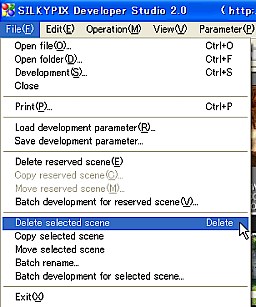 After selecting a thumbnail of the scene which you want to delete, execute [File(F)] - [Delete selected scene] or press Delete key to move the selected scene into the trash box.
By executing these two operations, you can move a scene into the trash box. In other words, a scene is not deleted completely, and you can restore it from the trash box later. If you want to delete it completely, please execute the menu or the shortcut key while pressing Shift key.
- 8.2.1 Copying/Copying Reserved Scene/Moving
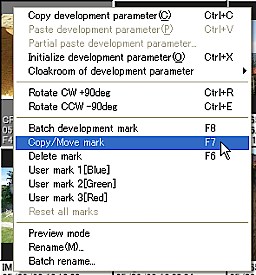 In order to copy or move a scene to other folders, you should display the pop-up menu by right-clicking in the thumbnail mode or the preview mode and execute [Copy/Move mark].
 [Copy/Move mark] is an operation to attach a mark to a scene for copy or move, and at this moment a file has not been copied or moved, yet.
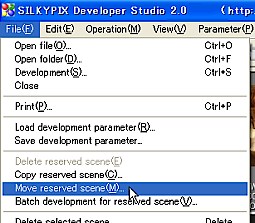 Execute [File(F)] - [Move reserved scene] and specify the folder into which the scene moves to move the scene.
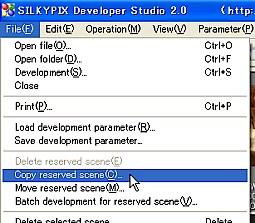 Execute [File(F)] - [Copy reserved scene] and specify the folder into which the scene moves to copy the scene.
 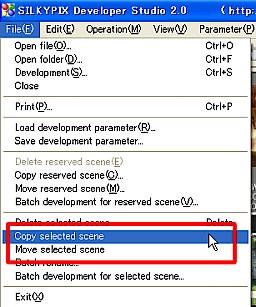 Execute [File(F)] - [Copy selected scene] or [Move selected scene] and specify the folder into which the scene moves to copy the scene.
- Since this software is compatible with the DCF (Design rule for Camera File system) Standard which has been adopted into the most digital cameras, the multiple files that have the same base name are handled as the identical scenes.
For example, if four files such as IMAG0001.CRW, IMAG0001.JPG, IMAG0001.THM, and IMAG0001.SPD exist in the same folder, these four files are handled as a set at the time of operation.
In other words, when you delete an IMAG0001, these four files are deleted as a set. So the same thing happens at the time of copying and moving.
Because in the DCF Standard, it is prescribed that the files which have the same base name are handled as a set.
Cameras conform to this standard create files in storage media as follows:
IMAG0002.RAW ... RAW file
IMAG0002.JPG ... JPG file created with RAW file simultaneously
IMAG0002.THM ... Thumbnail file
IMAG0002.WAV ... Sound clip associated with scene
This software writes the development parameters in the file named
IMAG0002.SPD
By this process, even in a case that scenes are copied, moved or deleted with other utilities that meet the DCF Standard, multiple information of these scenes are handled as a set. This is very convenient.
- This software creates a development parameter file, a parameter file, and a thumbnail file in the folder which has RAW data. (*1)
When you write into a CD/DVD, please write these files above simultaneously to save the development parameter settings and the thumbnail file settings.
If a thumbnail file is saved, when you view directly from CD/DVD with this software, a thumbnail file can be displayed quickly.
A development parameter file is created by using the same base name with extension *.spd and in the same folder as the case of RAW data.
In addition, a thumbnail file is created by using the same base name with extension *.spi and in the same folder as the case of RAW data.
Besides these, there is a case to create files with extensions such as .spt and .spj (Refer to → '13.3 Files Created Automatically' for details).
When you write into CD/DVD, you should also write in these files with extensions such as .spd, .spi, .spt, and .spj simultaneously.
In addition, a thumbnail file is created automatically in the background process while you are viewing a thumbnail in the thumbnail mode. However, there is a case that only the scenes that you have viewed are created in the thumbnail file. In order to create all thumbnails that exist in a certain folder, you can execute the following procedure.
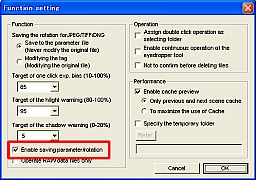 (1) Determine if "Enable saving parameter/rotation" under "Function setting" is checked or not. If it is not, check it.
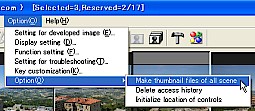 (2) Open the folder in which you want to create a thumbnail file and execute the menu [Option(O)] - [Option(O)] - [Make thumbnail files of all scene].
 | *1 ... You can suppress this function. For details, refer to '9.3.5 Enable Saving Parameter/Rotation' in "Function setting" dialog. |
- There are two ways to rename a file.
- • Rename
- You can use this when one picture is selected in the thumbnail mode.
- You can use this when multiple pictures are selected in the thumbnail mode.
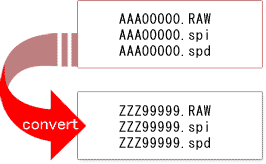
Only a base name (a file name without extension) can be renamed and cannot be renamed an extension part.
The file which has the same base name with a different extension and exists in the same folder is also renamed simultaneously.
 |
[How to Use Rename]
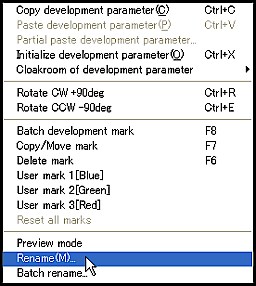 When a scene is selected in the thumbnail mode, you can display the context menu by right-clicking on that scene. Then select "Rename(M)" to display the control box for renaming that scene.
 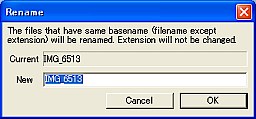 You can rename the file by inputting the base name that you want to use in the control box.
 [How to Use Batch Rename]
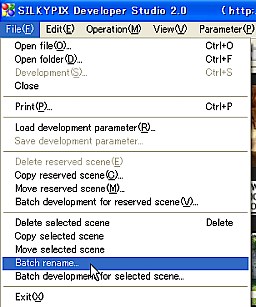 When a scene are selected in the thumbnail mode, the menu [File(F)] - [Batch rename] displays "Batch rename" dialog.
 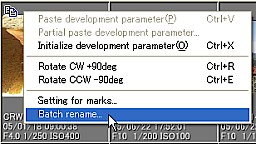 You can also display the "Batch rename" dialog by selecting [Batch rename] in the context menu. By inputting the base name that you want to use in this dialog, you can rename the files that have the same base name and exist in the same folder collectively.
 [How to Use Batch Rename Dialog]
(1) Setting Rename Rule:
- Specify base name in each 3 part, "[Area-A]", "[Area-B]", and "[Area-C]."
- [Area-A]: Specifies optional word.
[Area-B]: Selects from the prepared word.
[Area-C]: Specifies digit number of sequential number and the first figure.
- Specify sorting order of the selected scenes by name or date. Also by clicking "Before rename" in a list of selected scenes, you can invert ascending order and descending order.
- When the same filename exists even after being renamed, you can select either to expand the file name automatically or display the confirm dialog every time.
- Specify to use capital letters or small letters for an extension. You can specify either not to change the present one or change into capital letters or small letters.
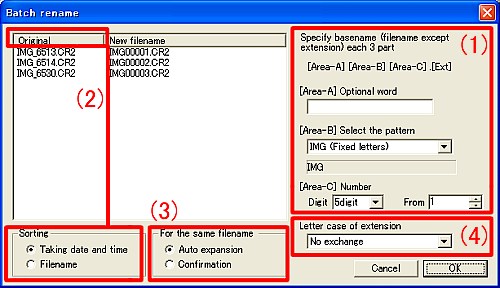 "Batch rename" Dialog |
 This function prints the picture which is edited in the preview mode, or the picture which is selected in the thumbnail mode.
One picture is printed on one sheet of paper.
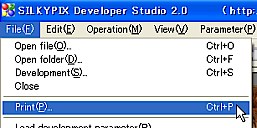
The menu [File] - [Print] displays "Print" dialog.
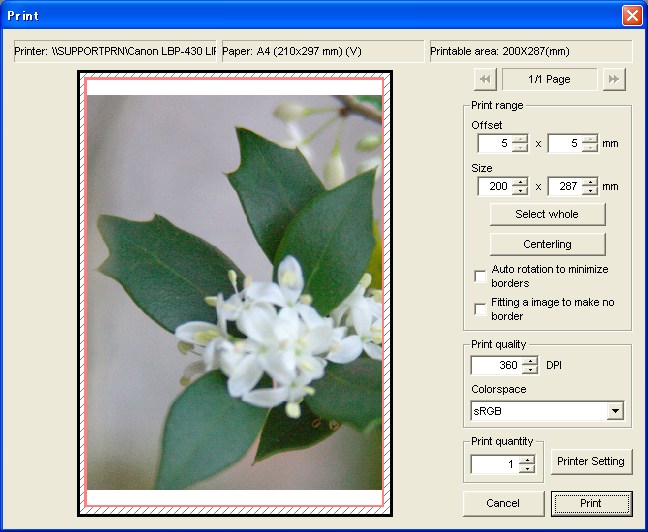 |
8.6.1 Print Range
- 8.6.1.1 Setting Print Size
- Set a print range. A picture is printed within the print range.
• "Offset"
- Specify offset from the upper left end to print in mm as unit.
• "Select whole" button
• "Centering" button
- Set alignment of picture in a print area.
• "Auto rotation to minimize borders"
- A picture is rotated and located automatically as minimizing borders.
- • Print dpi
- Specify print dpi.
Data with the specified print dpi is transferred to a printer. At this time, automatic enlargement or reduction is executed internally. The optimal print dpi setting depends on a printer. Refer to a manual of your printer.
- Select either sRGB or adobeRGB as colorspace for print.
Normally you can select sRGB. When selecting adobeRGB, you need to set color matching from adobeRGB with a printer driver. Refer to a manual of your printer.
- • Printer setting
- "Printer Setting" button displays "Printer setting" dialog of an OS.
Set each setting for the printer.
- Set print quantity.
• Print Cancellation
- Press the "Cancel" button to close the dialog.
- When multiple scenes are selected in the thumbnail mode, multiple pictures can be printed.
In the case of multiple pictures, by changing a page by clicking on the "Page" button, you can change a page and check a print image in the preview mode.