| SILKYPIX® | SOFTWARE MANUAL |
| 3. Preview mode and thumbnail mode | ||||||||
[Thumbnail mode]
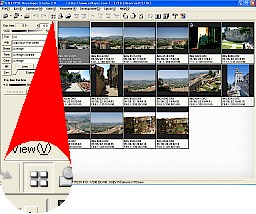 The thumbnail mode displays multiple RAW data in the clearest form. The scenes that are selected in the thumbnail mode, the frame will be highlighted in gray.
 You can preview the selected scene, by clicking the
 icon on the Toolbar, or double-clicking the left button on the thumbnail.
- 3.1 Mark
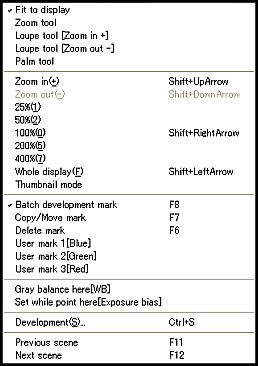
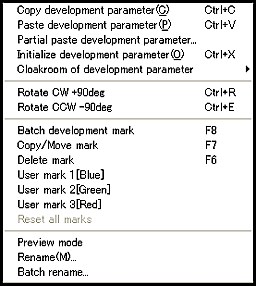 You can set some marks for each scene to reserve some operation or to manage the scenes. When you click the right button on the thumbnail, the context menu will popup that will allow provides you to select the mark.
 (1) Delete mark: Reservation to delete the scene
- This is the scene that is reserved to delete. You can delete all marked scenes at once by the Menu [File (F)] - [Delete reserved scene (F)].
 (2) Copy/Move mark: Reservation to copy/move the scene
- This is the scene that is reserved to copy/move. You can copy/move all marked scenes at once by Menu [File (F)] - [Copy reserved scene (C)] or [Move reserved scene (M)].
 (3) Batch development mark: Reservation of batch development
- This is the scene that is reserved to develop by batch development. You can develop all marked scene at once by Menu [Development (D)] - [Batch development for reserved scene (V)].
 (4) User mark 1 (Blue)
 - User mark 1 (Blue) can be used as tag.
 (5) User mark 2 (Green)
- User mark 2 (Green) can be used as a tag.
 (6) User mark 3 (Red)
 - User mark 3 (Red) can be used as a tag.
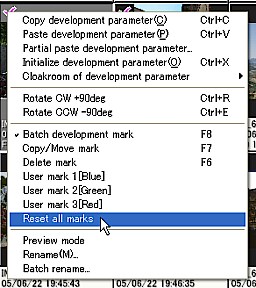 To reset all marks on the scene, you should select the [Reset all marks] on the context/content menu that is displayed by right clicking on the thumbnail.
 For each scene, you can set up to five marks with the following combinations.
- 1) Delete mark or Copy/Move mark
2) Batch development mark
3) User mark 1 (Blue)
4) User mark 2 (Green)
5) User mark 3 (Red)
To reset the mark, please do the same thing as to set the mark. This will allow you to turn ON and OFF the marks.
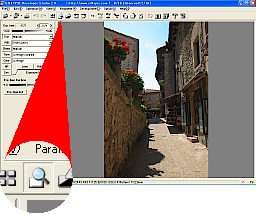 The preview mode displays one image at a time.
The preview mode displays the preview image of two different methods on your screen. First, the outline preview is quickly displayed using the fastest processing methods.
Then the final preview is displayed block by block in blocks using the same processing methods to develop save RAW data to a JPEG/TIFF file.
In the preview mode, click
 on the Toolbar to access the thumbnail mode.
- 3.2 Outline preview
 It processes the fastest preview display
- (1) The outline preview is processed by partially omitting some RAW data sampling and de-mosaic processing. This might create some jags and false color.
(2) Even if the sharpness parameter, the noise reduction, the development accuracy, and the false color control are changed, the setting will not be reflected in the outline preview display because neither the noise reduction, the false control nor sharpness are processed.
- The outline preview processes the adjustments to the exposure correction, white balance, tone and saturation.
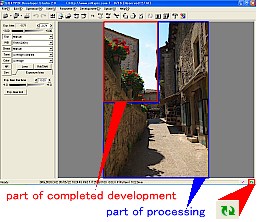
 When the outline preview is displayed, the final preview is processed under the background. It partially replaces the preview block by block.
 As a result, the image of the outline preview and this final preview will exist together on the screen while the final preview is processed. While
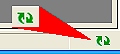
 is displayed in the right most of the status-bar, a part of the image is still being processed under the background.
 As a result, the outlined preview image and the final preview will simultaneously be on the same screen while the final preview is being processed. While the
is displayed on the right most part of the status-bar is part of the image, the image is still being processed in the background.When the
icon disappears from the status-bar, you can re-check the final developed image from the final preview. 3.4 To change the magnification of the preview display
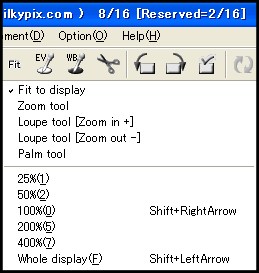
You can change the magnification setting by clicking the [FIT] icon on the Toolbar in the preview mode.
When you want to display the entire image in the display area choose the [Whole display (F)] in the dropped down menu function
[100%] displays one dot of the image as one dot of your monitor screen.
In addition, you can manually select different magnification for example, [25%], [50%], [200%], and [400%].
- 3.5 Using the mouse
 In the preview mode, when you right click the preview display area, the tool selection and the magnification are shown in the pop-up menu.
You can select the mouse operation mode from this pop-up menu, which is [Fit to display], [Zoom tool], [Loupe tool [Zoom in +]], [Loupe tool [Zoom out -]], or [Palm tool].
- (1) Fit to display
- The entire scene is always displayed in this mode, the magnification will change automatically when the window is resized.
When the display magnification changes, the zoom tool will automatically be selected.
In this mode, the mouse can be used as following
| The left double-click | ... | The display magnified at 100%, and the zoom tool is selected automatically. |
| SHIFT + left drag | ... | The zoom tool is selected and you can change the magnification whenever you want.(Same as Zoom tool) |

- The zoom tool is a convenient mouse operation mode that can move and zoom the displayed image continuously and instantly.
We highly recommend getting use to this technique.
| The left drag | ... | Panning operation. You can grab and move the preview image at will. |
| The left double-click | ... | Switching the magnification of the displayed image between 100% and the entire-display. |
| SHIFT + left drug | ... | Changing display magnification continuously. |

- Zooming operation, you can zoom in on the previewed image by clicking on it.
| Left-click | ... | Zoom in |
| ALT + left-click | ... | Zoom out |

- Zooming operation, you can zoom out of the previewed image by clicking on it.
| Left-click | ... | Zoom out |
| ALT + left-click | ... | Zoom in |

- Panning operation. You can grab and move the preview image at will.
| Left drug | ... | Panning operation |
| CTRL + left-click | ... | Zoom in |
| ALT + left-click | ... | Zoom out |
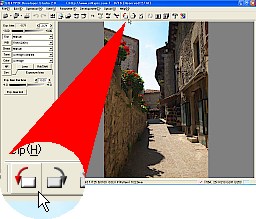
 When you click the
  icon on the Toolbar, the previous scene is selected. And when you click the
  icon on the Toolbar, the next scene is previewed.
3.7 Rotating the image
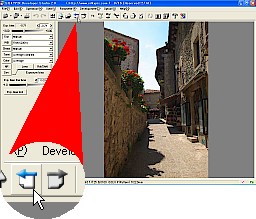
 When you click the
  icon on the Toolbar, the image will rotate counter clockwise 90 degree (-90 degree). And when you click the
  icon on the Toolbar, the image will rotate clockwise 90 degree (+90 degree).
3.8 Using the thumbnail mode
In the thumbnail mode, you can operate one or more selected scenes.
- 3.8.1 Selecting multiple scenes
- CTRL + left click allows you to select more than one scene at a time. You can change each scene state as selected or non-selected.
SHIFT + left-click allows you to select also more than one scene at a time, this operation selects multiple scenes between the last selected scene and the current clicked scene.
CTRL + A or the Menu [Edit (E)] - [Select all scene] command select all scene.
* When multiple scenes are selected, you cannot modify the development parameters nor switch to preview mode.
- When multiple scenes are selected, you can operate the rotation and the menu commands. In addition, you can operate the context menu by right clicking on the selected scene.
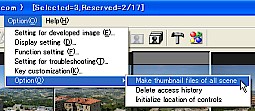 The menu [Option (O)] - [Option (O)] - [Make thumbnail files of all scene] command provides you to make thumbnail files for all scene.
*Please refer to (8.4 How to save the parameters and thumbnails on CD or DVD.)
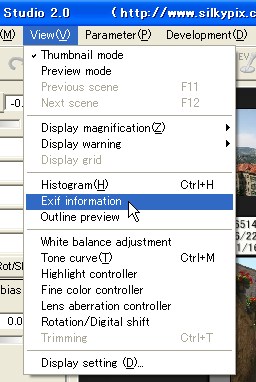 The menu [View (V)] - [Exif information] command provides you to display Exif information. There are two mode, simple view and detail view.
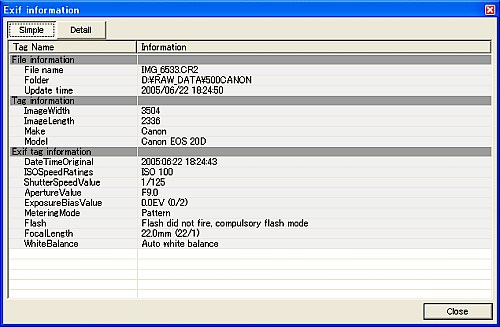
- Simple view
- Display only representative tag.
| File information | File name, Folder, Update time |
| Tag information | Image width, Image height, Make, Model |
| Exif tag information | Date time original, ISO speed Ratings, Shutter speed value, Aperture value, Exposure bias value, Metering mode, Flash, Focal length, White balance |
 Simple view |
- Display all tags in Exif header.
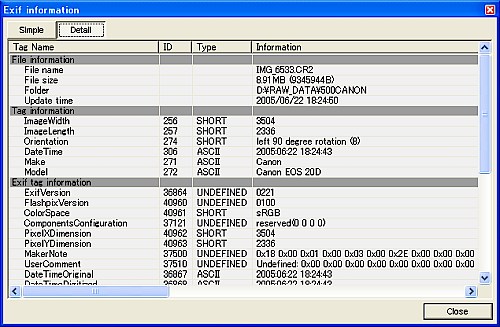 Detail view |
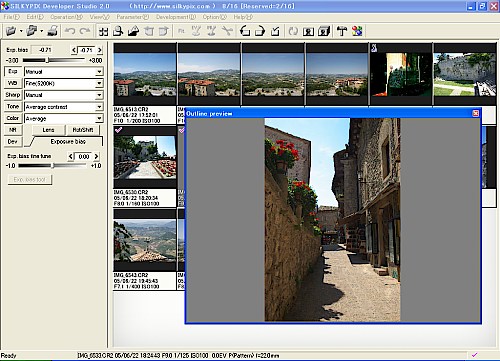
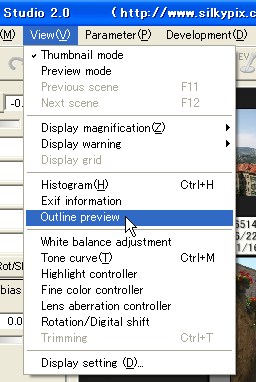 The menu [View (V)] - [Outline preview] command provides you to display outline preview in the thumbnail mode.
You can adjust the development parameters with this outline preview in the thumbnail mode.
 |
- 3.11 Display grid
- The menu [View (V)] - [Display grid] command provides you to display grid in the preview mode.
3.11.1 Move grid
When the grid is displayed in the preview window, you can move the grid by Ctrl key + left drag of mouse.
Ctrl key + double clicking left button of the mouse initializes grid position.