| SILKYPIX® | SOFTWARE MANUAL |
| 4. Adjusting the development parameters | ||||||||
The basic operation of adjusting the development parameter are as follows: First, you should adjust the exposure bias and the false color control, then you select the WB, sharpness, tone and saturation from the preset value of the combo box.
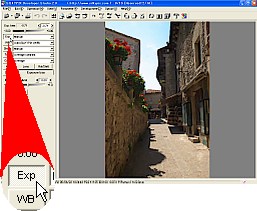
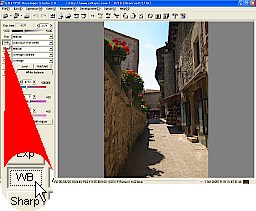
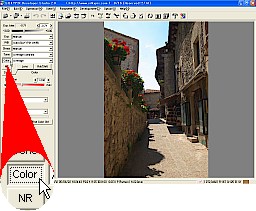
To adjust the detail of each parameter, we prepare the detail adjusting controls for each parameter and you can switch them by clicking the button, which is "Exp(osure)", "W(hite)B(alance)", "Sharp", "Tone", "Color" and "Dev(elopment)". We call them TAB PAGE with the following descriptions. There are 5 tab pages for adjusting the details of the development parameter.
- 4.1 Adjusting the development parameter and updating the preview display
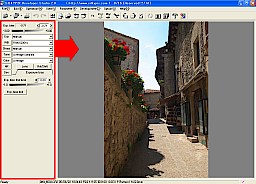 When the setting of each development parameter is changed, the preview display will automatically update.
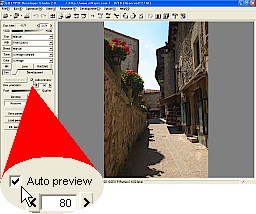 You can disable the automatic renewal of the preview display by removing the check mark on the "Auto preview" on the "Dev" tab page.
 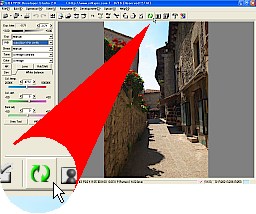 When the "Auto preview" is disabled, you can update the preview image by clicking the
  icon on the Toolbar or click the "Refresh preview" button on the "Dev" tab page.
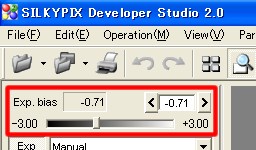 The "Exposure bias" determines the gain to develop the RAW data. You can lighten or darken the image by using the exposure bias. It almost has the same effect as the "Exposure compensation" setting of the digital camera,
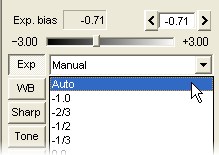
 To adjust the exposure bias, you can select the preset value from the combo box or specify the value with the exposure bias slider.
4.3.1 Auto exposure bias
- To select "Auto exposure bias", you should select "Auto" preset value on "Exp" combo box.
The algorism of "Auto exposure bias" recognizes the target object on the photo, analyzes the color, controls saturation of brightness and colors, and makes full use of color reproduction of output devices.
This function provides you to adjust exposure bias quickly, and it is effective for the photo taken under exposed.
 |
 To fine-tune the exposure bias, you can adjust it with the "Exp. Bias fine-tune" slider on the "Exp." Tab page.
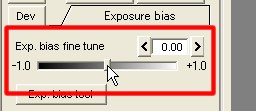
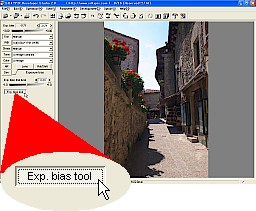 "Exposure bias tool" is one of the eyedropper tools. When you specify an area on the image with this tool, the exposure bias is calculated to adjust the brightness of the area.
You can use this tool by clicking the
 icon on the Toolbar or clicking the "Exp. Bias tool" button on the "Exp." Tab page.
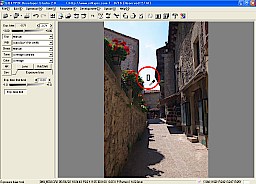 All eyedropper tools are operation mode on the preview display. When you enter the "Exposure bias tool" mode by the above operation, then you can specify the target point by left clicking of the mouse on the preview image, or you can specify the target area by left dragging of the mouse. The average brightness of the area is adjusted to the level that is specified by the setting. Please refer to "9.3.2 Setting up the exposure bias tool".
When you specify the color area instead of the gray area of the preview image with using the "Exposure bias tool", the maximum value of the RGB element is adjusted to the level.
* Please refer to "9.3.8 Enable continuous operation of the eyedropper tool" about how to operate the eyedropper.
- The white balance is a function to adjust the white color.
The human eyes can adjust to the ambient light. Therefore, we can perceive that a white object is white under sunlight, under a lamp, and under a fluorescent light. However in a photograph, a white object is perceived a little red or yellow under a lamp, a little blue or green under a fluorescent light. The "White balance" can adjust the white object color as white.
Almost all digital cameras support the "Auto White Balance" but it is not accurate under some condition. Even if it is accurate, it may not have the result that you hope sometimes.
However, it is very important to select an accurate white balance setting for each scene when taking a picture.
After taking a picture you can freely change the white balance when developing the scene and you can express the scene that you felt. It is not an exaggeration to say that the maximum advantage of which it takes a picture by the RAW data.
4.4.1 Adjusting with the preset white balance
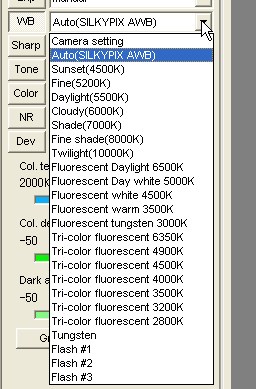 You can select the light source from the combo box, this is one method of adjusting the white balance. And you can make fine-tune adjustment after this operation.
Please see the following for the explanation of the general preset light source.
- Auto ... Our original auto white balance method.
- Sunlight ... There are the preset white balance for outdoor scenes
Fine sunset (4500K)
Fine (5200K)
Daylight (5500K)
Cloudy (6000K)
Shade (7000K)
Fine shade (8000K)
Twilight (10000K)
- Fluorescent light
- Tri-Color Fluorescent light
- Flash
- Tungsten lamp
- This function determines the white balance automatically.
As you know, there is not a fixed answer of white balance value. There are many suitable values and only you can determine the value to explain your own impression.
However, "Auto white balance" is extremely effective to process a large amount of photos.
Our "Auto white balance" method is different from the ordinary method done by a camera. It may give you better answer when there is no white objects or only high saturation color in the photo.
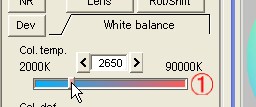
 You can adjust the white balance with two sliders on the "WB" tab page, one is the "Color temperature" and the other is the "Color deflection".
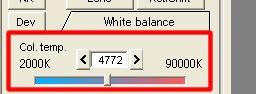 You can find a good white balance point by moving the "Color temperature" slider at first. When you feel there is too much red or yellow, you should lower the temperature. When you feel there is too much blue, you should raise the temperature.
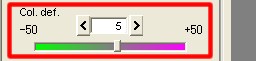 Then you can adjust the color deflection by using the "Color deflection" slider.
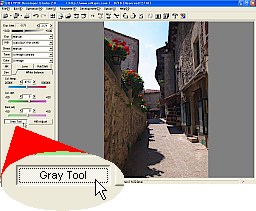 The "Gray tool" is a one of the eyedropper tools. When you specify the area on the image with this tool, the white balance is adjusted to which the specified area become gray.
You can use this tool by clicking the
 icon on the Toolbar or the "Gray tool" button on the "WB" Tab page.
All the eyedropper tools are in operation mode on the preview display. When you enter the "Gray balance" tool mode by the above operation, then you can specify the target point by left clicking of the mouse on the preview image, or you can specify the target area by left dragging of the mouse.
* Please refer to "9.3.8 Enable continuous operation of the eyedropper tool" about how to operate the eyedropper.
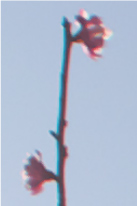
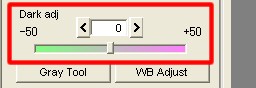 This function provides you to adjust the mono tone color in the dark area.
Even though you adjusted the white balance in bright area, sometimes the dark area was not adjusted completely and is slightly magenta or green. In this case you can control the white balance for the dark area individually with this function.
For example, the left figure shows a strong magenta in the dark area.
Please see the gray patches of Macbeth Color Checker. Bright gray patches are correctly balanced but the dark gray patches are magenta.
Using the color temperature and the color deflection properly.
When the white balance is adjusted, the white balance in the bright are set by the color temperature and the color deflection. Next, please adjust the shaded area when the coloring of the shade part is blurred. It is possible to adjust the color deflection again after adjusting the shaded part adjustment because the highlighted area is influenced by the shaded part. You can make adjustments to the shaded area.
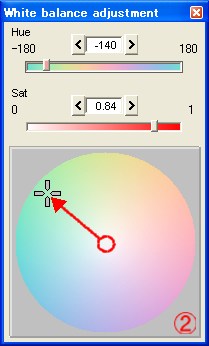
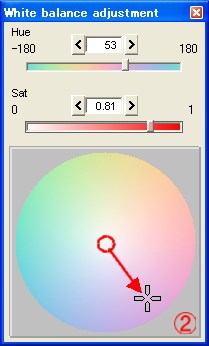
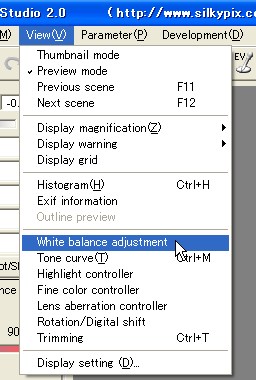 The menu [View (V)] - [White balance adjustment] command provides you to fine tune the white balance.
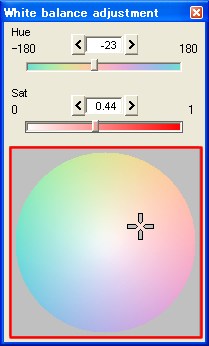 - White balance target
- You can adjust intuitively by clicking the mouse pointer on the color space chart.
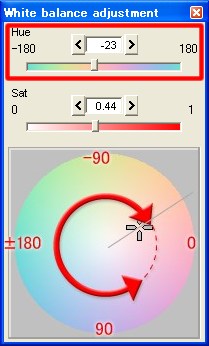 - Hue slider
- It indicates the clockwise angle. You can fine adjust the angle with this slider.
The value means;
| 0 | Right direction |
| 90 | Down direction |
| 180 (-180) | Left direction |
| -90 | Up direction |
| Positive | Lower semicircle |
| Negative | Upper semicircle |
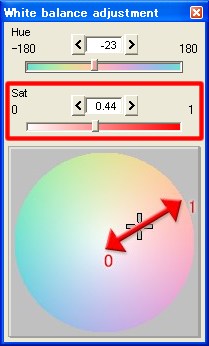 - Saturation slider
- It indicates the radius from the center of circle. You can fine adjust the radius with this slider. The range is from 0.00 to 1.00, 0.00 means center of circle and 1.00 means the maximum radius.
- Here are some examples to follow;
 1) When you feel the image is too red. (To reduce the red)
- (1) Move the "Color temperature" slider to Low
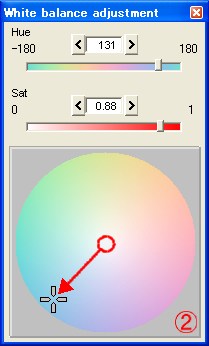 (2) With "White balance adjustment" dialog, move cursor to Blue direction.
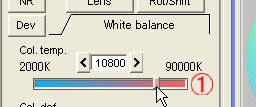 2) When you feel the image is too blue. (To reduce the blue)
- (1) Move the "Color temperature" slider to High
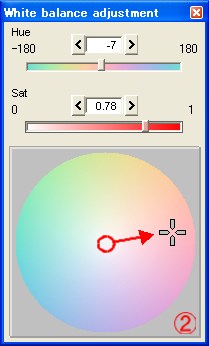 (2) With "White balance adjustment" dialog, move cursor to Red direction.
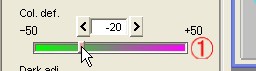 3) When you feel the image is too magenta. (To reduce the magenta)
- (1) Move the "Color deflection" slider to Minus (-)
 (2) With "White balance adjustment" dialog, move cursor to Green direction.
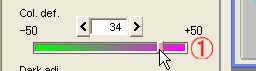 4) When you feel the image is too green. (To reduce the green)
- (1) Move the "Color deflection" slider to Plus (+)
 (2) With "White balance adjustment" dialog, move cursor to Magenta direction.
- The sharpness is to emphasize the outline of the image. This function is to increase the sharpness of the image.
However, if you adjust it too strongly, the imitation outline appears in white and black, and the outline will seems to be a bit unclear.
Please refer to the print result. Please set the appropriate strengthen.
In addition, when you strengthen the sharpness, the noise will also be emphasized. Please consider balancing the noise when doing this adjustment.
4.5.1 Adjusting with the preset sharpness
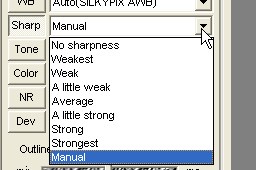 You can select the strength of the sharpness from the combo box, this is one method of adjusting the sharpness. And you can make fine-tune adjustment after this operation.
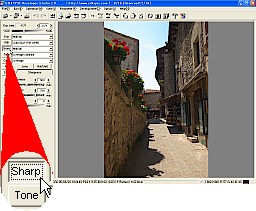 To fine-tune the sharpness, there are three sliders on the "Sharp" tab page.
(1) Outline emphasis
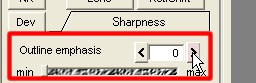 Adjusting the overall strength of the sharpness.
 Adjusting the degree of the emphasizing the detail edge. When this parameter is increased, the outline is emphasized a little and the detail edge is emphasized strongly. However it may also increases noise. Please take the balance between emphasis effect and noise.
* The effect of the detail emphasis is determined by both the "Outline emphasis" and the "Detail emphasis" parameters. Therefore you should adjust the "Outline emphasis" parameter at first, then the "Detail emphasis" parameter next.
 A black marking or imitation outline will appear on the edge of the image if you specify use too much sharpness. You can control these imitation outlines with this parameter. However, if you strengthen this parameter, the color separation worsens. Therefore, please take a balance with color separation.
- You can adjust the contrast and tone with these parameters.
4.6.1 Adjusting with the preset value
 You can select the preset value from the combo box, this is one method of adjusting the tone. And you can make fine-tune adjustment after this operation.
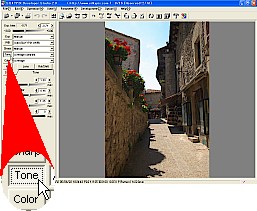 There are four parameters on the "Tone" tab page for detailed adjustment.
(1) Contrast
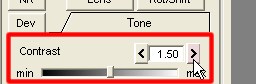 When you set this parameter high, the bright part of the target image becomes brighter and the dark part becomes darker, and the difference between the bright part and the dark part is increased.
 This parameter specifies the threshold to separate the bright part and the dark part of the target image and it is used with the "Contrast" parameter. In another word, this parameter specifies the fixed brightness point when you would adjust the "Contrast" parameter.
Increasing the "Contrast" parameter means compressing both the bright & dark part and expanding around the "Contrast center".
When you set it lower, then you may feel that the image is brighter. And when you set it higher, then you may feel it's darker.
If the target image is dark on the whole, it may be better setting this parameter lower. And if the target image is bright on the whole, it may be better setting this parameter higher.
The "Contrast center" is indicated on the Histogram. And also the brightness of the mouse cursor point on the preview image is indicated on the Histogram. Therefore you can find out the appropriate "Contrast center" with this tool.
 "Gamma" is one of the adjustment parameter for the brightness. Setting this parameter high makes the image brighter, and low makes it darker.
 But this is different from the "Exposure bias". When setting the "Gamma" high, the bright part of the target image is compressed and dark part is expanded. When setting it low, the bright part is expanded and the dark part is compressed.
 The "Black level" controls the depth of the black color.
When you set it high, The color black becomes deeper black. It is effective for a lazy scene and also a scene against the sunlight.
- You can adjust the "Saturation", the "Color mode" and the "Colorspace" in this section.
4.7.1 Adjusting with the preset value
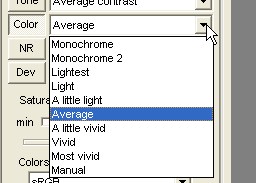 You can select the preset value from the combo box, this is one method of adjusting the saturation. And you can make fine-tune adjustment after this operation.
There is two special preset value, which is "Monochrome" and "Monochrome2". It is for a Black & White photograph.
When you select Monochrome preset value, you can also adjust with other development parameter, for example, white balance and color mode are valid for monochrome image.
 When you the fine-tune the adjustment for the saturation, you should select a preset value except "Monochrome" from the combo box, then adjust with the "Saturation" slider.
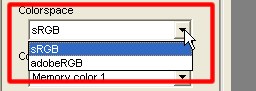 You can select the target colorspace with the combo box. There are two preset value, "sRGB" and "adobeRGB".
 Please use the default value "sRGB" unless you have understood about the colorspace and color management.
When you select the "adobeRGB", you should manage the color profile and color management for the later process.
SILKYPIX® Developer Studio provides the option, which is attaching ICC profile with output image file. Please refer "9.1.4 ICC profile" for the detail.
* When you select the "adobeRGB", color management for the monitor must be required.
Please refer "9.2.1 Color management"
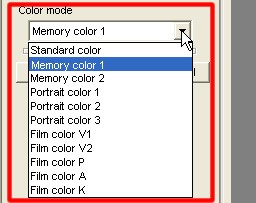 You can select the "Color mode" from the combo box. It determines the policy of the color reproduction.
4.7.4.1 Standard color
- It is default setting and accurate color reproduction policy. It makes a natural color reproduction. But it is sometimes different from our memory color.
- What is desired color reproduction? True color reproduction is one of the choices, but sometimes not comfortable for us.
Usually we feel colors in a brain as "Memory color" or "Expected color". Therefore, a beautiful photo required using such "Memory color" and "Expected color".
We prepare some "Memory color" in this software. You can select them for suitable scenes.
These color modes are usually more vivid than other color mode, especially than "Standard color".
When you select them for a high saturation scene, some color may be easily saturated and color tone is disappeared. To avoid it, you should control saturation low, exposure bias low or control saturated color with "4.11 Fine color controller".
We recommend you to use these mode for nature scenes, but not suitable for portraits.
- These color modes simulates the color reproduction of reversal films.
We provide you several type of film mode.
It is important that you should control white balance when you select these modes. And you can adjust the color with "4.11 Fine color controller" for fine-tuning.
There are two kinds of noise and we categories them as the following;Color noise: It appears remarkably when taking a picture by high sensitivity, which is uneven and blurred color noise. We call it "Color noise" in this software.
High frequency noise: It is felt as a rough and sandy feeling when taking a picture by high sensitivity. We call it "High frequency noise" in this software.
It is Noise reduction that the function to remove such noises. In this software the function of the noise reduction is separately located. This is summary of the noise reduction.
4.8.1 False color control
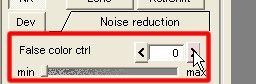 There are two kinds of color noise on the image taken by a digital camera. One is the high frequency color noise near the detail outline. Another is the low frequency color noise when the image is taken with high sensitive mode (high ISO speed rate). You can control such color noise with the "False color control" slider.
Please keep in mind that there are a few disadvantages of setting this mode at high. The color separation is reduced, the color is blurred near the outline or the high saturation color leaks around the picture. In short, by setting the mode too high the quality of the image will decrease.
 You can control the "High frequency noise" with the "Noise reduction" slider on the "NR" Tab page. This parameter reduces the noise during the development process.
To reduce the noise that is emphasized with "Sharpness", you can control it with the "Noise level" and the "Noise cancel" slider on "NR" tab page.
- "Color noise" appears remarkable when taking a picture by with high sensitivity.
You can use the "False color control" function to reduce the "Color noise".
To reduce the imitation outline that is made with the "Sharpness", you can control it with the "False outline ctrl." slider on the "Sharp" tab page.
4.8.3.1 Noise level
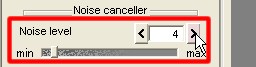 You can specify the noise level of the target image. This parameter is the threshold to judge the edge or noise of the target image. The part of the image that is judged as noise would not be emphasized.
However, by increasing the parameter the resolution of the image will decrease. In particular, the detail edge of the image will disappear.
Please set the noise level low when you want keep the detail of the image.
 This parameter is used with the "Noise level" parameter and it determines the strength to erase the noise.
 You can adjust the development precision with the "Dev. precision" slider on the "Dev." tab page.
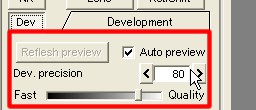 This parameter determines how fine the target image is analyzed on de-mosaic process. When you set it at high, analysis is it processed finely but it takes a long time. When low, analysis processed roughly but it takes a short time. Therefore to keep the level, it is required about 80.
Usually the higher parameter value makes better quality developed image. But when the target image has many a lot of noises in particular taken with high sensitive, higher parameter makes noisier image. In this case, you should lower the parameter setting.
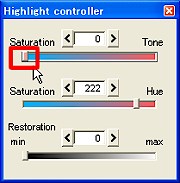
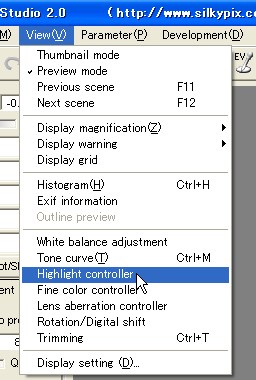 The menu [View (V)] - [Highlight controller] command displays "Highlight controller" dialog.
This function provides you to control how to saturate the highlight area. You can give the priority for "Hue", "Saturation" or "Tone".
4.10.1 Saturation/Tone control
- You can control the priority for "Hue" or "Saturation" to develop highlight area.
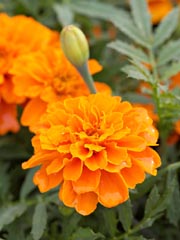
This is a example controlling Saturation/Tone.
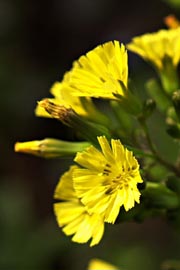 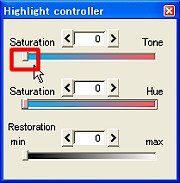 Saturation side(Value:0) | 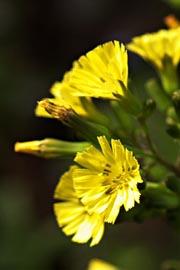 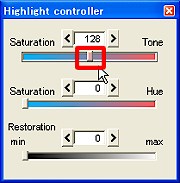 Medium(Value:128) | 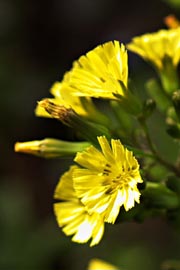 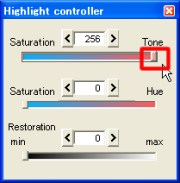 Tone side(Value:256) |
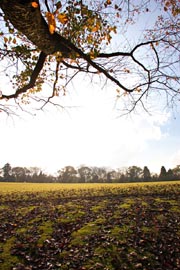
For another example, highlight controller is effective for a sunset scene.
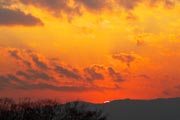  Saturation side(Value:0) | 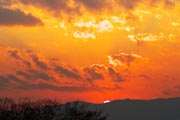 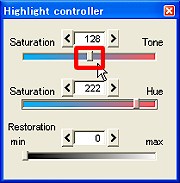 Medium(Value:128) | 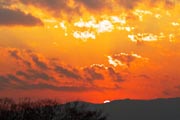 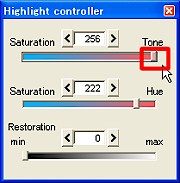 Tone side(Value:256) |
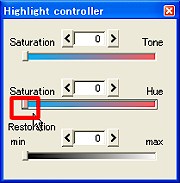
- When you give a priority to Saturation with above "Saturation/Tone" slider, you can control the priority between Saturation and Hue.
For an example, when you give priority to Saturation over Hue, hue is slightly shifted from orange to yellow.
In this case, you can avoid the hue shift by controlling "Saturation/Hue control".
This way may be effective for portrait when skin color is shifted to yellow.
  Saturation side(Value:0) | 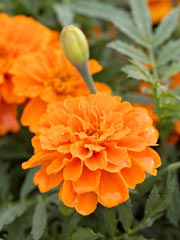 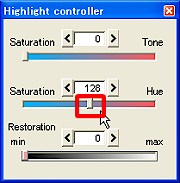 Medium(Value:128) |  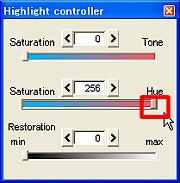 Hue side(Value:256) |
For another example, when you give priority to Saturation over Hue, it shows the pink on the flower and the yellow on a bee.
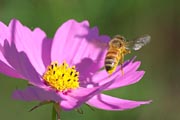 Saturation side(Value:0) | 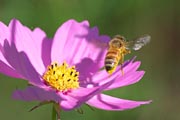 Medium(Value:128) | 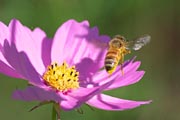 Hue side(Value:256) |
- This function provides you to restore the saturated brightness area.
When the brightness is saturated, you can restore the brightness with this function as far as at least one Bayer element is not saturated.
 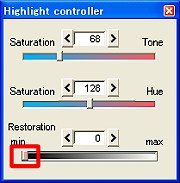 Restoration of highlight area(Value:0)AEV+0.0 | 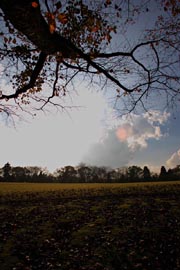 Restoration of highlight area(Value:0)AEV-2.0 | 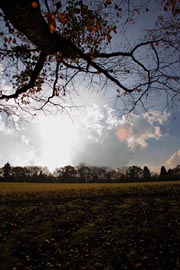 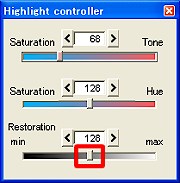 Restoration of highlight area(Value:128)AEV-2.0 |
Following example is the composite image from above two images.
 Composite image |
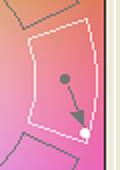
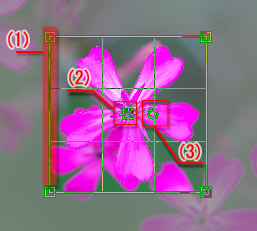
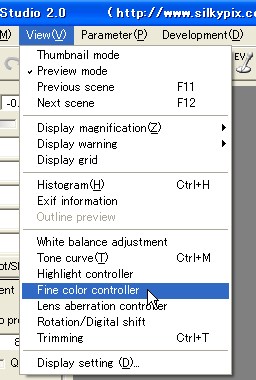 The menu [View (V)] - [Fine color controller] displays "Fine color controller" dialog.
This function provides you to control each colors individually.
You can move 8 points on the color circle to control each color.
You can adjust saturation by controlling the length between each points and the center of the circle. Moving to the outside makes the saturation higher and moving inside makes it lower.
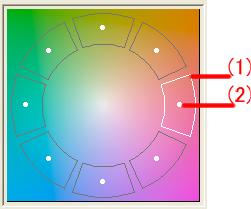
You can move 8 point on the color circle by using the mouse, it allows you to adjust the Saturation and the Hue.
And you can also control it with 3 sliders, they allow you to adjust the Saturation, Hue and the Brightness.
We recommend using this control after adjusting the white balance. exposure bias and color mode.
You can use this function to control the saturated color in the highlighted area.
 |
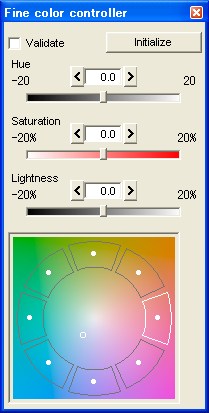 Adjusting with the sliders
- Hue: Specify the counter clockwise angle
Saturation: Length between the center of color circle and control point. Valid range is from -20% to +20%.
Brightness: Specify the brightness. Valid range is from -20% to +20%.
Initialize: Initialize to default parameters
Validate: Validate the parameters of "Fine color controller"
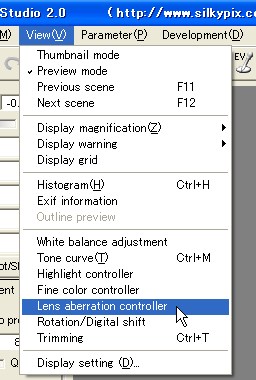 The menu [View (V)] - [Lens aberration controller] command displays "Lens aberration controller" dialog.
This function provides you to correct or reduce lens aberrations, which are shading(vignetting), distortion and chromatic aberration.
4.12.1 Shading(vignetting) control
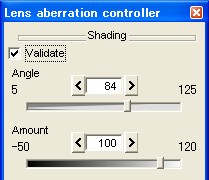 The shading (vignetting) correction is a function to correct the characteristic of the lack of light in the surrounding lens and the picture darkens around the image. This function can be adjusted by using two parameters.
4.12.1.1 Angle
- Specify the diagonal angle of the lens.
Shading is more serious near the edge of the lens than the center. It means that the influence of shading is larger with a wide-angle lens than with a telephoto lens.
When you specify the diagonal angle of the lens, shading correction parameter is calculated with the lens theory.
For example a 135 film base focal length, 50mm=46deg, 135mm=18deg, 35mm=63deg.
Please adjust the angle value to balance the shading because the actual lens property is somewhat different.
- Specify the correction amount value, which range is from -50% to 120%.
-50%`0% value allows you to add shading effect but not to correct or reduce shading.
 |
- When the image is distorted, distorting to small image makes brighter image.
For example, fish eye lens distorts the object around the edge smaller than on center but it contributes to prevent shading problem.
Some lens creates vignetting, which depends on a stop value of the lens. It also creates shading problem.
Therefore please specify the diagonal angle value at first as a default, then find out the balance point.
For example, when the correction left some shading only around the edge, please increase the "Angle" value.
- This function provides you to control the distortion of the lens. Check "Validate" to enable this parameter.
4.12.2.1 Distortion rate
- Move a slider left to correct the barrel distortion, and move the slider right to correct the pincushion distortion.
"Validate" control allows you to check before/after effectiveness.
 Pincushion distortion |  Corrected |  Barrel distortion |
4.12.2.2 Center/Edge control
- This control allows you to give priority to the center or the edge.
For example, when you adjust the distortion around edge of the image correctly but the center area is over corrected, you should move the slider to the "Edge" side.
  Before |   After(Distortion rate:-15 Center/Edge:-27) |
You can correct or reduce several type of distortion with the above two sliders, which is barrel type, pincushion type and also the combination of two.
This function makes trimming and expand image automatically to keep the original image pixel size.
This function also allows you to add distortion effect, for example to increase perspective.
Following is the sample of adding distortion effect.
  Before | 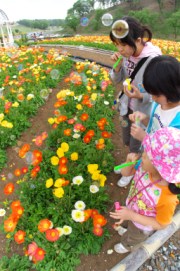  After(Distortion rate:50 Center/Edge:-50) |
We know you will enjoy this function, which is like getting a new lens, and you will find out new expression.
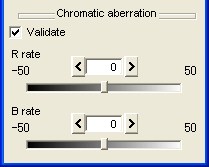 This function provides you to correct or reduce chromatic aberration problem.
When you do control the chromatic aberration with this function, we recommend you to display the preview at 400% or at a higher zoom rate.
4.12.3.1 R rate
- You can adjust the Red or Cyan chromatic aberration noise with this slider.
- You can adjust the Blue or Yellow chromatic aberration noise with this slider.
This function provides you to correct or reduce only lateral(transverse) chromatic aberration.
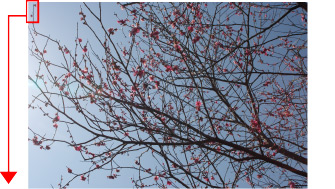 Original |
 Before | 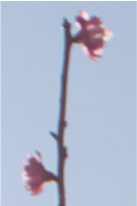 After |
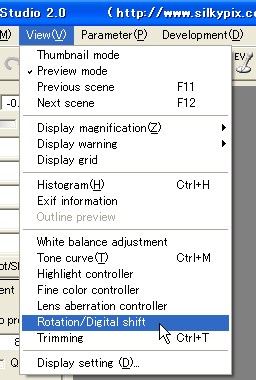 The menu [View (V)] - [Rotation/Digital shift] command displays "Rotation/Digital shift" dialog.
4.13.1 Rotation
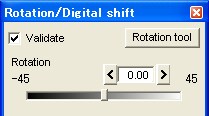 This function rotates the image.
You can rotate an image in the range from -45deg to +45deg.
This function makes trimming and expanding image automatic to keep the original image pixel size.
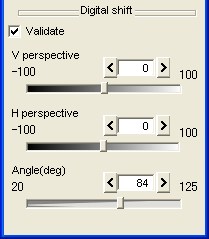 This function provides you to make the effect of shift lens.
You can control the perspective or correct the linear distortion of buildings.
There are two sliders to control vertical and horizontal individually.
This function makes trimming and expanding an image automatic to keep the original image pixel size.
This function allows you to make deformation. It is effective not only for building scene but also portrait.
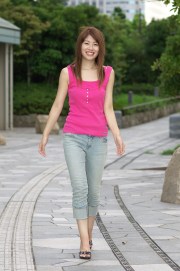 Before |  After(V perspective:+6) |
We know you will enjoy this function, which is like getting a new shift lens, and you will find out new expression.
Angle
- The diagonal angle of the lens is required to calculate the aspect ratio.
When RAW data includes the value of diagonal angle in Exif information, the default value is set automatically. But when you use the lens that is made by 3rd party or manual lens, this value may be not record in RAW data. In this case, you should set the value manually.
Or you can also set this parameter to add some effect for deformation.
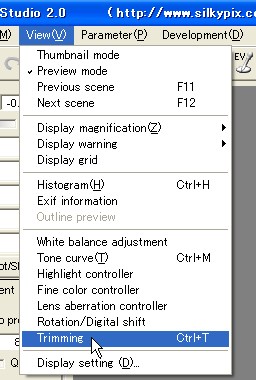 The menu [View(V)] - [Trimming] command displays "Setting for trimming" dialog in preview mode.
[Setting for trimming]
This function provides you to determine trimming area.
 The trimming-mark
  is displayed in the thumbnail at a thumbnail mode when the trimming area is set.
 [How to set the trimming area]
1. Specify the trimming method. Please select from the following 4 types.
Free: Not specify aspect ratio. You can set any trimming area.
- Image ratio: Keep the original image aspect ratio.
Fixed ration: Keep your specified aspect ratio.
Preset: Keep the aspect ratio that you select from the list.
* You can exchange the vertical and the horizontal ratio anytime.
* When you select "Image ratio", All the developed image will be the same aspect ratio, with trimming and without trimming.
* Trimming method is common setting for all scenes.
- Specify to input the value on Edit box.
- - Drag the handle of preview image.
1. The handles on 4 corners or on 4 lines change trimming area according to trimming method specified above.
2. A handle on center moves trimming area.
3. A round handle beside the center rotates the trimming area 90 degree.
 Handle of trimming area |
[How to operate on dialog"
1. Specify the area
(a) Top left point (x, y)
 Value of trimming area |
(c) Rectangle of the area (left, top)
(d) - (right, bottom)
3. Apply: Apply the current method
4. Default: Initialize to default
5. Tool: Enter the trim tool mode
6. Expand: Validate all area recorded in RAW data.
 "Setting for trimming" dialog |
About trimming expansion
"Expand" button validate all area recorded in RAW data, and also you can use invalidate area made by auto trimming of distortion, rotation and digital shift.
Invalidate area in RAW data may sometimes contain invalid color data or noise.