2. Designating image files for processing
To perform JPEG data processing on SILKYPIX , first designate an image file (JPEG) for processing.
There are two methods for designating image files: in file units or in folder units.
You can designate files on dialogs and through drag and drop.
You can designate folders from the “Folder” sub-control, from the history up to that point and through drag and drop.
There is also a way to add image files for processing when other image files are already designated for processing.
If image files and folders are designated for new processing, image files that had been set for processing to that point will automatically be closed.
If you designate image files and folders through the method for adding image files for processing, the newly designated image files will be added to the image files for processing to that point.
2.1. Select
When you start SILKYPIX JPEG Photography 10, it starts with the Select section selected first.
In the Select section, you can display the imported image data at high speed.
Open files, Marks, Ratings, and Filtering images, are shared between the Select and Adjustment sections.
This can be useful for purposes such as checking the composition and focus of a photograph as you cycle through images, setting Ratings and Marks for the images you want to adjust.
The display modes and file operation in the Select section are identical to those in the Adjustment section.
See “3. Display modes” for details on the display modes and frame manipulation, and “8. File Operation and Printing” for file operation.
For an overview of each section, see “0.2. Section”.
Note that the pixel size of the image displayed in the preview depends on the pixel size is limited for high-speed display.
For this reason, the display magnification is not described in the preview display of the Select section.
Also, the Select section shows images without Development processing of SILKYPIX.
For this reason, the preview and thumbnail displays displayed in the Select section differ from the preview and thumbnail displays shown in the Adjustment section through development process of SILKYPIX.
2.1.1. Move to Adjustment section
To adjust the selected image and export it to a file, you need to go to the Adjustment section.
Switch to the Adjustment section by clicking the ![]() Adjustment button on the toolbar or choosing [View]-[Adjustment] from the menu.
Adjustment button on the toolbar or choosing [View]-[Adjustment] from the menu.
You can also double-click a thumbnail in the Select section to switch to the adjustment section.
2.2. Opening File
2.2.1. Selecting from dialogs
 This is a method for designating image files for processing in file units.
You can designate multiple files. You can also add files.
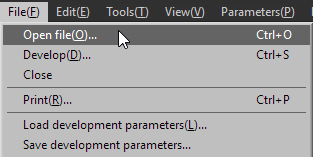
When you select [File (F)]-[Open File (O)] from the Menu, the “Open file” dialog will appear.
You can designate one or more image files for processing from the “Open file” dialog.
When selecting multiple image files for processing, do so while holding down either the [Shift] key or [Ctrl] key.
After selecting multiple files for processing, next designate whether they are for new processing or for adding to processing.
When the [Ctrl] key is pushed, the “Open (O)” button changes into an “Append (O)” button.
If adding, please click on the “Add and open (O)” button in this status.
If you click [Open (O)] button without clicking [Ctrl] key, the JPEG files is closed automatically which have been already loaded for processing.
And the JPEG files selected in this time is loaded instead of them.
2.2.2. Designating by drag and drop
This is a method for dropping image files for processing into SILKYPIX from a tool that files can be dragged from, such as Explorer or Finder.
If files that are not for processing are included, they cannot be dropped.
Multiple files can be designated. Files can also be added.
If you start dragging with a left drag, files dropped into SILKYPIX will be available for new processing.
Image files for processing up to that point will be automatically closed.
If you start dragging with a right drag, when you drop them into SILKYPIX a menu will appear for selecting the processing method.
You can select new processing, adding or cancel processing for the dropped files.
However, if there are no image files for processing up to that point, the menu will not appear and they will be processed as new processing.
2.3. Opening Folder
2.3.1. Selecting from the “Folder” sub-control
 Open Folder function allows you to select and load the JPEG files from the specified folder.
All image files for processing in the designated folder will be processed. This will be designated as new processing, and image files for processing up to that point will be automatically closed.
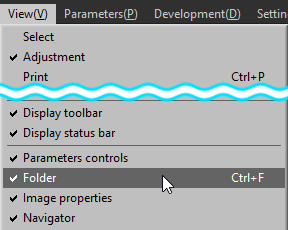
When you select [View (V)]-[Folder] from the Menu or click on the  icon, the “Folder” sub-control will be displayed in the Information Box.
Designate the folder with image files for editing from this screen.
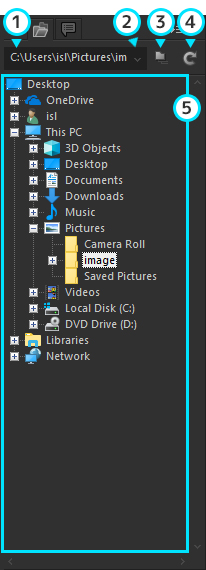
Folder name edit box
The path for the selected folder is displayed. You can also edit these characters and designate a folder to open.“Select recent accessed folder” button
Designate a folder from the folder history. Please see “2.3.2. Selecting from folder history” for details.“Select subfolder” button
You can set whether subfolders will also be searched when reading. See “2.3.1.1. Load from Sub-folder” for details.“Update” button
This renews the folder display to the latest status. You can introduce media and reflect newly created folders on the display.Folders
Folders are displayed.
Select a folder by clicking on a folder. The selected folder is for new processing. Image files that had been processing to that time will be automatically closed. Also at that time, the selected folder will become the focus and the folder name will be circled.
If you hold down the [Ctrl] key and left click on a folder not on the focus, you can add that folder.
If you hold down the [Shift] key and left click on a folder not on the focus, you can select multiple folders that were left clicked while holding down the [Shift] from the folder of focus.
Additional folders cannot be designated subfolders. Only designated folders are referred.
The background of the folder name for the folder with files currently being read is white.
In addition, when you add an image for processing to a single folder that has been selected, the “Hot folder” function for adding thumbnails will automatically turn ON.
Please see “4.1.2.2. Hot folder” concerning the “Hot folder” function.
2.3.1.1. Load from Sub-folder
You can select whether subfolders within designated folders will also be searched with the “Designate subfolder” in “Open folder”.
By using this option, you can simultaneously designate image files dispersed and stored in multiple folders located hierarchically.
2.3.2. Selecting from folder history
You can select image files for processing in folder units from folder history to that point.
You can designate only one folder when designating files by this method.
You cannot add image files for processing. You can designate sub-folders.
There are two ways to make selections from folder history.
The first is to open [File (F)] from the menu and display a list of folder history at the bottom of the menu.
Another method is to click on the  mark on the right side of the Folder Name Edit Box.
Use one of these methods to select one file from the list.
Furthermore, if you move the mouse cursor to the right edge of the menu, a submenu will appear.
You can designate subfolders from this submenu.
2.3.3. Assign Using Drag & Drop
This is a method for dropping a folder from tools that allow you to drag folders, such as Explorer and Finder, to SILKYPIX .
Only one folder can be dropped. If multiple folders are selected, they cannot be dropped. Furthermore, you cannot designate subfolders.
An error will be shown if a folder that does not include an image file for processing is dropped.
Drop folders that include an image file for processing.
If a drag begins as a left drag, the folder dropped to SILKYPIX will be subject to new processing.
Image files that had been subject to processing to that point will be automatically closed.
If a drag begins as a right drag, a menu will appear for selecting processing methods for that which was dropped to SILKYPIX .
You can choose new processing, adding or cancel processing of the dropped folder.
However, if there are no image files that had been subject to new processing to that point, the menu will not appear and it will be treated as being subject to new processing.