7. Development Parameter Operation
7.1. Copy development parameters
You can copy the development parameter of the selected image to other images by utilizing the paste buffer.
First, select image to be copied, and copy the development parameters and image properties to the paste buffer with [Parameters (P)]-[Copy development parameters (C)] from the menu or [Ctrl] + C.
Next, paste the development parameters or image properties recorded in the paste buffer to a single or multiple selected images.
Pasting methods are different for “Development parameters” and “Image properties”.
The following explains how to paste.
7.1.1. Paste development parameters
This is the method for pasting overall “Development parameters” as a batch. (*1, *2)
By the menu command [Parameters (P)]-[Paste development parameters (P)] or the shortcut key [Ctrl]+V, you can paste the entire development parameter from the paste buffer to the selected images.
*1 The “Crop tool”, “Spotting tools”, and “Partial correction tool” are treated as special parameters not included in the whole, and are not copied.
Please copy these parameters using the “Partial paste of development parameters” function.
*2 The “Perspective correction” of the “Rotation/Shift lens effect” is treated as special parameter not included in the whole, and it is not copied.
7.1.2. Partial paste of development parameters
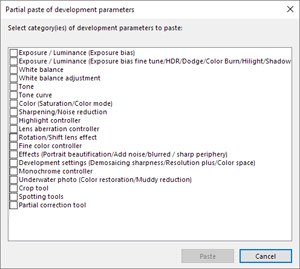 Use when pasting partial development parameters and parameters that are not development parameters (crop tool, spotting tools, and Partial correction tool) that are recorded in the paste buffer.
The menu command [Parameters (P)]-[Partial paste of development parameters] displays the “Partial paste of development parameters” dialog. Clicking [Paste] button pastes the selected part of the parameters to the target images.
7.1.3. Partial paste of image properties
 Use this when copying the editing contents of “Image properties” to other images.
Information from an image with no edited “Image properties” cannot be copied to other images.
The “Partial paste of image properties” function is turned off when “Image properties” edited contents are not recorded in the paste buffer.
First, copy development parameters and image properties into the paste buffer from “7.1. Copy development parameters”.
Next, display the “Partial paste of image properties” dialog with [Parameters (P)]-[Partial paste of image properties] from the menu.
Edit items in “Image properties” will be displayed in the “Partial paste of image properties” dialog.
Check the items from “Image properties” for pasting and click the “Start” button.
* Please note that if you paste “DateTime” of photograph taken, the edited contents for “DateTime” will be a different date and time.
Please refer to “4.20.6.2. DateTime” for details.
7.1.4. Special handling of pasted development parameters
When copying development parameters through pasting development parameters or partial paste, some development parameters are processed through a special conversion.
Furthermore, development parameters that have settings for “On” and “Off” are specially handled.
7.1.4.1. Paste Cropping Area
When pasting the “Crop tool” by the “Partial paste of development parameters” function, “Crop tool” is appropriately converted according to the image orientation or the development parameter.
When the orientation of the image is different, “cropping area” is turned 90 degrees.
When the image is transformed by “Rotation/Shift lens effect” function, the “cropping area” is relocated to become identical the relative position in the default valid area.
This conversion adjust only a position and an orientation, but the size of the cropping area is not changed. The extension area settings are pasted just as it is.
When pasting the parameter which does not specify a cropping area, the “cropping area” of the target image will be initialized.
7.1.4.2. Pasting Shift lens effect
Top-bottom and left-right shifts in the shift lens effect parameters of the “Rotation/Shift lens effect” category are parameters that depend on the aspect of the image.
Whether the image is horizontal or vertical is one criterion.
Therefore, if the shift lens effect parameter set on a horizontal image is pasted on a vertical image, “Top-bottom shift” and “Left-right shift” parameters will appropriately convert them.
This conversion is performed when images are rotated in 90degree units.
7.1.4.3. Pasting the Partial correction tool
When pasting the partial correction tool with the “Partial paste of development parameters” function, partial correction areas will be changed appropriately according to the rotation angle.
When the orientation (rotation of 90 degree units) of the image is different, the area being partially corrected is also rotated 90 degrees.
When the filter is rotated, it is turned relative to the orientation of the image being pasted.
When operations such as rotation of the image or digital shifts are added to the image being changed, it is repositioned so that the relative position of the initial area of effect is the same.
The revision of the partially corrected area is adjusted for position and orientation, but the size of the area and rotation information are not changed.
The partial correction tool’s Filter area list is overwritten and pasted on the image being pasted.
Therefore, please be aware that if the image being pasted already has a list of Partial correction tool Filter areas, the Filter area list and those parameters before being pasted will be lost.
7.2. Save Development Parameters
 You can record and save development parameters of a selected image as a file.
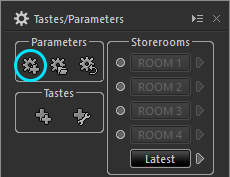
Click on  in the “Tastes/Parameters” sub-control, or use [Parameters (P)]-[Save development parameters] in the menu to begin processing.
SILKYPIX automatically records and saves the latest status of edited development parameters, but please use this if you want to save the status of development parameters at will.
7.3. Load Development Parameters
 You can load the development parameters from the saved parameter file (.spd) by the “Save development parameter” function, or from the developed image file (.jpg) by SILKYPIX JPEG Photography 10.
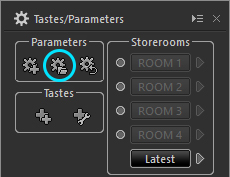
Click on  in the “Tastes/Parameters” sub-control, or use [Parameters (P)]-[Load development parameters (L)] in the menu to begin processing.
If you select multiple images in the “Thumbnail” mode or the “Combination” mode, you can load the development parameter to all selected images.
By SILKYPIX JPEG Photography 10 , the development parameter is embedded into the developed image file (.jpg). And you can load the development parameter from this developed image file.
For example, how to operate and use the features are noted below.
You must save the developed image file (.jpg) with Exif information to embed the development parameter into the file.
Please select the target images to load.
* If you select multiple images, you can load the development parameter to all selected images.
Display “Tastes/Parameters” sub-control by clicking the [Tastes/Parameters] button.
Click the [Load development parameters] button on the “Tastes/Parameters” sub-control.
The “Load development parameters” dialog will be displayed.
Designate the location in which JPEG image files were saved in (1) above in the “File name” field.Change the “File type” field as needed.
Select the source JPEG file and then Click the [Open(O)] button.
The development parameter will be loaded to all selected images.
7.4. Initialize Development Parameters
 Return development parameters of one or multiple selected images to initial status.
If default parameters are set, default parameters will be applied.
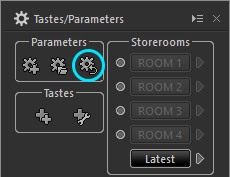
Click on the [Initialize] button in the Parameters controls or  in the “Tastes/Parameters” sub-control, or use [Parameters (P)]-[Initialize development parameters (I)] in the menu to begin processing.
7.5. Copy Development Parameters to Storerooms
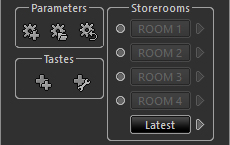 In the “Tastes/Parameters” sub-control, you can save the development parameter in the storerooms temporarily, and you can also restore the development parameter from the storerooms.
You can utilize this feature to save the development parameter temporarily during operating one image, or to copy the development parameter from one image to other images.
The Storerooms has four rooms (ROOM) that you can freely utilize, and a special room (Latest) that automatically stores the latest editing parameters.
 Click the
  button at the left side of the storerooms to save the development parameter of the selected image. Then a subscription time is displayed at the storerooms and it becomes active.
Click the active storerooms to paste the development parameter to the selected images.
This feature can be utilized for the comparison of two development parameters, too.
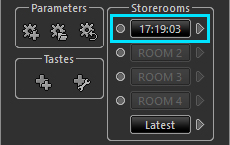
7.5.1. Paste the latest editing development parameters
The latest status of edited development parameters is always stored in a room for temporary registrations, shown as “Latest” at the bottom.
By pasting image parameters stored in this room to other images, you can continue working on other successive images under the editing status of other images being operated on up to that point.
Editing results of one image can be applied to other images as is, if images were taken under roughly the same photographic conditions or are successive, such as when photographed in a studio or when photographed in successive mode. This can also efficiently adjust the development parameters of multiple photographs by starting editing from that point, even if not kept exactly the same.
* Temporarily registered development parameters remain on until the software is ended.
Use “Save development parameters” if you want to save the development parameters because they will otherwise be cleared when the software is closed.
7.6. Set Development Parameters to Multiple Images
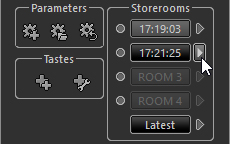 You can set the development parameter stored in the storerooms to multiple images continuously. Click the
  button at the right side of the storerooms in the “Thumbnail mode” or the “Combination mode”.
 Then the operation mode is changed to continuously paste mode. In this mode, you can set the development parameter to the target image by clicking on the thumbnail, and you can repeat this action continuously.
 Click the button at the right side of the storeroom once again to return to the previous mode.
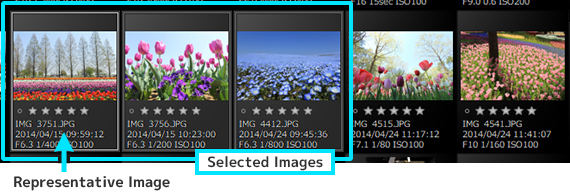
7.7. Operations for Multiple Selected Images
When multiple images are selected, the parameters of all images can be edited as a batch.
There is an image called the “Representative Image” when multiple images are selected.
The image of the “Representative Image” is displayed in preview and the selection display in the thumbnail window is brighter than other images.
As for “Copy development parameters”, “Save development parameters”, “Copy development parameters to Storerooms” and “Add taste”, development parameters for the “Representative Image” are applied.
7.8. Select Taste
You can select the development parameter from the list of taste. You can improve efficiency of your work flow by registering the taste that is used frequently.
About “Taste”, please refer to ‘4.1.1. Taste’.
Please see “4.1.1.1. All category tastes” and “4.1.1.2. Other tastes” concerning how to select tastes.
7.9. Add taste
You can register the development parameter of the selected image as “taste”. You can improve efficiency of your work flow by registering the taste that is used frequently.
You can register in the taste section the current selected image’s development parameters. The registered taste parameters that you use often can be moved up toward to top to make your operation more efficient.
Please see “4.1.1.3. Add taste” concerning how to add tastes.